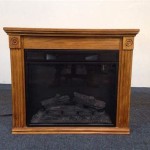
How to Paint a Gold Fireplace Insert Black
Many homeowners find themselves wanting to update the look of their fireplaces, and one common aesthetic alteration involves changing the color of a gold fireplace insert to black. Often, older fireplace inserts feature a gold finish that can appear dated compared to contemporary design trends. Painting these inserts black provides a modern, sleek appearance that better complements a wide range of interior styles. This process, while seemingly straightforward, requires careful preparation and the use of specific high-temperature paints to ensure a durable and aesthetically pleasing result. Proper execution prevents the paint from peeling or flaking due to the intense heat generated by the fireplace.
The successful transformation of a gold fireplace insert to black hinges on several critical aspects. These include selecting the correct type of paint, thoroughly preparing the surface of the insert, and applying the paint in a manner that maximizes adhesion and longevity. Furthermore, understanding the limitations of the painting process and the need for adequate safety precautions are paramount.
Choosing the Right Type of Paint
The most crucial aspect of painting a fireplace insert is selecting a paint specifically formulated to withstand high temperatures. Standard paints will not suffice, because the heat generated by a functioning fireplace will cause them to blister, crack, and release potentially harmful fumes. High-temperature paints, often labeled as “stove paint” or “fireplace paint,” are designed to endure temperatures ranging from 1200°F to 2000°F. These paints are typically available in spray cans, which facilitate even and consistent application, and are specifically formulated to adhere to metal surfaces under extreme heat conditions.
When selecting a high-temperature paint, it is imperative to scrutinize the product label and technical specifications. Ensure that the paint is not only heat-resistant but also suitable for use on metal surfaces. Some high-temperature paints are designed for specific applications, such as exhaust systems or engine components, and may not be ideal for fireplace inserts. Seek out paints that explicitly mention fireplace or stove applications on their labeling. Furthermore, selecting a matte or flat black finish is generally preferred for achieving a modern, sophisticated look. Glossy finishes can sometimes appear cheap or reflect light in an undesirable manner. Consider the overall aesthetic of the room and choose a black paint that complements the existing decor.
Another factor to consider is the paint's curing process. Some high-temperature paints require a heat-curing process, where the painted object is gradually heated to a specific temperature range to fully harden the paint. This process can enhance the paint's durability and resistance to chipping or scratching. If the selected paint requires heat curing, ensure that the fireplace insert can be safely and effectively heated according to the manufacturer's instructions. This usually involves a series of controlled burns after the paint has been applied and allowed to air dry.
The quality of the paint is a direct determinant of the final result. Investing in a reputable brand known for producing high-quality, durable high-temperature paints can prevent future problems. Cheaper paints may offer a lower initial cost, but they often lack the necessary heat resistance and adhesion properties, leading to premature failure and the need for re-painting. Reading online reviews and seeking recommendations from experienced painters or fireplace professionals can help in selecting the best high-temperature paint for the project.
Preparation: A Critical Step for Adhesion
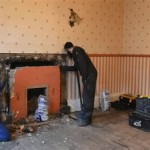
Surface preparation is arguably the most important step in ensuring the longevity of the paint job. Before any paint is applied, the gold fireplace insert must be thoroughly cleaned and prepared to promote optimal adhesion. This process typically involves several stages, starting with removing any loose debris, rust, or existing paint flakes. A wire brush or sandpaper can be used to gently scrub the surface and remove any imperfections. It is crucial to wear appropriate safety gear, such as a dust mask and eye protection, during this step to prevent inhalation of dust and debris.
Following the initial cleaning, the insert should be degreased using a strong degreasing agent. Over time, fireplace inserts can accumulate soot, grease, and other contaminants that can interfere with paint adhesion. A dedicated degreasing cleaner, available at most hardware stores, should be applied liberally to the surface and allowed to sit for the recommended time before being thoroughly wiped clean with a lint-free cloth. Multiple applications may be necessary to remove all traces of grease and grime. Ensure that the degreasing agent is completely removed before proceeding to the next step.
After degreasing, the surface should be lightly sanded to create a slightly roughened texture. This roughened surface provides greater surface area for the paint to adhere to, improving its overall durability. Use a fine-grit sandpaper (e.g., 220-grit) and gently sand the entire surface of the insert. Avoid applying too much pressure, as this can damage the metal. The goal is simply to create a slight texture that will promote better paint adhesion. Once sanded, remove any sanding dust with a tack cloth or a damp cloth. Allow the surface to dry completely before proceeding to the next step.
Priming the surface is often recommended, especially if the original gold finish is particularly glossy or if the insert has areas of exposed metal. A high-temperature primer, specifically designed for use with high-temperature paints, can significantly improve paint adhesion and prevent rust formation. Apply the primer in thin, even coats, following the manufacturer's instructions. Allow the primer to dry completely before applying the topcoat of black paint. Proper priming can be the difference between a paint job that lasts for years and one that fails within a few months.
Masking off any areas that should not be painted is also essential. This includes the surrounding fireplace surround, glass doors (if present), and any other features that need to be protected from overspray. Use painter's tape and plastic sheeting to carefully mask off these areas, ensuring that the tape is firmly adhered to the surface to prevent paint from seeping underneath. Take the time to properly mask off the surrounding areas, as this will save time and effort in cleaning up any accidental overspray later.
Application Techniques for a Professional Finish
With the surface properly prepared and the appropriate paint selected, the final step is applying the paint. The application technique is crucial for achieving a smooth, even, and durable finish. Always work in a well-ventilated area, preferably outdoors or with windows and doors open, to minimize exposure to paint fumes. Wear a respirator mask to protect yourself from harmful vapors.
Shake the spray paint can vigorously for at least two minutes before use to ensure that the paint is thoroughly mixed. Hold the can approximately 10-12 inches away from the surface of the insert and apply the paint in thin, even strokes, overlapping each stroke slightly. Avoid applying too much paint in a single coat, as this can lead to runs and drips. Multiple thin coats are always preferable to one thick coat.
Allow each coat of paint to dry completely before applying the next. Refer to the manufacturer's instructions for the recommended drying time. Typically, a drying time of 30 minutes to an hour is sufficient between coats. After the first coat has dried, inspect the surface for any imperfections, such as runs, drips, or uneven coverage. If any imperfections are present, lightly sand them down with fine-grit sandpaper before applying the next coat.
Apply at least two to three coats of paint to achieve full coverage and a durable finish. Pay particular attention to edges and corners, ensuring that these areas are adequately coated. After the final coat has dried completely, carefully remove the painter's tape and plastic sheeting. Inspect the finished paint job for any touch-ups that may be needed. If any areas require touch-ups, use a small brush to carefully apply paint to those areas, blending them seamlessly with the surrounding painted surface.
If the selected paint requires heat curing, follow the manufacturer's instructions precisely. This typically involves a series of controlled burns, gradually increasing the temperature of the fireplace insert over a period of several hours. The heat-curing process helps to fully harden the paint and improve its resistance to chipping and scratching. Ensure that the fireplace is properly ventilated during the heat-curing process, and monitor the temperature closely to avoid overheating.
Finally, allow the painted fireplace insert to cool completely before using the fireplace. This allows the paint to fully cure and harden, ensuring a long-lasting and durable finish. Avoid placing any objects on the painted surface until it has fully cured, as this can damage the paint. With careful preparation and proper application techniques, painting a gold fireplace insert black can significantly enhance the aesthetic appeal of a room, providing a modern and sophisticated focal point.

How To Paint A Gold Fireplace Brass Black Update

Fireplace Makeover Spray Paint Magic

How To Spray Paint A Brass Fireplace Insert Erfly House

Fireplace Makeover Spray Paint Magic

Diy Fireplace Makeover With High Heat Paint Jessica Welling Interiors

How To Spray Paint A Brass Fireplace Insert Erfly House

Fireplace Makeover Spray Paint Magic

Paint Suggestion For Gas Fireplace Trim R Homeimprovement

How To Paint Metal Fireplace Surround Four Generations One Roof

How To Change That Outdated Brass Insert On Your Fireplace Update
Related Posts