How to Make a Stone Fireplace Surround
A stone fireplace surround can add a touch of rustic elegance to any living space. Whether you're building a new fireplace or simply wanting to update an existing one, the process of constructing a stone surround can be a rewarding DIY project. This article provides step-by-step guidance on how to make a stone fireplace surround, covering essential materials, tools, and techniques.
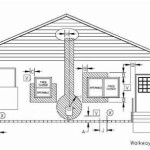
Planning and Preparation
Before embarking on the project, meticulous planning is crucial. Firstly, determine the desired style and size of the stone surround. Consider the existing dimensions of the fireplace opening and the overall aesthetic of the room. It's essential to select a stone type that complements the surrounding décor and complements the fireplace's style. Natural stone options like granite, slate, or limestone offer durability and visual appeal.
Once the design is finalized, gather the necessary materials. These typically include: *
Stone:
Choose the type, quantity, and size based on the design and desired finish. *Mortar:
Use a high-quality mortar specifically designed for fireplaces, ensuring it's heat-resistant and suitable for the chosen stone. *Backer board:
This provides a stable and moisture-resistant surface for the stone. *Metal lath:
This helps reinforce the mortar and prevent cracking. *Tile spacers:
These ensure even spacing between stones. *Grout:
Used to fill gaps and create a seamless finish. *Caulking:
This seals any joints or gaps between the surround and the fireplace. *Tools:
These may include a trowel, hammer, chisel, level, tape measure, saw, and safety gear like gloves and goggles.Building the Surround
Once the materials are prepared, the construction process can begin. Here's a step-by-step guide:
1.
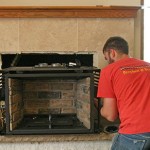
Prepare the Fireplace:
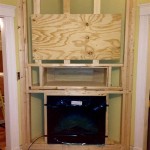
The fireplace opening should be clean and free from debris. If necessary, remove any existing surround or mantel. 2.Install the Backer Board:
Measure and cut the backer board to the desired size. Secure it to the fireplace opening using screws or construction adhesive. 3.Apply Mortar and Metal Lath:
Apply a thin layer of mortar to the backer board and attach the metal lath to create a robust base for the stone. 4.Laying the Stone:
Start by laying the first layer of stone, ensuring they are level and evenly spaced. Use spacers to maintain consistency. Apply mortar to the back of each stone and press it firmly against the lath. 5.Building the Surround:
Continue building the surround, working upwards in a spiral pattern. Make sure each layer is level and plumb, and that the stone is firmly secured with mortar. 6.Grout and Caulk:
Once the stone surround is complete, allow the mortar to cure thoroughly. Then, apply grout to fill any gaps between the stones and to create a seamless finish. Finally, caulk any joints between the surround and the fireplace to prevent moisture infiltration.Finishing Touches
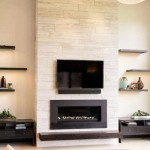
After the grout has dried, the stone surround requires finishing touches. This includes cleaning the grout lines, sealing the stone, and adding any decorative elements.
Cleaning the grout lines ensures a crisp, professional finish. Use a damp sponge or cloth to wipe away any excess grout and ensure the lines are clean and consistent. Sealing the stone protects it from staining and water damage. Choose a sealant specifically designed for the type of stone used. Decorative elements like a mantelpiece, hearth, or fireplace accessories can enhance the overall aesthetic of the surround.

Diy Faux Cast Stone Fireplace Part 1 Demo And Tiling The Hearth Top Shelf

How To Build And Hang A Mantel On Stone Fireplace Shanty 2 Chic

Diy Faux Plaster Fireplace Surround Chelsey Freng

Easy L And Stick Stone Fireplace Surround Sondra Lyn At Home

Diy Fireplace Mantel Surround Faux Cast Stone European Style Tidbits

Stone Fireplace Makeover Taryn Whiteaker Designs

Diy Painted Stone Fireplace Refresh Live Edge Mantle Lemon Thistle

Diy Faux Cast Stone Fireplace Part 2 Building The Mantel Top Shelf

Cast Stone Fireplaces So Much Better With Age

How To Whitewash A Stone Fireplace Super Easy Project Designs By Karan
Related Posts