How to Craft an Oak Fireplace Mantel: A Step-by-Step Guide
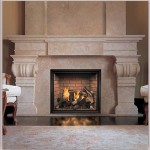
A fireplace mantel serves as a focal point in any room, drawing attention and adding character. An oak mantel, in particular, offers a combination of durability, classic aesthetics, and versatility, making it a popular choice. Constructing an oak fireplace mantel is a project that can be tackled by individuals with basic woodworking skills and access to the appropriate tools. This article provides a detailed guide on how to build an oak fireplace mantel, covering the necessary preparations, construction steps, and finishing touches. Safety precautions are paramount throughout the entire process.
Planning and Preparation: Defining the Project Scope
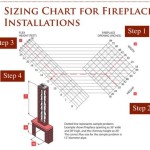
Before commencing the construction, careful planning is essential. The first step involves accurately measuring the fireplace opening and surrounding wall space. These measurements will dictate the dimensions of the mantelpiece. Consider the desired length, depth, and height of the mantel. A common guideline is to have the mantel extend several inches beyond the sides of the fireplace opening, providing a balanced and visually appealing appearance. The height of the mantel should also be considered in relation to the ceiling height and overall room proportions. Building codes regarding clearances from the firebox must also be obeyed.
Following the initial measurements, create a detailed design for the mantel. This design should include precise dimensions for each component, such as the mantel shelf, the support brackets or legs, and any decorative elements. A sketch or a simple CAD drawing can be beneficial in visualizing the finished product and ensuring that all components fit together correctly. The design should also take into account the mounting method. Will the mantel be supported by corbels attached to the wall, or will it be a floating mantel secured directly to the wall studs using a hidden bracket system?
Once the design is finalized, gather the necessary materials and tools. High-quality oak lumber is the primary material. The grade of oak will influence its appearance and cost. Select lumber free from excessive knots or imperfections that could compromise its structural integrity or aesthetic appeal. In addition to the oak lumber, gather supplies such as wood screws, wood glue, sandpaper (various grits), a wood stain or finish, and safety equipment. Essential tools include a measuring tape, a pencil, a square, a saw (either a circular saw or a table saw), a drill, a sander, clamps, and safety glasses.
Construction: Assembling the Mantel Components
With the planning stage complete, the construction phase begins. Start by cutting the oak lumber to the dimensions specified in the design. Precision is crucial during this stage to ensure that all components fit together seamlessly. Use a sharp saw and a steady hand to make accurate cuts. For larger pieces, a table saw is recommended for its ability to deliver precise, straight cuts. Always wear safety glasses when operating power tools.
Next, assemble the various components of the mantel. The process will vary depending on the complexity of the design. A simple mantel might consist of a single oak board for the shelf and two support brackets. A more elaborate mantel may have multiple layers, decorative moldings, and intricate carvings. When assembling the components, use wood glue and screws to create a strong and durable bond. Apply wood glue to all mating surfaces and then secure the pieces with screws. Use clamps to hold the components together while the glue dries. This will ensure a tight and secure joint.
After the glue has dried, remove the clamps and inspect the assembly for any imperfections. Fill any gaps or blemishes with wood filler. Allow the wood filler to dry completely before sanding the entire mantel. Sanding is a critical step in achieving a smooth and professional finish. Begin with a coarse grit sandpaper (e.g., 80-grit) to remove any rough edges or imperfections. Gradually progress to finer grits (e.g., 120-grit, 220-grit) to create a smooth and polished surface. Pay particular attention to the edges and corners of the mantel, as these areas are prone to splintering. Vacuum the surface thoroughly after sanding to remove any dust particles.
Finishing and Installation: Achieving the Desired Aesthetic and Secure Mounting
The final stage involves finishing the oak mantel and installing it above the fireplace. Choose a wood stain or finish that complements the décor of the room. Consider the natural color of the oak and how it will interact with the chosen stain. Test the stain on a scrap piece of oak before applying it to the mantel to ensure that the desired color is achieved. Apply the stain evenly, following the manufacturer's instructions. Allow the stain to dry completely before applying a topcoat.
A topcoat, such as a clear polyurethane finish, will protect the stained mantel from scratches, moisture, and fading. Apply several thin coats of polyurethane, allowing each coat to dry completely before applying the next. Lightly sand the surface between coats with fine-grit sandpaper to achieve a smooth and even finish. The number of coats will depend on the desired level of protection and sheen. Ensure proper ventilation when applying stains and finishes, and wear a respirator to avoid inhaling harmful fumes.
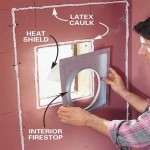
The final step is the installation of the mantel. The mounting method will depend on the design of the mantel and the wall construction. If the mantel is supported by corbels or legs, attach them securely to the wall using screws and wall anchors. If the mantel is a floating mantel secured directly to the wall studs, use a hidden bracket system. Locate the wall studs using a stud finder and attach the brackets to the studs using lag screws. Ensure that the brackets are level and securely fastened to the wall. Then, slide the mantel onto the brackets, ensuring a snug and secure fit. Consult local building codes and regulations for specific requirements regarding fireplace mantel installations.

How To Make An Easy Diy Fireplace Mantel Sprucing Up Mamahood

Diy Rustic Fireplace Mantel The Cure For A Boring

Diy Wood Mantel Simple To Make Artsy Rule

Diy Wood Beam Mantel

Diy Wood Beam Mantel

Diy Wood Beam Mantel

Easy Diy Fireplace Mantel Tutorial Jessica Welling Interiors
:max_bytes(150000):strip_icc()/remodelaholic-6ed1d077bb0744c5ae6f656273fbc540.jpg?strip=all "17 Diy Fireplace Mantel Plans")
17 Diy Fireplace Mantel Plans

How To Make A Wood Beam Fireplace Mantel

Easy Diy Wood Mantel Remington Avenue