How To Make A Wooden Fireplace Mantel
A wooden fireplace mantel serves as a focal point in a living space, adding warmth, character, and a touch of rustic elegance. Constructing a mantel is a manageable woodworking project for individuals with basic skills and access to standard tools. This article provides a detailed guide on how to build a wooden fireplace mantel, covering design considerations, material selection, construction techniques, and installation procedures.
Planning and Design Considerations
The first step in crafting a wooden fireplace mantel involves careful planning and design. This phase encompasses deciding on the mantel's style, dimensions, and overall aesthetic. The design should complement the existing architectural style of the room and the fireplace itself. Considerations include whether the desired look is modern, traditional, rustic, or contemporary. Examining existing fireplaces and mantel designs online or in home decor magazines can provide valuable inspiration.
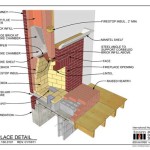
Accurate measurements are crucial. The width of the fireplace opening, the height from the floor to the top of the opening, and the desired projection of the mantel from the wall must be determined. Building codes often dictate minimum clearances between combustible materials, such as wood, and the fireplace opening. Consult local building codes to ensure compliance. Typically, a minimum of 6 inches of clearance is required above the fireplace opening, and 12 inches on either side.
Sketching a detailed design is essential. This sketch should include all dimensions, the shape of the mantel shelf, the profile of any decorative moldings, and the method of attachment to the wall. A detailed drawing will serve as a blueprint throughout the construction process, minimizing errors and ensuring a satisfactory final product.
Material Selection and Preparation
The choice of wood significantly impacts the mantel's appearance, durability, and cost. Common wood species suitable for mantels include pine, oak, maple, cherry, and walnut. Pine is an affordable option that accepts paint and stain well. Oak is a durable hardwood with a distinctive grain pattern. Maple offers a smooth, even texture and is suitable for painting or staining. Cherry and walnut are premium hardwoods known for their rich color and elegant appearance.
The selection of wood should consider factors such as the desired aesthetic, budget, and the availability of specific wood species in the region. Reclaimed wood presents an alternative option, offering a rustic and environmentally friendly choice. Reclaimed wood often exhibits unique character marks, such as nail holes and saw marks, adding to its appeal.
Once the wood is selected, it requires proper preparation. This involves selecting straight, flat boards free from significant defects, such as knots or warping. The boards should be kiln-dried to a moisture content appropriate for the environment in which the mantel will be installed. This minimizes the risk of warping or cracking after installation. Using a moisture meter is recommended to verify the moisture content.
After selecting the wood, milling the boards to the required dimensions is the next step. This typically involves using a jointer to create a flat, square edge on each board, followed by a planer to achieve a uniform thickness. The boards can then be cut to length using a miter saw or circular saw.
Construction Techniques
The construction of the mantel involves assembling the various components according to the design. The specific techniques employed will depend on the complexity of the design. However, common methods include joining the boards using wood glue and screws, dowels, or biscuits. Pocket hole joinery is a popular option for its strength and ease of use.
For a simple mantel shelf, the boards can be glued and screwed together along their edges to create a solid surface. Clamps should be used to apply even pressure during the gluing process. After the glue has dried, the surface can be sanded smooth using progressively finer grits of sandpaper.
Adding decorative moldings enhances the mantel's appearance. Moldings can be attached using wood glue and brad nails. Miter cuts are typically required for corners and other angled joints. A miter saw facilitates accurate and clean miter cuts. The moldings should be carefully aligned and secured to the mantel shelf.
If the design includes legs or vertical supports, these can be constructed separately and then attached to the mantel shelf. The legs should be securely fastened to the shelf using screws and glue. Ensuring the legs are perfectly vertical is crucial for the mantel's stability and appearance.
For mantels that incorporate a hollow box construction, the sides, top, and bottom are typically made from thinner lumber or plywood. These components are assembled using glue and screws or nails. The joints should be reinforced with corner blocks or cleats to enhance their strength.
Sanding is an essential step in the construction process. All surfaces should be thoroughly sanded to remove any imperfections and create a smooth, even finish. Start with a coarser grit sandpaper (e.g., 80-grit) and gradually progress to finer grits (e.g., 120-grit, 220-grit). Sanding between coats of finish is also recommended.
Finishing and Installation
The finishing stage involves applying a protective coating to the mantel that enhances its appearance and protects it from moisture and wear. Common finishing options include paint, stain, varnish, lacquer, and polyurethane. The choice of finish depends on the desired aesthetic and the type of wood used.
If stain is used, it should be applied evenly and allowed to penetrate the wood. Excess stain should be wiped off with a clean cloth. Multiple coats of stain may be required to achieve the desired color intensity.
After the stain has dried, a clear topcoat should be applied to protect the wood. Varnish, lacquer, and polyurethane are all durable options that provide a protective layer against scratches and moisture. Multiple coats of topcoat are recommended, with light sanding between coats to ensure a smooth finish.
If paint is used, a primer coat should be applied first to ensure proper adhesion of the paint. Multiple coats of paint may be required to achieve full coverage and a uniform color. Light sanding between coats is recommended.
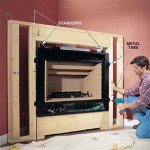
Installation involves securely attaching the mantel to the wall above the fireplace. The specific method of attachment will depend on the design of the mantel and the construction of the wall. Common methods include using screws, French cleats, or construction adhesive.
Locate the wall studs using a stud finder. Screws should be driven into the studs for maximum support. If studs are not available in the desired location, toggle bolts or wall anchors can be used. These anchors provide a secure attachment to drywall or plaster.
A French cleat provides a strong and concealed means of attachment. A French cleat consists of two interlocking pieces of wood, one attached to the back of the mantel and the other attached to the wall. The mantel is then simply hung on the wall cleat.
Construction adhesive can be used in conjunction with screws or cleats to provide additional support. The adhesive should be applied to the back of the mantel before it is pressed against the wall.
Before attaching the mantel, ensure it is level. Use a level to verify that the mantel shelf is perfectly horizontal. Shims can be used to adjust the mantel's position and ensure it is level.
After the mantel has been attached to the wall, inspect it to ensure it is secure and stable. All screws should be tightened, and any gaps between the mantel and the wall should be filled with caulk. The caulk should be painted to match the color of the wall.

Diy Rustic Fireplace Mantel The Cure For A Boring

How To Make An Easy Diy Fireplace Mantel Sprucing Up Mamahood

Easy Diy Fireplace Mantel Tutorial Jessica Welling Interiors

Diy Wood Mantel Simple To Make Artsy Rule

Easy Diy Wood Mantel Remington Avenue

Diy Wood Beam Mantel

Rough Hewn Wood Diy Fireplace Mantel Addicted 2 Decorating
:max_bytes(150000):strip_icc()/sandandsisal-bdc76ad938a44d28ae9e23ef6c9fa331.jpg?strip=all "17 Diy Fireplace Mantel Plans")
17 Diy Fireplace Mantel Plans

Diy Rustic Fireplace Mantel Domestically Speaking

How To Make A Diy Fireplace Mantel The Idea Room