How To Make A Rustic Fireplace Mantel Out Of Wood Pallets
A fireplace mantel serves as a focal point in a living space, offering a place for decoration and adding architectural interest. Constructing a mantel from reclaimed wood pallets provides a cost-effective and environmentally conscious alternative to purchasing a new, pre-fabricated mantel. The rustic aesthetic of pallet wood adds a unique charm and character to any room. This article details the process of creating a rustic fireplace mantel from wood pallets, outlining the necessary steps and considerations for a successful project.
Prior to beginning any construction project, it is crucial to prioritize safety. Safety glasses should be worn at all times to protect the eyes from flying debris. Work gloves are recommended to prevent splinters and abrasions. A dust mask or respirator is advisable to avoid inhaling sawdust, especially when sanding or cutting the wood. Furthermore, ensure the work area is well-ventilated to minimize exposure to dust and fumes from adhesives or finishes. When using power tools, always follow the manufacturer's instructions and safety guidelines. Never attempt to operate power tools if unfamiliar with their use. If working at height, use a stable ladder or scaffolding and have a spotter present.
Acquiring and Preparing the Wood Pallets
The first step involves sourcing suitable wood pallets. Pallets can often be obtained from local businesses, warehouses, or construction sites. Prior to taking any pallets, always seek permission from the property owner. Not all pallets are suitable for repurposing. Look for pallets that are in good condition, free from rot, excessive damage, or chemical stains. An "HT" stamp on the pallet indicates it has been heat-treated and is safe to use. Avoid pallets marked with "MB," which signifies methyl bromide fumigation, a toxic chemical. Once a suitable pallet is located, carefully dismantle it. A pry bar or reciprocating saw can be used to separate the boards. Exercise caution when prying boards apart to avoid splitting or damaging the wood.
After dismantling the pallet, thoroughly inspect each board. Discard any boards that are significantly damaged, rotten, or contaminated. Remove any remaining nails or staples using a hammer and nail punch or pliers. These fasteners can pose a safety hazard and interfere with the construction process. Once the boards are free of debris, begin the cleaning process. Use a stiff brush and soapy water to scrub away dirt, grime, and loose wood fibers. For stubborn stains, a mild bleach solution can be used, but be sure to rinse the wood thoroughly afterwards to prevent discoloration. Allow the boards to dry completely before proceeding.
Sanding the pallet wood is essential to create a smooth and safe surface. Begin with a coarse-grit sandpaper (e.g., 80-grit) to remove any rough edges, splinters, or imperfections. Progress to a medium-grit sandpaper (e.g., 120-grit) to further refine the surface. Finally, use a fine-grit sandpaper (e.g., 220-grit) for a smooth finish. A power sander will expedite this process, but be sure to wear a dust mask to avoid inhaling sawdust. The goal of sanding is not necessarily to create a perfectly smooth surface, as some imperfections can contribute to the rustic aesthetic. However, it is important to remove any hazards that could cause injury.
Designing and Constructing the Mantel
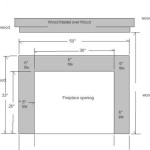
Before cutting any wood, it is vital to meticulously plan the design and dimensions of the mantel. Consider the overall style of the room and the desired aesthetic. Common mantel designs include a simple floating shelf, a more elaborate box-style mantel, or a mantel with corbels or other decorative elements. Measure the width of the fireplace opening and the desired height of the mantel. These measurements will determine the length and height of the mantel. Sketch the design on paper, including all dimensions. This will serve as a guide during the construction process.
Cut the pallet wood boards to the required lengths using a saw. A miter saw is ideal for making precise cuts, but a circular saw or hand saw can also be used. Ensure that all cuts are square and accurate. For a box-style mantel, cut the top, bottom, and side pieces according to the dimensions outlined in the design. A floating shelf mantel will require fewer pieces, typically consisting of a top board and a support structure. Arrange the boards to visualize the final product and make any necessary adjustments. Consider the grain patterns and color variations of the wood to create a visually appealing arrangement.
Assemble the mantel using wood glue and fasteners. Apply a generous amount of wood glue to the joining surfaces of the boards. Clamp the boards together securely and allow the glue to dry completely according to the manufacturer's instructions. For added strength, use nails or screws to reinforce the joints. Countersink the fasteners to prevent them from protruding above the surface of the wood. Fill the fastener holes with wood filler and sand smooth once the filler has dried. For a more rustic look, the fastener holes can be left unfilled.
Finishing and Installation
Once the mantel is assembled, apply a finish to protect the wood and enhance its appearance. A variety of finishes can be used, including stains, paints, varnishes, and oils. A stain can be used to alter the color of the wood and highlight its grain patterns. A paint can be used to create a more uniform and opaque finish. A varnish or oil will provide a protective coating and enhance the natural beauty of the wood. Select a finish that complements the overall style of the room and provides the desired level of protection. Apply the finish according to the manufacturer's instructions, ensuring proper ventilation and wearing appropriate protective gear.
Consider using a sealant to protect the wood from moisture and staining. This is particularly important if the mantel is located in a high-humidity environment or if it will be exposed to spills or splashes. Apply the sealant after the finish has dried completely. Reapply the sealant periodically to maintain its effectiveness.
Installing the mantel requires careful planning and execution. Before beginning the installation, ensure that the fireplace wall is structurally sound and capable of supporting the weight of the mantel. Locate the wall studs using a stud finder. Mark the location of the studs on the wall. The mantel will need to be securely attached to the studs to prevent it from falling. Use a level to ensure that the mantel is installed horizontally.
Attach the mantel to the wall using screws or bolts. Predrill pilot holes through the back of the mantel and into the wall studs. This will prevent the wood from splitting and make it easier to drive the screws or bolts. Use screws or bolts that are long enough to penetrate the studs deeply and provide a secure hold. For a floating shelf mantel, consider using heavy-duty brackets or cleats to provide additional support. Conceal the screws or bolts with wood plugs or decorative moldings.
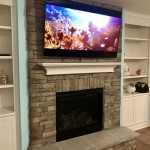
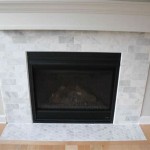
Once the mantel is installed, inspect it carefully to ensure that it is securely attached to the wall and that it is level. Add any decorative elements, such as corbels or moldings, to enhance the aesthetic appeal of the mantel. The completed mantel will serve as a focal point of the room and provide a unique and rustic charm.
Key Considerations for Success
Consider the legalities regarding pallet usage in your area. Some municipalities have restrictions due to potential pest infestations. Research and comply with local regulations before sourcing and using pallets.
Choose appropriate fasteners based on the mantel's weight and the wall construction. For heavier mantels, consider using lag bolts instead of screws for increased stability. Consult with a hardware professional for guidance on selecting the right fasteners.
Apply fire-retardant sealant to the mantel. While this does not make the wood fireproof, it will slow down the spread of flames and provide additional safety. This is particularly important for mantels installed close to the fireplace opening.

Diy Pallet Fireplace Design

Pallet Fireplace With Tv Stand Diy Furniture

First Attempt At A Pallet Project Diy Faux Fireplace

Diy Pallet Fireplace Wood Wall Design Wooden Furniture

Diy Pallet Fireplace Creative And Cost Effective Home Decor

Diy Pallet Wall Spoonful Of Imagination

Pin By Mendy Hoffman Treadway On Diy Faux Fireplace Pallet

Pallet Fireplace With Tv Stand Faux Diy

How To Build A Rustic Faux Beam Mantel Toolbox Divas

Diy Wood Beam Mantel
Related Posts