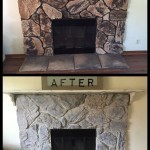
How To Make A Rustic Fireplace Mantel Out Of Wood
A fireplace mantel serves as a focal point in a living space, offering both aesthetic appeal and functional utility. Constructing a rustic fireplace mantel out of wood provides an opportunity to introduce natural elements and character into a home's design. This article details the process of creating a rustic wooden fireplace mantel, covering sourcing materials, preparation, construction, and finishing.
Sourcing and Selecting Wood
The selection of appropriate wood is paramount to achieving the desired rustic aesthetic. Reclaimed wood, such as barn beams, old timbers, or salvaged lumber, offer inherent character marks, including knots, weathering, and variations in grain. These features contribute significantly to the rustic appearance. Alternatively, new wood can be treated to replicate the look of aged wood. Species like pine, oak, and cedar are commonly used due to their availability and workability. The dimensions of the chosen wood will depend on the size and design of the intended mantel. A typical mantel might measure 6-8 inches in depth, 8-10 inches in height, and span the width of the fireplace opening plus an additional 6-12 inches on either side.
When sourcing reclaimed wood, it is essential to inspect the material for structural integrity and safety. Wood should be free from rot, insect infestation, and excessive warping. Any nails, screws, or metal fragments must be removed to prevent damage to tools during the cutting and shaping process. If using new wood, select pieces with interesting grain patterns and consider techniques for distressing the surface to simulate aging.
Consider the moisture content of the wood. Ideally, the wood should be seasoned or kiln-dried to a moisture content appropriate for interior use, typically between 6-12%. This helps prevent warping, cracking, and other dimensional changes after installation. A moisture meter can be used to assess the moisture content of the wood.
Preparing the Wood
Proper preparation of the wood is a critical step in ensuring a successful mantel construction. Begin by cleaning the wood thoroughly. This may involve brushing off loose debris, washing with a mild detergent, and allowing the wood to dry completely. For reclaimed wood, a wire brush can be used to remove stubborn dirt and grime. Exercise caution when handling potentially contaminated reclaimed wood, wearing appropriate personal protective equipment, such as gloves and a dust mask.
Once cleaned, the wood should be inspected for any imperfections that need addressing. Cracks can be filled with epoxy wood filler or reinforced with wood glue and clamps. Knots can be left as-is for aesthetic purposes, or filled to create a smoother surface. Any unevenness or warping should be addressed using a planer or hand plane. The goal is to create a relatively flat and stable surface for the mantel.
Sanding is an essential step in preparing the wood for finishing. Start with a coarse grit sandpaper (e.g., 80-grit) to remove any remaining imperfections and level the surface. Gradually progress to finer grits (e.g., 120-grit, 220-grit) to achieve a smooth finish. Sand with the grain of the wood to avoid creating scratches. For a more rustic look, the sanding process can be minimized, leaving some of the original texture and character intact.
If distressing techniques are desired, now is the time to apply them. Distressing can involve methods such as hammering, chain dragging, wire brushing, or using a drawknife to create marks and imperfections that mimic the effects of aging. Experiment with different techniques on scrap wood to determine the desired aesthetic.
Construction and Installation
The construction of the mantel itself can take several forms, depending on the desired design. A simple mantel can be constructed from a single piece of wood, while more complex mantels may involve joining multiple pieces together to create a box-like structure or decorative features. If joining multiple pieces, use wood glue and clamps to create strong and durable bonds. Consider using biscuits or dowels for added strength and alignment.
For a hollow mantel, construct a frame using 2x4 lumber and clad it with the prepared wood. This method is lighter and easier to install than a solid wood mantel. Ensure the frame is securely attached to the cladding using screws or nails. The corners of the mantel can be mitered for a clean and professional look, or left square for a more rustic aesthetic.
Installation of the mantel requires careful planning and execution. The mantel must be securely attached to the fireplace surround or wall to prevent it from falling. The method of attachment will depend on the type of fireplace and the construction of the wall. Common methods include using screws, lag bolts, or specialized mantel mounting brackets.
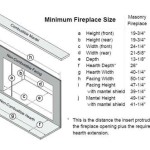
Before installation, determine the desired height of the mantel. Building codes often specify minimum clearances between the top of the fireplace opening and the bottom of the mantel. These clearances are designed to prevent the mantel from overheating and potentially catching fire. Consult local building codes and manufacturer's instructions for fireplace safety guidelines.
When attaching the mantel, use a level to ensure it is perfectly horizontal. If attaching directly to the wall, locate wall studs and use screws or lag bolts to securely fasten the mantel to the studs. If attaching to a brick or stone fireplace surround, use masonry screws or anchors. For heavier mantels, consider using specialized mantel mounting brackets, which are designed to support significant weight. These brackets are typically concealed within the mantel, providing a clean and seamless appearance.
Ensure the fasteners used are appropriate for the weight of the mantel and the type of wall or surround. Over-tightening fasteners can damage the wood or the surrounding materials. After installation, check the stability of the mantel and make any necessary adjustments.
Finishing the Mantel
The finishing process enhances the appearance of the wood and protects it from moisture and wear. Several finishing options are available, each offering a different aesthetic and level of protection. Options include stains, paints, varnishes, oils, and waxes. The choice of finish will depend on the desired look and the intended use of the mantel.
Staining the wood allows the natural grain patterns to show through while adding color and depth. Choose a stain that complements the existing décor and enhances the rustic character of the wood. Apply the stain evenly, following the manufacturer's instructions. Wipe off any excess stain with a clean cloth. Several coats of stain may be required to achieve the desired color intensity.
Painting the wood provides a more opaque finish, concealing the grain patterns. Choose a paint that is suitable for wood and apply it in thin, even coats. Sand lightly between coats to create a smooth finish. Distressing techniques can be applied after painting to create an aged look.
Varnishes and lacquers provide a durable and protective finish that is resistant to scratches and moisture. These finishes typically offer a glossy or semi-gloss sheen. Apply the varnish or lacquer in thin, even coats, following the manufacturer's instructions. Sand lightly between coats to remove any imperfections.
Oils and waxes provide a more natural and subtle finish that enhances the beauty of the wood. These finishes penetrate the wood, providing protection from within. Apply the oil or wax liberally and allow it to soak into the wood. Wipe off any excess with a clean cloth. Reapply the oil or wax periodically to maintain the finish.
Regardless of the chosen finish, it is important to prepare the surface properly before application. Ensure the wood is clean, dry, and free from any dust or debris. Apply the finish in a well-ventilated area, following the manufacturer's instructions. Allow the finish to dry completely before installing the mantel.
Once the finish has dried, inspect the mantel for any imperfections and make any necessary touch-ups. The mantel is now ready for installation and will serve as a beautiful and functional addition to the living space for years to come.

Diy Rustic Fireplace Mantel The Cure For A Boring

Diy Rustic Fireplace Mantel Domestically Speaking

Diy Rustic Fireplace Mantel The Cure For A Boring

Weathered Barn Wood Fireplace Mantel Diy Pine And Prospect Home

How To Make A Wood Beam Fireplace Mantel

Diy Mantel Tutorial Taryn Whiteaker Designs

Easy Diy Fireplace Mantel Tutorial Jessica Welling Interiors

Diy Rustic Fireplace Mantel Domestically Speaking

Diy Rustic Fireplace Mantel The Cure For A Boring

Build A Rustic Faux Beam Mantel Or Shelf
Related Posts