How To Make A Rustic Fireplace Mantel
A rustic fireplace mantel adds warmth and character to any living space. It serves as a focal point, drawing attention while providing a surface for displaying decorative items. Constructing a rustic mantel is a manageable project for individuals with basic woodworking skills and the correct tools. This article provides a comprehensive guide to building a rustic fireplace mantel, from selecting materials to installation.
Planning and Material Selection
The initial stage involves careful planning and material selection. The overall aesthetic of the room, the fireplace design, and the desired size of the mantel are critical factors to consider. Understanding local building codes is also essential prior to commencing any construction. Code compliance ensures safety and prevents potential issues in the future.
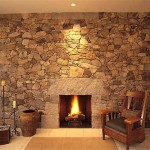
The most common material for a rustic mantel is wood. Reclaimed wood is a popular choice for achieving an authentic rustic look. Salvaged beams from old barns or buildings offer unique textures and histories that enhance the aesthetic appeal. Other suitable wood options include cedar, pine, and oak. The selection should be guided by preference, availability, and budget.
When selecting wood, inspecting it for structural integrity is paramount. Avoid wood that is excessively cracked, rotted, or infested with insects. While imperfections add character to a rustic mantel, they should not compromise the mantel's stability. Kiln-dried wood is preferable to minimize warping or shrinking after installation. If using green wood, allow it to dry and acclimate to the environment for several weeks before working with it. This process alleviates moisture content, which leads to dimensional changes.
The dimensions of the mantel need to be calculated according to the fireplace opening and the desired projection from the wall. Typically, a mantel extends several inches beyond the opening on each side and projects outwards by at least six inches. The height of the mantel above the firebox must also adhere to local building codes to prevent fire hazards. Consult local building codes for minimum clearance requirements before proceeding with the design.
Beyond the wood itself, other necessary materials include: construction adhesive, wood screws, sandpaper (various grits), wood stain or sealant, and appropriate mounting hardware. The type of mounting hardware will depend on the material of the fireplace surround (brick, stone, or drywall) and the weight of the mantel.
Construction Process
The construction process can be broken down into several key steps, including preparing the wood, shaping the mantel, and applying the finish.
First, the wood needs to be cleaned and prepared. Remove any loose debris, dirt, or old paint with a wire brush or scraper. If the wood has significant imperfections, consider filling them with wood filler or epoxy. Allow the filler to dry thoroughly before sanding.
Next, shape the mantel to the desired dimensions. Use a circular saw or hand saw to cut the wood according to the predetermined measurements. If using a single piece of wood, ensure the cut is straight and accurate. For larger mantels, multiple pieces of wood may need to be joined together. Biscuits, dowels, or mortise and tenon joints can be used to create strong and seamless connections. Apply construction adhesive to the joints and clamp the pieces together until the adhesive dries. Ensure the joined sections are flush and aligned.
Once the mantel is assembled, begin sanding the surface. Start with a coarse grit sandpaper (e.g., 80-grit) to remove any rough edges or imperfections. Gradually move to finer grits (e.g., 120-grit, 220-grit) to create a smooth and even surface. Sand with the grain of the wood to avoid scratches. Pay particular attention to the edges and corners of the mantel, rounding them slightly to create a more comfortable and visually appealing profile.
After sanding, the mantel is ready for finishing. Choose a wood stain or sealant that complements the existing decor. Stain enhances the wood's natural grain and adds color, while sealant protects the wood from moisture and wear. Apply the stain or sealant according to the manufacturer's instructions. Multiple coats may be necessary to achieve the desired color and level of protection. Allow each coat to dry completely before applying the next. Lightly sand between coats with fine-grit sandpaper to remove any imperfections and ensure a smooth finish.
For a more rustic look, consider distressing the wood. Techniques such as hammering, chain dragging, and using a wire brush can create intentional dents, scratches, and wear marks. Experiment with different distressing techniques to achieve the desired effect. Remember to apply the distressing before applying the finish. After distressing, clean the wood thoroughly to remove any debris before staining or sealing.
Installation and Safety
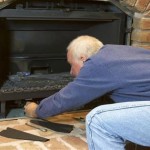
The final step is installing the mantel onto the fireplace. Proper installation is crucial to ensure the mantel is secure and safe. The installation method will depend on the type of fireplace surround and the weight of the mantel. A mantel weighing less than 50 pounds can usually be safely mounted with heavy-duty construction adhesive and screws. Heavier mantels require more robust support, such as corbels or concealed support brackets.
Before installation, locate the studs in the wall behind the fireplace surround. Stud finders can be used to identify the location of the studs. Mark the stud locations on the wall. If mounting to brick or stone, use a masonry drill bit to drill pilot holes for the mounting hardware. Insert anchors into the pilot holes to provide a secure hold for the screws.
For a floating mantel appearance, concealed support brackets are often used. These brackets are typically made of steel and are designed to be inserted into the back of the mantel. The brackets are then attached to the wall studs or masonry using screws or bolts. Ensure the brackets are level before securing them to the wall. Cut corresponding slots in the back of the mantel to accommodate the steel supports, using a router or chisel.
Apply construction adhesive to the back of the mantel where it will contact the fireplace surround. Carefully position the mantel onto the wall, aligning it with the support brackets or marked stud locations. Press the mantel firmly against the wall to ensure a strong bond with the adhesive. Insert screws through the mantel into the studs or masonry anchors. Use a level to ensure the mantel is perfectly horizontal. Adjust the screws as needed to achieve a level installation.
If using corbels, attach them to the wall beneath the mantel to provide additional support. The corbels should be spaced evenly apart and securely fastened to the wall studs or masonry. Ensure the corbels are level and can adequately support the weight of the mantel.
After the mantel is installed, inspect it carefully to ensure it is stable and secure. Test the mantel by applying pressure to different areas to verify it does not wobble or shift. If any issues are detected, address them immediately. Reinforce the mounting hardware or add additional support as needed.
Safety Considerations are paramount during the construction and installation of a fireplace mantel. Always wear safety glasses and gloves when working with power tools or handling wood. Ensure the work area is well-ventilated when applying stains or sealants. Follow all manufacturer's instructions for the safe use of tools and materials. Consult with a qualified professional if uncertain about any aspect of the project.

Diy Rustic Fireplace Mantel The Cure For A Boring

Diy Rustic Fireplace Mantel Domestically Speaking

Diy Rustic Fireplace Mantel The Cure For A Boring

Diy Rustic Fireplace Mantel Domestically Speaking

Diy Rustic Fireplace Mantel Makeover Cottonwood Shanty

Diy Mantel Tutorial Taryn Whiteaker Designs

Build A Rustic Faux Beam Mantel Or Shelf

Weathered Barn Wood Fireplace Mantel Diy Pine And Prospect Home

How To Make A Wood Beam Fireplace Mantel

How To Build And Hang A Mantel On Stone Fireplace Shanty 2 Chic