How to Light the Pilot Light on a Gas Fireplace: A Comprehensive Guide
A gas fireplace offers a convenient and aesthetically pleasing alternative to traditional wood-burning fireplaces. However, like any gas appliance, it relies on a pilot light to ignite the main burners. The pilot light is a small, continuous flame that serves as an ignition source. If the pilot light goes out, the fireplace will not function. Understanding how to safely relight the pilot light is a crucial skill for any gas fireplace owner. This article will provide a detailed, step-by-step guide to relighting a gas fireplace pilot light, covering various scenarios and safety precautions.
Understanding Pilot Light Functionality and Potential Issues
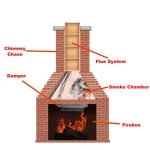
The pilot light is a small flame that constantly burns within the fireplace. Its primary function is to ignite the gas flowing to the main burners when the fireplace is turned on. The pilot light system typically includes a thermocouple or thermopile, a safety device that senses the heat from the pilot flame. If the pilot light is burning correctly, the thermocouple/thermopile generates a small electrical current that keeps the gas valve open, allowing gas to flow to the pilot. If the pilot light goes out, the thermocouple/thermopile cools down, shutting off the gas supply to both the pilot and the main burners. This is a crucial safety feature that prevents gas from leaking into the home.
Several factors can cause the pilot light to go out. A common cause is a draft that extinguishes the flame. This can be due to open windows, doors, or a strong gust of wind. A blockage in the pilot light orifice or gas line can also prevent the pilot light from receiving sufficient gas, causing it to extinguish. A malfunctioning thermocouple/thermopile can also lead to pilot light failure, as it may not be able to consistently sense the flame. Finally, a gas supply interruption, such as a temporary service outage or low gas pressure, can also extinguish the pilot light.
Before attempting to relight the pilot light, it is essential to identify the potential cause of the outage. Addressing the underlying issue, such as closing a draft or clearing a blockage, can prevent the pilot light from going out again shortly after relighting it. If the issue persists, it may be necessary to consult a qualified gas fireplace technician.
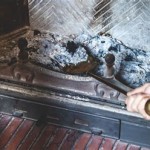
Locating the Pilot Light Assembly and Controls
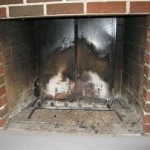
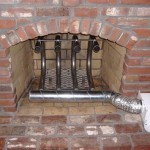
The first step in relighting the pilot light is to locate the pilot light assembly and the associated controls. The pilot light assembly is usually located near the main burner assembly inside the fireplace. It typically consists of a small burner with a metal shield around it, along with a small tube that supplies gas to the pilot light. The controls are usually located nearby, often behind a small access panel or on the side of the fireplace. These controls typically include a gas control valve with settings for "Off," "Pilot," and "On," as well as a push-button igniter.
The exact location of the pilot light assembly and controls can vary depending on the make and model of the fireplace. Consult the owner's manual for specific instructions and diagrams. If the owner's manual is unavailable, a thorough visual inspection of the fireplace interior should reveal the necessary components. Pay close attention to any labels or markings that indicate the function of each control.
Before proceeding, ensure that the area around the pilot light assembly is clear of any debris or obstructions. This will improve visibility and allow for easier access to the controls. It is also essential to have adequate lighting to ensure a clear view of the pilot light assembly and controls.
Step-by-Step Instructions for Relighting the Pilot Light
The following steps outline the general procedure for relighting a gas fireplace pilot light. Always refer to the owner's manual for specific instructions tailored to the fireplace model. Deviations from these instructions may be necessary depending on the fireplace design.
Step 1: Shut Off the Gas Supply. Locate the gas control valve, typically found near the pilot light assembly. Turn the valve to the "Off" position. This will shut off the gas supply to the pilot light and the main burners. Allow several minutes (typically 5-10) for any accumulated gas to dissipate from the fireplace. This is a crucial safety precaution to prevent a potential explosion.
Step 2: Locate the Pilot Light Assembly. Identify the small burner assembly where the pilot light flame will be ignited. This is usually located at the base of the main burner assembly, often behind a protective shield. Consult the owner's manual for the exact location if needed.
Step 3: Set the Gas Control Valve to "Pilot." Turn the gas control valve to the "Pilot" position. This allows gas to flow only to the pilot light. The valve may require pushing inward or depressing a button while turning it to the "Pilot" position. This is a safety feature to prevent accidental activation.
Step 4: Depress and Hold the Pilot Button. While the gas control valve is in the "Pilot" position, depress and hold the pilot button. This button allows gas to flow to the pilot light. Continue holding the button for the duration of the next step.
Step 5: Ignite the Pilot Light. While still holding the pilot button, activate the igniter. This is typically a push-button or a spark igniter that generates a spark to ignite the gas. Repeatedly press the igniter button until the pilot light ignites. Observe the pilot light assembly to confirm that the flame is lit. If the pilot light does not ignite after several attempts, release the pilot button, turn the gas control valve to the "Off" position, and wait several minutes for any accumulated gas to dissipate before attempting the process again.
Step 6: Hold the Pilot Button After Ignition. Once the pilot light is lit, continue holding the pilot button for an additional 20-30 seconds. This allows the thermocouple/thermopile to heat up and generate sufficient electrical current to keep the gas valve open. If the pilot button is released too soon, the thermocouple/thermopile may not be sufficiently heated, and the pilot light will extinguish.
Step 7: Release the Pilot Button. After holding the pilot button for 20-30 seconds, slowly release the button. The pilot light should remain lit. If the pilot light extinguishes after releasing the button, the thermocouple/thermopile may be malfunctioning or the pilot light flame may be too weak. In this case, repeat the process, ensuring that the igniter is producing a strong spark and that the pilot light flame is stable.
Step 8: Turn the Gas Control Valve to "On." Once the pilot light is burning steadily, turn the gas control valve to the "On" position. This allows gas to flow to the main burners. The fireplace can now be operated as usual.
Step 9: Test the Fireplace. Activate the fireplace using the switch or remote control. The main burners should ignite and produce a consistent flame. Monitor the fireplace for any unusual noises, smells, or performance issues. If any problems are detected, turn off the fireplace and consult a qualified gas fireplace technician.
If the pilot light fails to light after multiple attempts, or if it consistently extinguishes shortly after being lit, there may be an underlying problem that requires professional attention. Do not attempt to force the issue, as this could potentially damage the fireplace or create a safety hazard.
Safety Precautions and Troubleshooting Tips
Safety is paramount when working with gas appliances. Before attempting to relight the pilot light, ensure that the area is well-ventilated. Open windows and doors to allow any accumulated gas to dissipate. Never smoke or use open flames near the fireplace while relighting the pilot light.
If there is a strong odor of gas, immediately evacuate the area and contact the gas company or fire department. Do not attempt to relight the pilot light until the gas leak has been located and repaired.
If the pilot light consistently extinguishes, check for drafts that may be blowing out the flame. Close any open windows or doors that may be contributing to the draft. If the problem persists, inspect the pilot light orifice for any blockages. A small piece of debris can obstruct the gas flow and cause the pilot light to extinguish. Use a small wire or needle to carefully clear any obstructions.
If the thermocouple/thermopile is suspected of malfunctioning, it may need to be replaced. This is a relatively simple repair that can often be performed by a qualified technician. It is important to use a replacement thermocouple/thermopile that is specifically designed for the fireplace model.
Regular maintenance can help prevent pilot light problems. Schedule annual inspections and cleanings by a qualified technician. This will ensure that the fireplace is operating safely and efficiently.
Furthermore, always consult the owner’s manual of the gas fireplace. Manuals provide specific instructions and warnings related to the unit’s operation and maintenance. Following manual instructions is often key to a successful and safe relighting of the pilot light. If the manual is misplaced, try locating it online using the fireplace’s model number.

How To Light The Pilot On A Gas Fireplace

Fireplace Pilot Light Tutorial

Gas Fireplace Pilot Lights Your Complete Guide Universe

How To Fix A Pilot Light In Your Gas Fireplace Vertical Chimney Care

How To Light The Pilot On A Gas Fireplace

What Is A Pilot Light And Why It Important

Starting A Gas Fireplace Raleigh Nc Chimneys Plus

Gas Log Fireplace Repair Tips So Helpful This Link Is How To Troubleshoot When Your Keeps G Logs Insert

How To Light Start A Gas Fireplace Using Real Example

How To Light The Pilot On A Gas Fireplace
Related Posts