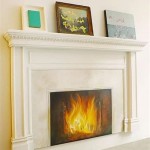
How To Lay Stacked Stone On A Fireplace
Stacked stone, also known as ledger stone, offers a visually appealing and textured surface ideal for transforming a fireplace. The process, while manageable for a dedicated DIY enthusiast, requires careful planning, precise execution, and attention to detail. Adhering to best practices is crucial for a durable and aesthetically pleasing final product.
Before commencing the project, assess the existing fireplace structure. Ensure the surface is structurally sound and capable of supporting the added weight of the stone. An unstable or compromised fireplace could lead to safety hazards and render the stacked stone application ineffective. Address any structural repairs prior to stone application.
Gather necessary materials. This includes the stacked stone panels or individual stones, thin-set mortar specifically designed for stone applications, a notched trowel (size dependent on the stone manufacturer's recommendations), a wet saw with a diamond blade for cutting stone, a level, a rubber mallet, safety glasses, work gloves, a margin trowel, and a bucket for mixing mortar.
Surface Preparation is Paramount
Proper surface preparation is crucial for successful stacked stone installation. The existing fireplace surface must be clean, dry, and free of loose paint, debris, or other contaminants. If the surface is painted or glossy, roughen it with a wire brush or grinder to create a better bonding surface for the mortar. Clean the surface thoroughly after roughening it. A concrete bonding agent may be advantageous for exceptionally smooth surfaces, but this step is project-dependent and dependent on the conditions of the existing surface of the fireplace.
Consider the material of the surface on which the stone is to be applied. If the fireplace is brick, a thin layer of mortar may be sufficient. If the fireplace is drywall, it is recommended to install cement board as a substrate. Cement board provides a stable and moisture-resistant surface ideal for supporting the weight of the stone and resisting moisture damage.
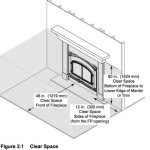
Measure the fireplace accurately. This will help determine the amount of stacked stone required and minimize waste. Account for cuts needed around the firebox opening and any corners. Factor in a waste allowance of approximately 10-15% to accommodate cuts and potential breakage. Plan the layout before beginning the installation. This helps visualize the finished result and identify any potential pattern inconsistencies or cutting challenges.
Mortar Application and Stone Installation
Mix the thin-set mortar according to the manufacturer's instructions. Use a slow-speed drill with a mixing paddle to achieve a smooth, consistent consistency similar to peanut butter. Avoid over-mixing, as this can introduce air bubbles and weaken the mortar. Allow the mortar to slake (rest) for the recommended time, typically 5-10 minutes, before remixing briefly prior to application.
Apply a layer of thin-set mortar to the back of the first stone panel or individual stone using the notched trowel. Ensure the entire back surface is covered with mortar, creating ridges for better adhesion. The depth of the mortar ridges should correspond to the trowel size recommended by the stone manufacturer.
Position the first stone panel or individual stone at the base of the fireplace, ensuring it is level and plumb. Press the stone firmly into the surface, using a slight twisting motion to ensure good contact with the mortar. Use a rubber mallet to gently tap the stone into place, ensuring it is flush with adjacent stones or the surrounding surface. Wipe away any excess mortar from the face of the stone with a damp sponge immediately.
Continue installing the remaining stones, working your way up the fireplace. Maintain consistent spacing between the stones, if applicable. Use spacers if necessary to ensure uniform grout lines, though many stacked stone applications are designed for a dry-stack appearance, with no visible grout lines. Stagger the joints between the stones to create a more visually appealing and structurally sound pattern. Regularly check the level and plumb of the stones using a level. Adjust as necessary before the mortar sets.
Cutting and Finishing Touches
Cutting stacked stone requires a wet saw equipped with a diamond blade. This will ensure clean, precise cuts and minimize dust. Measure and mark the stone accurately before cutting. Wear safety glasses and work gloves to protect yourself from debris and sharp edges. When cutting, feed the stone slowly and steadily into the blade, allowing the saw to do the work. Avoid forcing the stone, as this can cause chipping or breakage.
After the mortar has cured according to the manufacturer's instructions (typically 24-48 hours), inspect the installation for any imperfections. Remove any excess mortar with a chisel or scraper. Lightly brush the stone surface to remove any loose debris. If the stone is porous, consider applying a stone sealer to protect it from staining and moisture damage. This is particularly important for fireplaces exposed to soot or smoke.
Caulk any gaps between the stacked stone and the surrounding surfaces, such as the firebox opening or the mantel. Use a caulk that is paintable and heat-resistant. This will create a clean, finished look and prevent air infiltration.
Properly disposing of mortar buckets and stone remnants is necessary. Check local regulations for waste disposal. Clean tools immediately after use to extend their lifespan. The finished fireplace should be visually appealing and the stacked stone should sit flush. Follow the previous steps for any future applications of stacked stone on fireplaces.

B S Diy Stacked Stone Fireplace Surround Genstone

Diy Stacked Stone Fireplaces On A Budget Msi Blog

How To Install Stack Stone Tile On Fireplace Cement Board Installation

How To Install Stacked Stone Tile On A Fireplace Thrifty Decor Diy And Organizing

How To Install A Stacked Stone Fireplace Practical Whimsy Designs

Thin Stone Veneers Make A Fireplace Update Easy Swenson Granite 100 Natural Stones

Diy How To Install Stone On Your Fireplace Easily

How To Install Stacked Stone Tile On A Fireplace Thrifty Decor Diy And Organizing

Diy Stack Stone Fireplace

17 Modern Stacked Stone Fireplace Ideas For Your Home
Related Posts