How To Insulate A Fireplace Insert
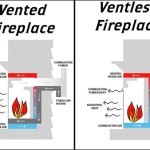
A fireplace insert is a self-contained heating appliance designed to fit inside an existing masonry fireplace. These inserts significantly improve heating efficiency compared to traditional open fireplaces, which often lose more heat than they generate. However, even with an insert, proper insulation is crucial for maximizing its performance and minimizing heat loss into the surrounding masonry structure. Insulating a fireplace insert involves creating a barrier between the insert itself and the firebox, preventing heat from escaping into the chimney and the surrounding walls. This article provides a comprehensive guide on how to insulate a fireplace insert effectively.
Before beginning any insulation project, it is paramount to prioritize safety. Ensure the fireplace insert is completely cool. Disconnect the power supply if the insert has electrical components. Assemble all necessary materials and tools in a well-lit and ventilated area. Safety glasses and gloves should be worn throughout the process to protect against dust, debris, and potential irritants from the insulation materials. A dust mask or respirator is also recommended to prevent inhalation of airborne particles.
The process of insulating a fireplace insert involves several steps, beginning with a thorough assessment of the existing conditions. This assessment informs the selection of appropriate insulation materials and the customization of the insulation plan. Proper preparation and execution are key to achieving optimal thermal performance and ensuring the longevity of both the insert and the insulation.
Key Point 1: Selecting the Right Insulation Materials
The choice of insulation material is critical for the effectiveness and safety of the insulation project. Several factors influence this selection, including the temperature rating of the material, its compatibility with the fireplace insert, its ease of installation, and its resistance to moisture and pests. Common insulation materials for fireplace inserts include ceramic fiber insulation, mineral wool insulation, and high-temperature fiberglass insulation. Each material has its own set of advantages and disadvantages.
Ceramic fiber insulation is known for its exceptional high-temperature resistance, typically exceeding 2000°F (1093°C). This makes it suitable for direct contact with the fireplace insert's hot surfaces. It is lightweight, flexible, and easy to cut and shape. Ceramic fiber insulation is relatively resistant to chemical degradation, but it can be susceptible to moisture absorption if not properly sealed. It is often available in blanket, board, or loose-fill forms.
Mineral wool insulation, also known as rock wool or slag wool, is another popular choice for insulating fireplace inserts. It is manufactured from molten rock or slag and offers excellent thermal resistance and fire protection. Mineral wool typically can withstand temperatures up to 1800°F (982°C). It is denser than ceramic fiber insulation and provides better sound absorption. It is generally available in batts, rolls, or loose-fill forms. Some mineral wool products are treated to resist moisture absorption.
High-temperature fiberglass insulation is a less expensive alternative, but its temperature resistance is lower compared to ceramic fiber and mineral wool. It is usually rated for temperatures up to 1000°F (538°C). Fiberglass insulation is widely available and easy to handle. It is important to select a fiberglass product specifically designed for high-temperature applications. Standard fiberglass insulation used for home construction is not suitable for fireplace inserts due to its lower temperature rating and potential for off-gassing harmful substances when heated. When choosing fiberglass, encapsulated or foil-faced options provide added protection against moisture and fiber migration.
When selecting any of these materials, consideration of the R-value (thermal resistance) is important. A higher R-value indicates better insulation performance. The ideal R-value will depend on the specific climate, the size of the firebox, and the desired level of energy efficiency. Consulting with a professional installer or insulation specialist can help determine the optimal insulation material and R-value for a particular situation.
Key Point 2: Preparing the Firebox for Insulation
Before installing insulation, it's crucial to prepare the firebox thoroughly. This preparation involves cleaning the firebox, sealing any gaps or cracks, and ensuring a secure and even surface for the insulation to adhere to. A clean and well-prepared firebox will ensure optimal insulation performance and prevent potential issues such as moisture intrusion and drafts.
First, remove all ash, soot, and debris from the firebox using a brush, vacuum, and dustpan. Pay close attention to the corners and crevices where debris can accumulate. A wet/dry vacuum is particularly useful for removing fine particles. Once the firebox is clean, inspect it for any cracks, gaps, or holes in the masonry or mortar joints. These imperfections can allow heat to escape and compromise the effectiveness of the insulation.
Use a high-temperature mortar or sealant to fill any cracks or gaps. Apply the mortar or sealant according to the manufacturer's instructions, ensuring it is properly cured and dried before proceeding with the insulation installation. For larger gaps, consider using backer rod, a flexible foam material that provides a base for the mortar or sealant. Backer rod helps reduce the amount of mortar or sealant needed and prevents it from sagging or cracking over time.
If the firebox walls are uneven or have loose bricks, it may be necessary to apply a layer of refractory cement to create a smooth and stable surface for the insulation. Refractory cement is a high-temperature-resistant material that can withstand the extreme heat of the fireplace. Apply the refractory cement according to the manufacturer's instructions, ensuring it is evenly distributed and properly cured. A smooth surface will allow the insulation to adhere more effectively and provide a more uniform thermal barrier.
Finally, consider applying a high-temperature primer to the firebox walls before installing the insulation. The primer helps the insulation adhere better to the masonry and provides an additional layer of protection against moisture and corrosion. Select a primer specifically designed for high-temperature applications and suitable for use with the chosen insulation material.
Key Point 3: Installing the Insulation
The installation process varies depending on the type of insulation material and configuration of the fireplace insert. However, the general principles remain consistent: ensure a tight fit between the insulation and the firebox walls, minimize gaps or voids, and secure the insulation in place to prevent shifting or sagging. Proper installation is essential for optimizing thermal performance and ensuring the longevity of the insulation.
If using ceramic fiber or mineral wool blankets, cut the material into pieces that fit the firebox walls. Measure each section carefully and use a sharp utility knife or scissors to make precise cuts. Ensure that the insulation pieces are slightly larger than the area they are intended to cover, allowing for a snug fit. Press the insulation firmly against the firebox walls, working from the bottom up. Use high-temperature adhesive or mechanical fasteners, such as metal studs or screws, to secure the insulation in place. Overlap the seams between the insulation pieces to prevent heat leakage. Seal the seams with high-temperature foil tape to create an airtight barrier.
For loose-fill insulation, such as ceramic fiber or mineral wool, pour the material into the cavity between the fireplace insert and the firebox walls. Distribute the insulation evenly, ensuring that all voids are filled. Use a long, narrow tool to compact the insulation and prevent it from settling over time. Avoid over-compressing the insulation, as this can reduce its thermal performance. If necessary, construct a temporary barrier at the top of the firebox to prevent the insulation from falling out. This barrier can be made from cardboard or plywood and should be removed once the insulation is properly settled.
When installing any type of insulation, pay close attention to areas around the flue collar and other openings. Cut the insulation carefully to fit around these features, ensuring a tight seal. Use high-temperature sealant to fill any gaps or cracks. Avoid obstructing the flue opening, as this can impede the flow of exhaust gases and create a safety hazard. Consider using a flue collar insulation kit, which is specifically designed to insulate the area around the flue collar and prevent heat loss.
After installing the insulation, inspect the firebox thoroughly to ensure that all areas are properly insulated and that there are no gaps or voids. Use a flashlight to check for any potential weak spots. If necessary, add additional insulation to address any deficiencies. Once satisfied with the insulation, allow the fireplace insert to cure completely before using it. Follow the manufacturer's instructions for curing and break-in procedures. This will help ensure that the insulation is properly seated and that the fireplace insert operates safely and efficiently.
Regular inspection of the insulation is recommended to ensure its continued integrity. Look for signs of damage, such as crumbling, sagging, or discoloration. Promptly address any issues to maintain optimal insulation performance and prevent potential safety hazards. In some cases, it may be necessary to replace the insulation entirely after several years of use. Follow the same procedures outlined above for removing the old insulation and installing new insulation.

Electric Fireplace Insulation An Ultimate Guide Inserts Guy

Walls Behind Fireplaces Building America Solution Center

Insulation Around A Fireplace Insert Hearth Com Forums Home

Finally Got Around To Insulating My Fireplace Hearth Com Forums Home

Finally Got Around To Insulating My Fireplace Hearth Com Forums Home

Walls Behind Fireplaces Building America Solution Center

How To Insulate Prefab Chimney Interior Wall Greenbuildingadvisor

Finally Got Around To Insulating My Fireplace Page 2 Hearth Com Forums Home

How To Insulate A Fireplace And Chimney Improve Efficiency

First Year With Wood Insert Not Really Helping Please Help Page 3 Hearth Com Forums Home
Related Posts