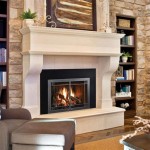
How to Install a Stacked Stone Fireplace Surround
A stacked stone fireplace surround can add a touch of rustic elegance and warmth to any living space. Whether you're working with manufactured stone veneer or natural stone, the installation process involves several key steps to ensure a beautiful and durable finish. This guide will walk you through the essential steps, providing a clear understanding of the process and the materials needed.
Materials and Tools
Before diving into the installation, make sure you have the necessary materials and tools readily available. This will ensure a smooth and efficient process. Here's a list of the essentials:
- Stacked stone veneer or natural stone: Choose the type and style of stone that complements your fireplace and interior design.
- Mortar mix: Use a high-quality mortar specifically designed for stone installation.
- Backer board: This will provide a solid and smooth surface for attaching the stone.
- Metal lath: This will help create a strong bond between the mortar and the backer board.
- Masonry screws: These will secure the backer board to the fireplace wall.
- Level: To ensure the stone surround is straight and level.
- Trowel: For applying mortar and shaping the stone joints.
- Grout float: For filling the gaps between stones.
- Bucket: To mix the mortar and clean tools.
- Sponge: For cleaning excess mortar and grout.
- Safety glasses: To protect your eyes from debris.
- Gloves: To protect your hands.
Preparing the Fireplace Wall
The success of your stacked stone fireplace surround relies heavily on a well-prepared surface. Before starting, ensure the existing fireplace wall is clean, dry, and free of any loose paint, wallpaper, or other obstructions. Here are the steps to prepare the wall:
- Remove any obstacles: This includes removing existing trim, moldings, or decorative elements that will interfere with the installation.
- Clean the wall: Use a brush, vacuum, or damp cloth to remove dust, dirt, and debris from the wall surface.
- Repair any cracks or damage: Fill any cracks or holes in the wall with patching compound or mortar before proceeding.
- Prime the wall: Apply a primer suitable for masonry surfaces. This will enhance the adhesion of the mortar and prevent moisture penetration.
Installing the Backer Board and Metal Lath
The backer board acts as a stable and smooth surface for attaching the stone. Metal lath reinforces the backer board and provides a strong base for the mortar. Here's how to install them:
- Measure and cut the backer board: Determine the dimensions of the fireplace surround and cut the backer board panels accordingly, ensuring they fit snugly against the wall.
- Attach the backer board: Use masonry screws to securely fasten the backer board to the prepared wall. Make sure the screws are long enough to penetrate the wall adequately.
- Install the metal lath: Cut the metal lath to size and attach it to the backer board using specialized lath staples or screws. Ensure the lath is securely fastened and covers the entire surface that will be covered with stone.
Laying the Stone
Finally, it's time to lay the stacked stone veneer or natural stone. This is where patience and attention to detail are crucial to achieve a professional-looking finish. Follow these steps:
- Mix the mortar: Follow the manufacturer's instructions for mixing the mortar. Ensure it has a smooth, workable consistency that can be spread easily.
- Start at a corner: Begin laying the stone from one corner of the fireplace surround. This will provide a reference point for the rest of the installation.
- Spread the mortar: Using a trowel, spread a thin layer of mortar onto the backer board. Make sure the mortar is evenly distributed and covers a sufficient area for the stone.
- Position the stone: Carefully place the stone onto the mortar bed, adjusting it until it is level and aligned with the surrounding stones.
- Check for level: Use a level to ensure that each stone is installed level and plumb. Adjust the position as needed.
- Stagger joints: Ensure that the joints between the stones are staggered, creating a visually appealing and structurally sound pattern.
- Work in sections: Divide the fireplace surround into manageable sections and work on one section at a time. This allows the mortar to set before adding more weight.
Grouting and Finishing
Once the stone is installed and the mortar has dried, it's time to grout the joints between them. This adds a final touch of refinement and helps create a cohesive look. Here are the steps:
- Clean the joints: Remove any excess mortar from the stone surface and the joints between the stones using a brush, sponge, or damp cloth.
- Apply grout: Use a grout float to push grout into the joints between the stones. Ensure the grout is packed firmly and reaches the full depth of the joint.
- Remove excess grout: After applying the grout, clean the excess using a sponge and water. Work quickly and carefully to prevent the grout from setting.
- Clean the stones: Wipe down the stone surface with a clean damp cloth to remove any remaining grout residue.
Allow the grout to dry thoroughly before using the fireplace to avoid damage or staining. Once it has dried completely, seal the grout to protect it from stains and moisture. Finally, consider applying a sealant to the stone surface to enhance its durability and protect it from the elements.

How To Install Stacked Stone Tile On A Fireplace Thrifty Decor Diy And Organizing
.jpg?strip=all "Tips And Tools For Professional Stacked Stone Fireplaces")
Tips And Tools For Professional Stacked Stone Fireplaces

How To Install Stack Stone Tile On Fireplace Cement Board Installation

Diy How To Install Stone On Your Fireplace Easily

How To Install Stacked Stone Tile On A Fireplace Thrifty Decor Diy And Organizing

How To Install A Stacked Stone Fireplace Practical Whimsy Designs

Tips And Tools For Professional Stacked Stone Fireplaces

How To Install Stacked Stone Tile On A Fireplace Thrifty Decor Diy And Organizing

Thin Stone Veneers Make A Fireplace Update Easy

Stacked Stone Fireplace How To Diy
Related Posts