Ensure that all articles are original content. ## How To Install a Propane Tank for a Gas Fireplace
Installing a propane tank for a gas fireplace requires careful planning and adherence to safety regulations. Propane, while an efficient and clean-burning fuel source, is highly flammable and potentially dangerous if mishandled. This article provides a comprehensive guide to installing a propane tank for a gas fireplace, outlining the necessary steps and precautions to ensure a safe and functional installation.
Before commencing any work, it is imperative to understand local building codes and regulations related to propane tank installations. These regulations may vary depending on the municipality and often dictate the permitted size and location of the tank, as well as required safety features. Contacting the local building department or a qualified propane installer is highly recommended to obtain specific information relevant to the installation site.
Furthermore, any individual undertaking a propane tank installation should possess a reasonable level of mechanical aptitude and be comfortable working with gas lines and fittings. If unsure about any aspect of the installation process, it is strongly advised to hire a qualified and licensed propane technician. Improper installation can result in gas leaks, fires, or explosions, posing a significant risk to property and personal safety.
Planning and Preparation
The initial stage involves meticulous planning and preparation. This includes selecting the appropriate propane tank size, determining the optimal location for the tank, and gathering all necessary tools and materials. A crucial aspect of planning is to consider the BTU (British Thermal Units) requirements of the gas fireplace. The BTU rating indicates the amount of heat the fireplace produces per hour. The propane tank size must be adequate to supply the required BTU output of the fireplace for the desired usage duration.
Generally, propane tanks are available in various sizes, ranging from small portable tanks to large stationary tanks. The choice depends on factors such as space limitations, frequency of use, and heating needs. Larger tanks offer a greater supply of propane and require less frequent refills, but they also necessitate more space and may be subject to stricter regulations. Portable tanks are suitable for occasional use or where space is limited, but they require more frequent refills.
Selecting the location for the propane tank is critical for safety and accessibility. The tank must be placed in a well-ventilated area, away from potential ignition sources such as open flames, electrical equipment, and heat-producing appliances. It is also essential to ensure that the tank is easily accessible for refills and maintenance. Regulations often specify minimum distances from buildings, property lines, and other structures. Underground tanks are an option to consider for aesthetic reasons or when space is limited, but they require professional installation and are subject to specific regulations.
After determining the tank size and location, gather all the necessary tools and materials. Essential tools include pipe wrenches, a pipe cutter, Teflon tape or pipe sealant, a leak detector solution, and safety glasses. Required materials include propane-rated piping, fittings, a pressure regulator, and a shut-off valve. Ensure that all materials are specifically designed and approved for use with propane, as using incompatible materials can lead to leaks and other safety hazards.
Installation Process
Once the planning and preparation phase is complete, the physical installation of the propane tank can begin. The installation process typically involves the following steps, which should be executed with precision and caution:
1.
Tank Placement:
Position the propane tank on a level and stable surface, ensuring that it is properly supported. If the tank is placed on the ground, consider using a concrete pad or gravel base to prevent corrosion and shifting. Secure the tank to prevent it from tipping over, particularly in areas prone to high winds or seismic activity.2.
Connecting the Regulator:
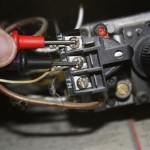
The pressure regulator is a crucial component of the propane system, as it reduces the high pressure of the propane in the tank to a safe and usable pressure for the gas fireplace. Connect the regulator to the tank valve, ensuring that the connection is tight and leak-free. Use Teflon tape or pipe sealant on the threads to create a secure seal. The regulator should be oriented according to the manufacturer's instructions, typically with the vent pointing downwards to prevent moisture from entering.3.
Running the Gas Line:
Run a propane-rated gas line from the regulator to the gas fireplace. Use appropriate piping materials, such as black iron pipe or flexible copper tubing, depending on local codes and the specific installation requirements. Route the gas line carefully, avoiding sharp bends or obstructions. Secure the gas line to walls or floors using appropriate supports to prevent sagging or damage. If the gas line passes through a wall or floor, ensure that it is properly sleeved to protect it from abrasion or damage.4.
Installing the Shut-Off Valve:
Install a shut-off valve in the gas line, close to the gas fireplace. The shut-off valve allows for easy isolation of the gas supply in case of emergencies or maintenance. Ensure that the valve is easily accessible and clearly labeled. Use Teflon tape or pipe sealant on the threads of the valve to create a leak-free connection.5.
Connecting to the Gas Fireplace:
Connect the gas line to the gas fireplace, following the manufacturer's instructions. Ensure that the connection is tight and leak-free. Use Teflon tape or pipe sealant on the threads to create a secure seal. Before connecting the gas line, ensure that the gas fireplace is turned off and the pilot light is extinguished.Leak Testing and Safety Checks
After completing the installation, it is imperative to conduct thorough leak tests and safety checks to ensure that the propane system is functioning properly and safely. This involves the following steps:
1.
Leak Testing:
Apply a leak detector solution to all gas line connections, including the tank valve, regulator, fittings, shut-off valve, and the connection to the gas fireplace. Look for bubbles forming in the solution, which indicates a gas leak. If a leak is detected, immediately shut off the gas supply and tighten the connection or replace the faulty component. Repeat the leak test after making any repairs.2.
Pressure Testing:
After confirming that there are no leaks, perform a pressure test to verify the integrity of the gas line. Consult local codes and regulations for the appropriate pressure testing procedures. Typically, this involves pressurizing the gas line with air or nitrogen to a specific pressure and monitoring for any pressure drop over a specified period. A significant pressure drop indicates a leak or a weakness in the gas line.3.
Ventilation:
Ensure that the area around the propane tank and the gas fireplace is adequately ventilated. Proper ventilation is essential to prevent the build-up of propane gas in case of a leak. Check that vents are clear of obstructions and that there is adequate airflow.4.
Carbon Monoxide Detector:
Install a carbon monoxide detector in the vicinity of the gas fireplace. Carbon monoxide is a colorless and odorless gas that can be produced by incomplete combustion in gas appliances. A carbon monoxide detector will alert occupants to the presence of this dangerous gas, allowing them to take appropriate action.5.
Pilot Light Ignition:
Follow the manufacturer's instructions to light the pilot light on the gas fireplace. Observe the flame to ensure that it is burning properly. A yellow or flickering flame may indicate a problem with the gas supply or the burner.6.
Functional Testing:
Once the pilot light is lit, turn on the gas fireplace and observe its operation. Ensure that the flames are burning evenly and that there are no unusual noises or odors. Monitor the fireplace for any signs of malfunction, such as excessive soot or smoke.Following these steps meticulously helps ensure a safe and efficient propane tank installation for a gas fireplace. However, remember that this guide provides general information, and specific installation requirements may vary depending on local codes and the specific equipment used. Consulting with a qualified propane technician is strongly recommended to ensure a safe and compliant installation.

General Guidelines For Propane Tank Placement Indoor Comfort Marketing

Episode 21 Propane Tank Installation

How Do I Install Propane Outside Of The House To Run A Fireplace Ehow

Propane Tank Installation Western Massachusetts George

Residential Propane Tanks What Size Tank Do You Need

How To Install A Free Standing Propane Fireplace Doityourself Com

Lpg Gas Fires What You Need To Know Direct Fireplaces

How To Select And Install A Gas Fireplace Log Set Fireplaces Direct Learning Center

Why You Need To Be Using Propane In Your Tiny House The Life

Propane Fireplace Installation Bucks County Gastec
Related Posts