How To Install a Propane Gas Fireplace Insert
Adding a propane gas fireplace insert to an existing masonry or prefabricated fireplace can significantly enhance the aesthetic appeal and heating efficiency of a home. This detailed guide provides a comprehensive overview of the installation process, covering essential considerations, necessary preparations, and step-by-step instructions to ensure a safe and effective installation.
Before embarking on the installation of a propane gas fireplace insert, it is crucial to understand the fundamental differences between different types of fireplace inserts and to determine if this renovation project is a viable solution for an existing fireplace. A propane gas fireplace insert is essentially a self-contained heating unit that is designed to fit inside of an existing fireplace opening. It operates by burning propane gas to generate heat, which is then distributed into the room through a blower or convection system. Propane inserts offer several advantages over traditional wood-burning fireplaces, including increased efficiency, reduced emissions, and greater convenience.
Unlike wood-burning fireplaces, which can lose a significant amount of heat up the chimney, propane inserts are designed to maximize heat output. They typically have a sealed combustion chamber and a direct vent system that draws fresh air from outside and vents exhaust gases directly outdoors. This prevents the loss of heated air from the home and ensures that the insert operates safely and efficiently.
Installing a propane gas fireplace insert is a complex task that requires a thorough understanding of gas fitting, electrical wiring, and building codes. While it is possible for experienced homeowners to complete the installation themselves, it is generally recommended to hire a qualified professional. A licensed contractor will ensure that the insert is installed correctly and safely, and that it meets all applicable regulations.
Key Point 1: Pre-Installation Assessment and Preparation
Prior to purchasing and installing a propane gas fireplace insert, a thorough assessment of the existing fireplace and surrounding area is necessary. This assessment will help determine the appropriate size and type of insert, as well as identify any potential challenges or modifications that may be required.
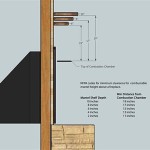
The first step in the pre-installation assessment is to measure the dimensions of the existing fireplace opening. This includes the width, height, and depth of the firebox, as well as the dimensions of the hearth. The dimensions will help determine the maximum size of the insert that can be accommodated. It is crucial to choose an insert that fits snugly within the fireplace opening without being too large or too small. If the insert is too large, it may be impossible to install it correctly. If it is too small, it may not provide adequate heat output.
In addition to measuring the fireplace opening, it is also important to inspect the chimney. The chimney must be in good condition and free of any obstructions. A professional chimney sweep should be hired to inspect and clean the chimney prior to installation. This will ensure that the insert vents properly and that there is no risk of carbon monoxide poisoning. The chimney liner should be inspected for cracks or deterioration. If the chimney liner is damaged, it will need to be repaired or replaced before the insert can be installed. Using a flexible stainless-steel liner is recommended for propane inserts to ensure proper venting and prevent corrosion.
A gas line must be readily available to the fireplace location. If there is no existing gas line, one will need to be installed by a qualified gas fitter. The gas line must be sized appropriately for the insert and must be installed in accordance with all applicable codes. The gas line should be pressure tested to ensure that there are no leaks. A shut-off valve should be installed on the gas line near the fireplace for safety purposes.
An electrical outlet is also required to power the blower and other components of the insert. If there is no existing outlet near the fireplace, an electrician will need to install one. The outlet should be grounded and should be protected by a circuit breaker. Ensure that the electrical circuit has sufficient capacity to handle the insert's power requirements.
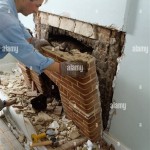
The existing fireplace and surrounding area should be cleaned thoroughly before installation. Remove any debris, soot, or creosote from the firebox and chimney. Protect the surrounding floor and furniture with drop cloths. This will help to prevent damage and make the installation process easier.
Key Point 2: Installing the Venting System and Gas Connection
The installation of the venting system and gas connection are critical steps in the propane gas fireplace insert installation process. Improper installation can result in serious safety hazards, including carbon monoxide poisoning and gas leaks. Therefore, it is essential to follow all instructions carefully and to consult with a qualified professional if you have any questions.
The venting system for a propane gas fireplace insert typically consists of a flexible stainless-steel liner that is inserted into the existing chimney. The liner connects the insert to the chimney and vents exhaust gases outdoors. The liner must be sized appropriately for the insert and must be installed in accordance with the manufacturer's instructions. Carefully measure the chimney and select a liner that is long enough to reach the top of the chimney and wide enough to accommodate the insert's vent collar.
Lower the flexible liner down the chimney until it reaches the fireplace opening. Connect the liner to the insert's vent collar using a suitable connector. Ensure that the connection is secure and airtight. Seal the space between the liner and the chimney using a non-combustible sealant. This will prevent exhaust gases from leaking into the home.
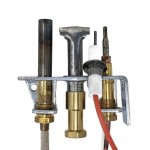
After the venting system has been installed, connect the gas line to the insert. Use a pipe wrench to tighten the gas fittings. Ensure that all connections are tight and leak-free. Apply pipe joint compound or Teflon tape to the threads of the gas fittings to ensure a tight seal.
Prior to igniting the insert, it is crucial to test the gas connections for leaks. Apply a soap and water solution to all of the gas fittings. If bubbles appear, there is a gas leak. Tighten the fittings until the leaks are eliminated. If you are unable to eliminate the leaks, contact a qualified gas fitter.
Once the gas connections have been tested and any leaks have been resolved, turn on the gas supply and check the gas pressure. The gas pressure should be within the range specified by the insert manufacturer. If the gas pressure is too high or too low, adjust the gas regulator accordingly. Having a qualified gas fitter perform this test is highly recommended.
Key Point 3: Insert Placement, Electrical Hookup, and Final Checks
The final stages of propane gas fireplace insert installation involve carefully placing the insert into the fireplace opening, connecting the electrical components, and conducting thorough final checks to ensure safe and reliable operation.
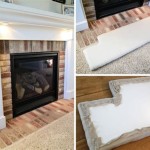
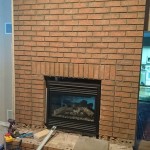
With the venting and gas connections completed, carefully slide the insert into the fireplace opening. Ensure the unit is level and centered within the firebox. Use shims if necessary to achieve a perfectly level installation. Avoid forcing the insert into place, as this could damage the unit or the surrounding masonry.
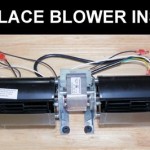
Connect the insert's electrical components to the electrical outlet that was previously installed. The electrical connection typically involves plugging the insert into a standard 120-volt outlet. Make sure to comply with the manufacturer’s instructions regarding wiring and grounding. Do not overload the circuit. Confirm that the blower fan and any other electrical features are functioning correctly.
Before completing the installation, perform a series of final checks to ensure that everything is working properly and safely. Start by inspecting the entire installation for any potential hazards, such as loose connections, damaged components, or obstructions. Verify that the venting system is properly sealed and that there are no gas leaks.
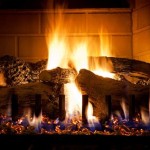
Turn on the insert and observe its operation. Check the flame pattern and ensure that it is burning cleanly and efficiently. Monitor the temperature of the surrounding area to ensure that the insert is not overheating. Allow the insert to run for a sufficient period of time to properly assess its performance.
Consult the insert's owner's manual for specific instructions on how to operate and maintain the unit. Familiarize yourself with the safety features of the insert, such as the shut-off valve and the carbon monoxide detector. Regular maintenance, such as cleaning the burner and venting system, will help to ensure that the insert operates safely and efficiently for many years to come.
Having the installation inspected by a qualified professional is highly advisable to ensure compliance with local codes and regulations, and to provide peace of mind knowing that the insert has been installed correctly. Additionally, understanding the long-term maintenance requirements of the insert is crucial for its continued safe and efficient operation. This includes regular cleaning, inspection of the venting system, and periodic professional servicing.

How To Install A Gas Fireplace Insert This Old House

How To Install A New Gas Fireplace Insert This Old House

Install A Propane Gas Fireplace Insert Vent Free 2

Why Install A Propane Fireplace Paraco Gas

How To Install A Gas Fireplace Insert

Gas Fireplace Inserts Quick Install New Propane Usage

How To Install A New Gas Fireplace Insert This Old House

Convert To Gas Installing Fireplace Inserts Doctor Flue

Gas Fireplace Insert Cost Forbes Home

How To Install Gas Fireplace Insert Design Swan
Related Posts