How to Install Natural Stone Veneer on Fireplace Drywall
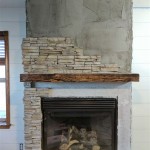
Natural stone veneer is an excellent material to bring the beauty of natural stone into your home without the hefty price tag of solid stone. It is lightweight, versatile, and relatively easy to install, making it a suitable option for a DIY project. Here's a step-by-step guide to help you install natural stone veneer on fireplace drywall:
Materials Required:
- Natural stone veneer - Thin-set mortar - Grout - Trowel - Sponge - Marble saw (if cutting veneer is required) - Measuring tape - Level - Pencil - Safety gear (gloves, eye protection, dust mask)
Step 1: Surface Preparation
Ensure that the fireplace drywall is clean, dry, and free of any dust or debris. If the drywall is uneven or has any imperfections, it is recommended to level it using a joint compound. Allow the compound to dry completely before proceeding.
Step 2: Laying Out the Veneer
Plan the layout of the stone veneer by placing it temporarily on the drywall without applying any mortar. This will give you an idea of how the finished product will look and allow you to make adjustments as needed. Use a measuring tape and level to ensure that the veneer is aligned correctly.
Step 3: Applying Thin-Set Mortar
Mix the thin-set mortar according to the manufacturer's instructions. Using a trowel, apply a thin layer of mortar to the back of the veneer. Press the veneer firmly onto the drywall, making sure to align it with the layout plan. Use a level to check for evenness.
Step 4: Grouting
Once the thin-set mortar has dried completely (refer to the manufacturer's recommended curing time), apply grout to the joints between the stones. Use a grout float or trowel to press the grout into the joints, ensuring that they are filled and level. Remove any excess grout with a damp sponge.
Step 5: Curing
Allow the grout to cure completely. This can take up to several days, depending on the type of grout used. Protect the stone veneer from moisture during the curing process.
Step 6: Sealing (Optional)
To enhance the durability and protect the stone veneer from stains and scratches, you can apply a penetrating sealer. Follow the manufacturer's instructions for the specific sealer.
By following these steps carefully, you can successfully install natural stone veneer on fireplace drywall. This versatile material will add a touch of elegance and sophistication to your living space, creating a warm and inviting atmosphere.

Installing Stone Veneer 2024 10 12 World
Installing Stone Veneer On Wall With Fireplace Hearth Com Forums Home

Installing Stone Veneer 2024 10 12 World

Installing Stone Veneer 2024 10 12 World

How To Install Stacked Stone Veneer Wall Tiles

How To Install A Stone Veneer Fireplace Shoe Makes New

How To Install Stacked Stone Tile On A Fireplace Thrifty Decor Diy And Organizing
Installing Stone Veneer On Wall With Fireplace Hearth Com Forums Home

Natural Stone Veneer Installation Guide By Bsi

How To Install A Stone Veneer Fireplace Shoe Makes New
Related Posts


