How To Install Gas Logs In A Wood Burning Fireplace
Installing gas logs in a wood-burning fireplace can transform a drafty, infrequently used hearth into a source of consistent heat and ambiance. This conversion offers the visual appeal of a traditional fire without the mess and effort associated with burning wood. However, proper installation is crucial for safety and optimal performance. This article provides a detailed guide on how to install gas logs in a wood-burning fireplace, emphasizing safety precautions, necessary tools, and step-by-step instructions.
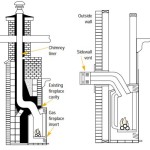
Before commencing any installation, it is paramount to verify the suitability of the existing fireplace and chimney for gas log use. A professional inspection by a qualified technician is highly recommended. This inspection will determine if the fireplace and chimney meet the required safety standards and building codes for gas appliances. Crucially, the technician will assess the chimney's structure for any deterioration or blockages that could impede proper ventilation, as inadequate ventilation can lead to carbon monoxide poisoning.
The type of gas log set selected is also a critical consideration, as different sets are designed for specific fireplace sizes and gas types. Natural gas and propane gas log sets are not interchangeable and require different orifices and regulators. Selecting the wrong type of gas log set can result in inefficient burning, soot buildup, and potentially hazardous conditions. Therefore, confirming that the selected gas log set is compatible with the available gas supply is essential.
Furthermore, understanding the distinction between vented and vent-free gas log sets is important. Vented gas logs require a fully functional chimney to vent combustion byproducts, while vent-free logs are designed to operate without a chimney. Vent-free logs are equipped with an oxygen depletion sensor (ODS) that shuts off the gas supply if oxygen levels in the room drop to unsafe levels. While vent-free logs offer greater flexibility in installation, they are still subject to local building codes and regulations and may not be permitted in all jurisdictions.
Once compatibility and safety are established, the installation process can begin. This process involves several steps, including preparing the fireplace, connecting the gas supply, positioning the gas logs, and testing the installation for leaks and proper operation. Each step requires careful attention to detail and adherence to manufacturer's instructions to ensure a safe and efficient installation.
Key Point 1: Preparing the Fireplace for Installation
The first step in installing gas logs is preparing the existing wood-burning fireplace. This involves thoroughly cleaning the firebox, removing any accumulated ash, soot, and debris. A shop vacuum is useful for this purpose. The fireplace damper must be permanently secured in the open position for vented gas log sets. This can be accomplished by removing the damper handle or permanently affixing it using screws or metal straps. This ensures proper ventilation of combustion byproducts through the chimney.
For vent-free gas log installations, the damper can remain closed, but it is essential to consult local building codes and manufacturer instructions to confirm compliance. Some jurisdictions may still require the damper to be partially open to provide minimal ventilation. The firebox floor should be level and free of obstructions. If necessary, use fire-resistant leveling compound to create a smooth and even surface for the gas log burner.
If the fireplace has a gas line, it is crucial to identify and test its functionality. A qualified technician should inspect the existing gas line for leaks and proper pressure. If a gas line does not exist, installing one will require the services of a licensed plumber or gas fitter. Connecting to an existing gas line without proper expertise can lead to gas leaks and potentially explosive situations.
Installing a shut-off valve within easy reach of the fireplace is also recommended. This allows for quick and easy shut-off of the gas supply in case of emergency or during maintenance. The shut-off valve should be clearly labeled and accessible. Consider installing a carbon monoxide detector in the vicinity of the fireplace as an additional safety precaution, regardless of whether vented or vent-free gas logs are installed.
Key Point 2: Connecting the Gas Supply and Installing the Burner
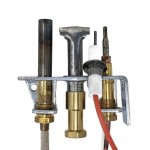
Once the fireplace is prepared, the next step is to connect the gas supply to the burner. The gas log set typically includes a burner assembly, a regulator, and a connection hose. The regulator controls the gas pressure to ensure proper combustion, and the connection hose connects the regulator to the gas supply line.
Before making any gas connections, ensure that the gas supply is turned off at the main shut-off valve. Apply pipe thread sealant, specifically designed for gas lines, to the threaded connections to prevent leaks. Avoid using Teflon tape, as it may not provide a reliable seal for gas connections. Carefully tighten all connections using two wrenches to prevent damage to the fittings. One wrench holds the fitting in place while the other tightens the connecting part.
The burner assembly should be positioned in the firebox according to the manufacturer's instructions. Most gas log sets include specific placement guidelines to ensure proper flame distribution and heat output. Some sets require the use of sand or lava rocks to support the burner and distribute the gas. The sand or lava rocks should be spread evenly around the burner, avoiding covering the burner ports.
After connecting the gas supply and positioning the burner, it is essential to test all connections for leaks. Use a non-corrosive leak detection solution specifically designed for gas lines. Apply the solution to all connections and look for bubbles, which indicate a leak. If a leak is detected, immediately turn off the gas supply and tighten the leaking connection. Repeat the leak test until all connections are leak-free. A properly executed leak test is crucial for ensuring the safety of the installation.
Key Point 3: Positioning the Gas Logs and Testing the Installation
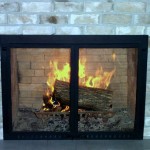
With the gas supply connected and the burner installed, the final step is to position the gas logs and test the installation. Gas logs are typically numbered or labeled to indicate their proper placement on the burner. Follow the manufacturer's instructions carefully to ensure that the logs are positioned correctly.
Incorrectly positioned logs can obstruct the burner ports, resulting in incomplete combustion and the production of carbon monoxide. The logs should be placed to create a realistic fire appearance while allowing sufficient airflow for proper combustion. Avoid stacking the logs too closely together, as this can restrict airflow and lead to soot buildup.
After positioning the logs, turn on the gas supply at the main shut-off valve and light the gas logs according to the manufacturer's instructions. Observe the flame pattern to ensure that the burner is functioning correctly. The flames should be consistent and evenly distributed across the burner. If the flames are uneven or yellow, it may indicate a problem with the gas pressure or burner assembly.
Allow the gas logs to burn for several minutes to allow for any residual odors to dissipate. Monitor the surrounding area for any signs of gas leaks or carbon monoxide buildup. A carbon monoxide detector should be used to verify that the room is safe. If any problems are detected, immediately turn off the gas supply and consult a qualified technician.
Finally, review the manufacturer's instructions for maintenance and care of the gas logs. Regular cleaning and inspection can help to ensure the longevity and safety of the installation. The burner ports should be cleaned periodically to remove any debris that may obstruct the gas flow. The logs themselves may require occasional cleaning to remove soot buildup. Following the manufacturer's recommendations for maintenance will help to keep the gas logs operating safely and efficiently.
Proper installation of gas logs in a wood-burning fireplace involves careful preparation, meticulous gas line connections, and precise positioning of the logs. Adhering to manufacturer's instructions and prioritizing safety precautions are essential for a successful conversion. While this guide offers detailed instructions, seeking professional assistance from a qualified technician is always advisable, especially for individuals with limited experience in gas appliance installation.

How To Put In A Gas Log Set For Fireplace

How To Put In A Gas Log Set For Fireplace

How To Select And Install A Gas Fireplace Log Set Fireplaces Direct Learning Center

How To Select And Install A Gas Fireplace Log Set Fireplaces Direct Learning Center

Convert A Wood Fireplace To Gas Full Service Chimney

Vented Fireplace Gas Log Replacement Installing A Non

Can I Install Gas Logs In My Existing Fireplace Thomas Bros Propane

Episode 276 Installing A Gas Log Set In The Family Room Fireplace

How To Install A Log Lighter Fireplace Gas Starter Pipe

5 Common Gas Log Set Installation Mistakes Fireplaces Direct Learning Center
Related Posts