How to Install a Fireplace Mantel
Installing a fireplace mantel can dramatically enhance the aesthetic appeal of any room, transforming a functional fireplace into a captivating focal point. The process, while achievable for many homeowners, requires careful planning, precise measurements, and a solid understanding of basic carpentry skills. This article provides a comprehensive guide to installing a fireplace mantel, covering everything from preparation to final finishing touches.
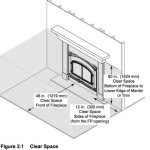
Before commencing the installation, it is imperative to ensure that the mantel meets local building codes, particularly concerning clearances from the firebox opening and combustible materials. Consulting with a building inspector or a qualified contractor is advisable in areas with stringent fire safety regulations. The mantel’s dimensions should be carefully considered, taking into account the size of the fireplace opening and the overall proportions of the room. A mantel that is too large or too small will detract from the visual harmony of the space.
Key Point 1: Preparation and Material Gathering
The initial phase of installing a fireplace mantel involves meticulous preparation. This includes gathering the necessary tools and materials, carefully measuring the installation area, and preparing the wall surface. Neglecting any of these steps can lead to complications later in the process.
The following tools and materials are typically required:
- Fireplace mantel
- Measuring tape
- Level
- Stud finder
- Pencil
- Drill with various drill bits
- Screws (appropriate length and type for the wall material)
- Construction adhesive (optional, but recommended)
- Caulk (for filling gaps)
- Sandpaper
- Paint or stain (to match existing trim)
- Safety glasses
- Dust mask
With all materials assembled, the next step involves locating the wall studs using a stud finder. Marking their positions with a pencil is crucial, as these will serve as anchor points for securing the mantel. If studs are not conveniently located, additional support may be needed, such as installing a ledger board or using wall anchors.
The wall surface should be thoroughly cleaned and prepared. Remove any existing trim or molding that might interfere with the mantel installation. Inspect the wall for any imperfections, such as cracks or unevenness, and repair them accordingly. A smooth and even surface is essential for a professional-looking installation. Lightly sanding the wall surface will improve adhesion for the construction adhesive, if used.
Key Point 2: Mounting the Mantel
The method used to mount the mantel will depend on its design and the composition of the wall. For heavier mantels, securing them directly to the wall studs is generally the most reliable approach. Lighter mantels may be adequately supported using wall anchors, but this should be carefully considered based on the weight rating of the anchors and the overall weight of the mantel.
Begin by determining the desired height of the mantel. Using a measuring tape and level, mark the location of the top edge of the mantel on the wall. This line will serve as a visual guide during the installation process. For added precision, use a laser level to ensure the line is perfectly horizontal.
If using a ledger board, attach it to the wall studs at the marked height, ensuring it is level. The ledger board will provide temporary support for the mantel while the adhesive cures and the screws are installed. Apply construction adhesive to the back of the mantel where it will contact the wall. Carefully position the mantel against the wall, aligning it with the level line and resting it on the ledger board (if used).
Predrill pilot holes through the mantel and into the wall studs. This will prevent the wood from splitting when the screws are installed. Insert screws through the mantel and into the studs, tightening them securely. Avoid overtightening, as this can damage the wood. If wall anchors are used instead of studs, follow the manufacturer's instructions for installation, ensuring they are properly seated in the wall.
After the mantel is securely fastened to the wall, remove the ledger board (if used). Inspect the installation for any gaps or imperfections. Fill any gaps between the mantel and the wall with caulk, smoothing it out with a wet finger or a caulking tool. Allow the caulk to dry completely before proceeding.
Key Point 3: Finishing and Final Adjustments
Once the mantel is securely mounted, the final step involves finishing and making any necessary adjustments to achieve a polished and professional look. This includes concealing screw holes, sanding any rough edges, and applying paint or stain to match the existing trim.
Countersink the screw heads slightly below the surface of the wood. Fill the screw holes with wood filler, using a putty knife to smooth it out flush with the surrounding surface. Allow the wood filler to dry completely, then sand it smooth with fine-grit sandpaper. Remove any sanding dust with a tack cloth.
Apply paint or stain to match the existing trim or to complement the overall décor of the room. Use multiple thin coats, allowing each coat to dry completely before applying the next. This will result in a smoother and more even finish. If staining, apply a wood conditioner first to ensure even absorption of the stain.
Inspect the installed mantel for any final adjustments or touch-ups. Ensure that all screws are securely tightened and that the mantel is perfectly level. Clean the surrounding area and remove any debris from the installation process. Following these steps meticulously will ensure a successful and aesthetically pleasing fireplace mantel installation.

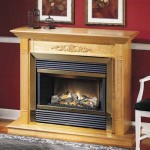
Fireplace Mantel Installation Tips How To Antique Woodworks

Fireplace Mantels Installation Care Redwood Burl Inc

Fireplace Mantels Installation Care Redwood Burl Inc

How To Install A Floating Mantle The Easy Way In Just One Afternoon

Fireplace Mantels Installation Care Redwood Burl Inc

How To Install A Floating Mantle The Easy Way In Just One Afternoon

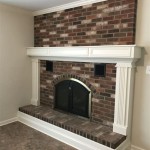
Fireplace Mantel Installation Before And After

How To Install A Floating Mantle The Easy Way In Just One Afternoon

How To Install A Hollow Mantel With Richard L Ourso Ckd Caps

How To Install A Floating Mantle The Easy Way In Just One Afternoon
Related Posts