How To Install Dry Stack Stone On A Fireplace
Dry stack stone offers a visually appealing and texturally rich aesthetic for fireplace facades. Unlike traditional stone veneer installations that rely on mortar, dry stack stone creates a stacked appearance without visible mortar joints. This technique demands precision and careful planning, but the resulting fireplace becomes a striking focal point. This article details the process of installing dry stack stone on a fireplace, covering preparation, installation, and necessary safety precautions.
Planning and Preparation: A Foundation for Success
Prior to commencing any physical work, meticulous planning is essential. This phase involves assessing the existing fireplace structure, selecting appropriate stones, and gathering the necessary tools and materials. A well-executed plan mitigates potential errors and ensures a smooth installation process.
The initial step involves thoroughly inspecting the fireplace structure. The existing surface must be structurally sound and capable of supporting the weight of the stone. If the fireplace is brick or concrete, ensure the surface is clean and free from loose debris, dirt, and grease. A wire brush can effectively remove loose particles. If the existing surface is painted, consider removing the paint to ensure proper adhesion of the adhesive.
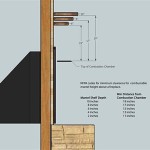
For fireplaces with drywall or other non-masonry surfaces, a cement backer board, such as HardieBacker or Durock, must be installed. This board provides a stable and moisture-resistant substrate for the stone. Cut the backer board to size, ensuring it covers the entire area where the stone will be applied. Secure the backer board to the fireplace structure using appropriate screws designed for cement board. Follow the manufacturer's recommendations for screw spacing and installation.
Next, select the dry stack stone. The choice of stone significantly impacts the final aesthetic. Consider factors such as color, texture, size, and shape. Natural stone offers a unique and varied appearance, while manufactured stone provides consistency and often comes in lighter weights. Ensure that the chosen stone is suitable for fireplace applications and can withstand the heat generated by the fireplace.
Calculate the quantity of stone required by measuring the surface area of the fireplace facade. Add approximately 10% to the calculated amount to account for cuts and waste. It is prudent to purchase stones from the same batch to ensure color consistency throughout the installation. Open all the boxes and shuffle the stones to ensure a random, natural look.
Gather the necessary tools and materials. These include: a level, measuring tape, pencil, diamond blade saw (for cutting stone), safety glasses, gloves, dust mask, notched trowel, thin-set mortar (specifically formulated for stone veneer), cement backer board screws (if needed), cement backer board (if needed), shop towels or sponges, and a mixing bucket for the mortar.
The Installation Process: Building the Stone Facade
With the planning and preparation complete, the installation process can begin. This involves applying the adhesive, carefully placing the stones, and making necessary cuts for a seamless and visually appealing finish. Patience and attention to detail are crucial during this stage.
Before applying the adhesive, dry-lay a few rows of stone to visualize the desired pattern and ensure a balanced appearance. This step allows for adjustments in stone placement and helps to identify any potential challenges. Consider the overall symmetry of the fireplace and the arrangement of different stone sizes and shapes.
Mix the thin-set mortar according to the manufacturer's instructions. The consistency should be similar to that of peanut butter – spreadable but not too runny. Improperly mixed mortar can compromise the adhesion of the stone. Use a mixing drill with a paddle attachment to thoroughly blend the mortar and ensure a consistent texture.
Using a notched trowel, apply a layer of thin-set mortar to the back of the stone. Ensure the mortar is evenly distributed and covers the entire surface. The thickness of the mortar layer will depend on the size and weight of the stone, but generally, a layer of about ¼ inch is sufficient. Avoid applying too much mortar, as it can squeeze out between the stones and create a messy appearance. Instead of back buttering each stone, some installers prefer to apply the thin-set directly to the cement backer board.
Carefully position the stone on the fireplace facade, pressing it firmly into the mortar. Begin at the bottom and work upwards, row by row. Use a level to ensure that each stone is aligned correctly. Maintain a consistent joint width between the stones. While dry stack stone does not utilize mortar joints, a slight gap (approximately 1/8 to ¼ inch) can enhance the visual appeal and provide some flexibility for expansion and contraction.
Continue adding stones, working in a staggered pattern to create a natural and visually interesting appearance. Avoid placing similar stones next to each other. Vary the sizes, shapes, and colors to achieve a random and organic look. This approach mimics the appearance of naturally stacked stones.
As the installation progresses, it will be necessary to cut stones to fit around corners, edges, and other architectural features. Use a diamond blade saw to make precise cuts. Always wear safety glasses and a dust mask when cutting stone to protect your eyes and respiratory system.
For outside corners, miter the stones at a 45-degree angle to create a clean and professional finish. This technique requires precise cutting and careful alignment. For inside corners, the stones can be butted together or overlapped, depending on the desired aesthetic.
Periodically check the installation with a level to ensure that the stones are aligned correctly. Make adjustments as needed to maintain a consistent and even surface. Use shims to support stones that are not fully supported by the mortar. Allow the mortar to dry completely before removing the shims.
After all the stones have been installed, allow the mortar to cure completely according to the manufacturer's instructions. This typically takes 24 to 48 hours. Avoid disturbing the stones during the curing process.
Finishing Touches and Safety Considerations
After the mortar has cured, the final step involves cleaning the stone surface and addressing any remaining details. This ensures a polished and professional finished product. Safety considerations must be observed throughout the entire process.
Once the mortar has fully cured, use a damp sponge or shop towel to remove any excess mortar or dust from the stone surface. Avoid using harsh chemicals or abrasive cleaners, as these can damage the stone. Gently wipe the surface with a clean, damp cloth.
Inspect the installation for any gaps or imperfections. If necessary, fill any small gaps with caulk that matches the color of the stone. Apply the caulk sparingly and smooth it out with your finger or a caulk smoothing tool.
Consider applying a stone sealer to protect the stone from moisture and stains. Stone sealers are available in various finishes, including matte, satin, and gloss. Choose a sealer that is appropriate for the type of stone and the desired aesthetic. Follow the manufacturer's instructions for application.
Throughout the entire installation process, prioritize safety. Wear safety glasses to protect your eyes from flying debris. Wear gloves to protect your hands from mortar and sharp edges. Wear a dust mask to protect your respiratory system from dust and particles. Work in a well-ventilated area to avoid inhaling harmful fumes. Use caution when operating power tools and follow the manufacturer's instructions carefully.
Ensure that the fireplace is not used until the mortar has fully cured and any sealants have dried completely. Consult with a qualified professional if you have any questions or concerns about the installation process.

Stacked Stone Fireplace How To Diy

Tips On How To Build A Stone Fireplace Horizon

How To Update Your Fireplace With Stone Evolution Of Style

How To Build An Outdoor Stacked Stone Fireplace

How To Install A Stacked Stone Fireplace Practical Whimsy Designs

Help Dry Stacked Stone Fireplace Issues

How To Install An Electric Fireplace Morton Stones

Costa Ledge Drystack Ledgestone Blue Grey Ledger Stone

Drystack Fireplace Cut Edge What To Do

How To Install A Stacked Stone Fireplace Top Source Slate
Related Posts