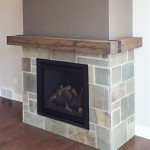
Here is an article on how to install a decorative stone fireplace.
How to Install a Decorative Stone Fireplace
Installing a decorative stone fireplace can significantly enhance the aesthetic appeal and ambiance of a living space. This project, while potentially demanding, can be accomplished by homeowners with a moderate level of DIY experience. Understanding the proper procedures and utilizing appropriate tools and materials are crucial for a successful installation and ensuring a safe and visually pleasing outcome. This article provides a comprehensive guide to the process of installing a decorative stone fireplace, covering essential steps from preparation to finishing touches.
Before embarking on the installation, meticulous planning and preparation are paramount. This involves assessing the structural integrity of the existing wall, obtaining necessary permits, selecting the appropriate stone veneer, and gathering essential tools and materials. Neglecting these preliminary steps can lead to complications and potentially compromise the safety and longevity of the fireplace.
Planning and Preparation: The Foundation for Success
The initial stage involves a thorough evaluation of the wall where the stone veneer will be applied. The existing structure must be capable of supporting the added weight of the stone. If the wall is constructed of drywall, it is often necessary to reinforce it with a layer of cement board. This provides a more stable and durable surface for the stone veneer to adhere to. For wood-framed walls, ensure that the framing is structurally sound and free from rot or damage. Consulting with a structural engineer or experienced contractor is recommended if there is any doubt about the wall's load-bearing capacity.
Building codes vary depending on location, and it is essential to obtain the necessary permits before beginning any construction project, including the installation of a stone fireplace. Contact the local building department to inquire about specific requirements and regulations. Failure to obtain permits can result in fines and delays, and may even require the removal of the installed stone.
Choosing the right stone veneer is a crucial decision that impacts the overall aesthetics of the fireplace. Stone veneer is available in a wide variety of styles, colors, and textures, ranging from natural stone to manufactured stone. Natural stone offers a unique and authentic look but can be more expensive and heavier than manufactured stone. Manufactured stone is often lighter, more affordable, and easier to install, while still providing a realistic stone appearance. Consider the overall design style of the room and select a stone veneer that complements the existing décor. Calculate the square footage of the area to be covered and purchase sufficient stone veneer, adding a 10-15% overage to account for cuts and waste.
A well-equipped workspace is essential for a smooth and efficient installation. Gather the following tools and materials:
- Cement board
- Cement board screws
- Thin-set mortar
- Grout
- Grout bag
- Stone veneer
- Level
- Measuring tape
- Notched trowel
- Wet saw with diamond blade
- Safety glasses
- Gloves
- Dust mask
- Buckets
- Mixing paddle
- Sponge
- Clean water
Installation Process: Applying the Stone Veneer
With the planning and preparation complete, the installation process can begin. This involves preparing the wall surface, applying the thin-set mortar, adhering the stone veneer, and grouting the joints. Each step requires careful attention to detail to ensure a professional-looking and durable result.
Begin by preparing the wall surface. If the existing wall is drywall, install cement board using cement board screws, ensuring that the screws are properly countersunk. Cement board provides a moisture-resistant and durable surface for the thin-set mortar to adhere to. If the existing surface is already cement board or a suitable masonry surface, clean it thoroughly to remove any dust, dirt, or debris that may interfere with the adhesion of the mortar. Use a wire brush and a solution of water and mild detergent to scrub the surface, then rinse it thoroughly with clean water and allow it to dry completely.
Mix the thin-set mortar according to the manufacturer's instructions. Use a mixing paddle attached to a drill to ensure a consistent and lump-free mixture. The consistency of the mortar should be similar to that of peanut butter. Allow the mortar to slake for the recommended time, typically 5-10 minutes, and then remix it briefly before applying it to the wall. Avoid mixing too much mortar at once, as it can dry out before it can be used.
Using a notched trowel, apply a layer of thin-set mortar to the prepared wall surface. The depth of the notches will depend on the size and weight of the stone veneer, but generally, a 1/4-inch notched trowel is suitable for most applications. Apply the mortar in small sections, working from the bottom up. Ensure that the mortar is evenly distributed and that there are no gaps or voids.
Carefully apply the stone veneer to the mortar-covered wall surface. Press each stone firmly into the mortar, ensuring that it is properly aligned and level. Use a level to check that the stones are installed horizontally and vertically. Stagger the joints between the stones to create a more natural and aesthetically pleasing appearance. If necessary, use a wet saw with a diamond blade to cut the stones to fit around corners, edges, or other obstructions. Always wear safety glasses and a dust mask when cutting stone.
Continue applying the stone veneer, working from the bottom up in small sections. Allow the mortar to dry for the recommended time, typically 24-48 hours, before proceeding to the next step. This will ensure that the stones are securely bonded to the wall surface.
Grouting and Finishing Touches: Completing the Fireplace
Once the mortar has dried, the joints between the stones need to be filled with grout. Grouting not only enhances the aesthetic appeal of the fireplace but also provides a weatherproof seal that protects the underlying structure from moisture damage. The final step involves cleaning the stone veneer and applying any desired finishing touches.
Mix the grout according to the manufacturer's instructions. The consistency of the grout should be similar to that of toothpaste. Use a grout bag to apply the grout to the joints between the stones. Fill each joint completely, ensuring that there are no gaps or voids. Allow the grout to set for the recommended time, typically 15-30 minutes.
Using a damp sponge, carefully remove any excess grout from the surface of the stone veneer. Rinse the sponge frequently in clean water to avoid smearing the grout. Be careful not to remove too much grout from the joints, as this can weaken the bond between the stones and the grout. Allow the grout to cure completely, typically 24-48 hours.
Once the grout has cured, clean the stone veneer thoroughly with a mild detergent and water. Use a soft brush to remove any remaining grout residue or dirt. Rinse the stone veneer with clean water and allow it to dry completely. Apply any desired finishing touches, such as sealant or stone enhancer, to protect the stone veneer and enhance its appearance. Consider adding decorative elements, such as a mantel or hearth, to further enhance the aesthetic appeal of the fireplace.
Installing a decorative stone fireplace requires careful planning, preparation, and execution. By following these steps, homeowners can achieve a professional-looking and durable result that will enhance the beauty and value of their home for years to come. Always prioritize safety and consult with professionals when necessary.

How To Build An Outdoor Stacked Stone Fireplace

Fireplace Mantel Installation Casa Di Sassi

Custom Built Fireplace Surround Install A New Mantel Hearth

Fireplace Decorative Stone Cladding

12 Stacked Stone Fireplace Ideas For Optimal Coziness

How To Install Faux Stone Veneer Lowe S

Diy Overgrouted Stone Fireplace Shoe Makes New

Installing A Stone Veneer Fireplace With Evolve

Diy Stacked Stone Fireplace Reveal And How To Thrifty Decor Organizing

Stacked Stone Fireplace Cost Installation Examples Ideas
Related Posts

