How To Install An Electric Fireplace Insert
Electric fireplace inserts provide the ambiance and warmth of a traditional fireplace without the hassle of wood-burning. Installing an electric fireplace insert can be a relatively straightforward DIY project, but it requires careful planning and attention to detail. This article will guide you through the process, providing information on necessary tools, materials, and step-by-step instructions.
1. Planning and Preparation
Before you begin the installation, it's essential to plan and prepare the area. Here's what you need to do:
- Measure the existing fireplace opening. This will determine the size of the insert you need to purchase. Ensure that the insert fits comfortably within the opening, leaving enough space for proper ventilation.
- Determine the electrical requirements. Electric fireplaces require a dedicated electrical outlet. Check the insert's specifications for voltage and amperage, and ensure that your electrical system can handle the load. If necessary, consult with an electrician.
- Gather necessary tools and materials. This may include a level, tape measure, screwdriver, drill, stud finder, safety glasses, gloves, and any other tools specific to your fireplace.
- Prepare the fireplace opening. Remove any existing mantel or decorative elements that might hinder installation. Clean out the fireplace and ensure it's clear of debris.
2. Installing the Electric Fireplace Insert
Once you've prepared the fireplace opening, you can begin installing the insert:
- Position the insert. Carefully lower the insert into the fireplace opening, ensuring it's level and centered. Use shims or spacers if necessary to achieve a snug fit.
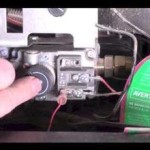
- Connect the electrical wiring. Connect the insert's power cord to the dedicated outlet you have installed. Ensure the wiring is secure and meets all electrical codes.
- Secure the insert. Most fireplace inserts come with mounting brackets. Secure these brackets to the walls or fireplace surround, then attach the insert to the brackets. Make sure the insert is firmly secured in place.
- Install the mantel or decorative elements (optional). If you have a mantel or other decorative elements to reattach, install them after securing the insert.
3. Testing and Finishing
After installing the electric fireplace insert, it's important to test it and finish the installation:
- Test the insert. Turn on the insert and check for proper operation, including heating and visual effects. Ensure the insert is functioning correctly and that all controls are responsive.
- Install any finishing trim or decorative elements. Once you're satisfied with the operation of the insert, you can install any finishing trim, decorative elements, or fire screens to enhance the aesthetic appeal of your fireplace.
- Read and follow the manufacturer's instructions. To ensure safe and proper operation, always refer to the manufacturer's instructions for specific installation and maintenance details.
Installing an electric fireplace insert can be a rewarding project that adds beauty and warmth to your home. However, remember that proper planning, attention to safety, and careful adherence to the installation instructions are crucial for a successful and enjoyable installation.

How To Install An Electric Fireplace Insert

ᑕ❶ᑐ How To Install An Electric Fireplace Insert Magikflame Blog

How To Install A Fireplace Insert In An Unconventional Opening Ask This Old House

Fireplace Insert Installation Wood Inserts Gas Pellet And Electric

How To Install An Electric Fireplace For Your Living Room Mmminimal

How To Install An Electric Fireplace Insert Step By Guide

Recessed Or Wall Mount Electric Fireplace Installations Explained Touchstone Home S Inc

How To Install A Napoleon Built In Electric Fireplace Fireplaces Direct Learning Center

How To Install An Electric Fireplace Quora

How To Install An Electric Fireplace Diy Family Handyman