How to Install a Gas Fireplace Log Set
Installing a gas fireplace log set can transform a dated or inefficient fireplace into a visually appealing and functional heating source. While professional installation is always a recommended option, particularly for those unfamiliar with gas lines or electrical components, a confident homeowner with basic mechanical skills and a thorough understanding of safety protocols can undertake the installation process. This article provides a comprehensive guide to installing a gas fireplace log set, outlining the necessary tools, safety precautions, and step-by-step instructions.
Before proceeding, it is essential to emphasize that working with gas lines can be dangerous. Gas leaks can lead to explosions and carbon monoxide poisoning. If there is any doubt about one’s ability to safely complete this installation, it is imperative to hire a qualified gas technician. The instructions provided herein are for informational purposes only and should not be considered a substitute for professional guidance.
Key Point 1: Preparation and Prerequisite Checks
Prior to initiating the installation process, thorough preparation is crucial. This involves identifying the existing fireplace type, ensuring compatibility with the desired gas log set, and gathering the necessary tools and safety equipment. Skipping these preliminary steps can lead to delays, complications, and potentially hazardous situations.
Fireplace Type Identification: The first step is to determine the type of fireplace currently installed. This involves differentiating between wood-burning fireplaces, gas fireplaces with existing log sets, and fireplaces that have been converted from wood-burning to gas. If the fireplace is currently wood-burning, a more involved conversion process will be necessary, potentially requiring permits and professional assistance to ensure compliance with local building codes. If a pre-existing gas log set is in place, it will need to be carefully removed, disconnecting the gas supply after verifying it is turned off at the source. The dimensions of the firebox must be accurately measured to ensure the new log set will fit properly. A log set that is too large can impede proper ventilation and combustion, leading to safety hazards and inefficient heating.
Compatibility Assessment: Not all gas log sets are compatible with all gas fireplace systems. It is vital to verify that the BTU (British Thermal Unit) rating of the gas log set matches the BTU rating of the gas supply line. The BTU rating indicates the amount of heat the appliance can produce. Installing a log set with a higher BTU rating than the gas supply line can handle will result in insufficient gas pressure and poor performance. Conversely, a log set with a lower BTU rating may not provide adequate heating. The type of gas, whether natural gas or propane, is another critical factor. Gas log sets are designed specifically for either natural gas or propane, and using the wrong type can be extremely dangerous. Ensure that the log set selected is compatible with the type of gas available at the fireplace gas line.
Tools and Materials: The following tools and materials are typically required for installing a gas fireplace log set:
- Pipe wrench
- Adjustable wrench
- Screwdrivers (flathead and Phillips head)
- Level
- Measuring tape
- Flashlight
- Leak detection solution (e.g., soapy water)
- Gas line sealant (appropriate for gas lines)
- Gloves
- Safety glasses
- Drop cloth or protective covering
- Gas log set (including logs, burner, and connectors)
- New gas connector (flexible gas line) – optional, but recommended if the existing connector is old or damaged
- Properly sized gas fittings (if required)
A thorough check of the contents of the gas log set box is crucial to ensure all components are present and undamaged. Refer to the manufacturer's instructions for a complete list of included parts.
Safety Precautions: Safety is paramount when working with gas lines. Before beginning any work, ensure the gas supply to the fireplace is completely shut off. The gas shut-off valve is typically located near the fireplace or at the main gas meter. Use a pipe wrench to turn the valve to the "off" position. Double-check that no gas is flowing by listening for a hissing sound and using a gas detector (if available). Open windows and doors to provide adequate ventilation. Never smoke or use open flames near gas lines.
Key Point 2: Step-by-Step Installation Process
With the preparation complete, the actual installation process can begin. This involves removing the existing components (if any), connecting the gas supply, positioning the burner assembly, and arranging the logs according to the manufacturer's instructions.
Removal of Existing Components: If a gas log set or gas burner is already in place, it must be carefully removed. Begin by disconnecting the gas line using a pipe wrench. Be prepared for a small amount of residual gas to escape when the line is disconnected. Cap off the gas line temporarily to prevent any accidental gas leakage. Remove the existing burner assembly and any associated hardware, taking note of the orientation and connections for reference if needed. Clean the firebox thoroughly to remove any debris, soot, or dust. A clean firebox will ensure proper ventilation and efficient combustion.
Gas Line Connection: Inspect the gas line and connector for any signs of damage, such as cracks, leaks, or corrosion. If the connector is old or damaged, replace it with a new, flexible gas line specifically designed for gas fireplaces. Apply gas line sealant to the threads of the gas line and connector before attaching them. Tighten the connection securely with a pipe wrench and adjustable wrench, ensuring a tight seal. Avoid over-tightening, which can damage the threads. After connecting the gas line, use a leak detection solution (soapy water) to check for leaks. Brush the solution onto the connections and look for bubbles forming. If bubbles appear, tighten the connection further and re-check for leaks. If leaks persist, shut off the gas supply and consult a qualified gas technician.
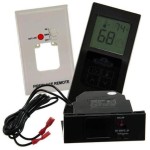
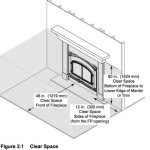
Burner Assembly Installation: Position the burner assembly in the firebox according to the manufacturer's instructions. Ensure that the burner is level and stable. The burner should be positioned in the center of the firebox, with adequate clearance around the sides and back. Connect the gas line to the burner assembly, using gas line sealant and tightening the connection securely. Again, check for leaks using a leak detection solution. Many gas log sets come with a control valve (manual or remote-controlled). Ensure this valve is easily accessible and functions properly. The control valve is used to turn the gas supply on and off and adjust the flame height.
Log Placement: The log placement is crucial for both aesthetics and proper ventilation. Refer to the manufacturer's instructions for the specific log arrangement for the gas log set. Each log is typically numbered or labeled to indicate its correct position. Avoid blocking the burner ports with the logs, as this can lead to incomplete combustion and carbon monoxide production. Ensure that there is adequate airflow around the logs to allow for proper ventilation. The logs should be positioned to create a realistic flame pattern and provide optimal heat distribution. Some logs may have interlocking features or designated grooves to ensure they are securely in place.
Key Point 3: Testing and Troubleshooting
After completing the installation, thorough testing is necessary to ensure the gas log set is functioning safely and efficiently. This involves checking for gas leaks, verifying proper ignition, and observing the flame pattern. Any issues identified during testing should be addressed promptly.
Leak Testing: Before igniting the gas log set, perform a final leak test of all gas connections, including the gas line, connector, and burner assembly. Apply leak detection solution to all connections and carefully inspect for bubbles. If any leaks are detected, immediately shut off the gas supply and tighten the connections. Re-test after tightening. If leaks persist, consult a qualified gas technician.
Ignition Verification: Turn on the gas supply at the shut-off valve. Follow the manufacturer's instructions for lighting the gas log set. This may involve using a manual lighter or triggering an electronic ignition system. Observe the ignition process to ensure that the burner lights quickly and evenly. If the burner fails to ignite, check the gas supply, the ignition system, and the burner ports for any obstructions. Some gas log sets have a pilot light that must be lit first before the main burner can be ignited. Ensure the pilot light is functioning properly.
Flame Pattern Observation: Once the gas log set is burning, observe the flame pattern carefully. The flames should be steady, evenly distributed, and blue or yellow in color. If the flames are flickering, uneven, or orange in color, this may indicate a problem with the gas supply, ventilation, or burner assembly. Adjust the air shutter on the burner assembly to optimize the air-to-gas mixture. This adjustment can usually be made by loosening a screw and rotating a small plate to increase or decrease the amount of air entering the burner. Consult the manufacturer's instructions for specific guidance on adjusting the air shutter. Observe the flames for at least 15-20 minutes to ensure that the system is operating stably.
Troubleshooting Common Issues: While the troubleshooting process is case-specific, here are some of the most frequently encountered issues and possible solutions:
- No Ignition: Check the gas supply, ignition system (spark igniter or pilot light), and burner ports for obstructions.
- Weak Flame: Verify the gas pressure and ensure the gas log set BTU rating matches the gas supply BTU rating.
- Uneven Flame: Adjust the air shutter on the burner assembly to optimize the air-to-gas mixture.
- Soot Buildup: Ensure proper ventilation and check for any obstructions in the firebox or chimney.
- Gas Odor: Immediately shut off the gas supply and check for gas leaks using a leak detection solution.
If the issue cannot be resolved with basic troubleshooting, it is recommended to consult a qualified gas technician. Never attempt to repair a gas appliance without the proper training and expertise.
Following these steps meticulously will enhance the prospect of a successful gas fireplace log set installation. Consistent attention to safety precautions and thorough testing are paramount to ensure the safe and efficient operation of the fireplace.

How To Select And Install A Gas Fireplace Log Set Fireplaces Direct Learning Center

How To Select And Install A Gas Fireplace Log Set Fireplaces Direct Learning Center

How To Put In A Gas Log Set For Fireplace

Installing Vent Free Gas Log Set

How To Put In A Gas Log Set For Fireplace Ron Hazelton

Pleasant Hearth Wildwood 24 In Vent Free Dual Fuel Gas Fireplace Logs Vfl2 Ww24dt The Home Depot

How To Put In A Gas Log Set For Fireplace

Vented Gas Logs Heater Or Decorative Bart Fireside

Peterson Real Fyre White Birch Vented Gas Log Set Woodland Direct

Installing Vent Free Gas Log Set
Related Posts