How To Install A Gas Fireplace Insert In Existing Fireplace
Installing a gas fireplace insert into an existing fireplace can significantly enhance the efficiency and aesthetics of a home heating system. This process involves several important steps, each requiring careful attention to detail to ensure safety and optimal performance. It's crucial to acknowledge local building codes and regulations, and potentially procure necessary permits, before commencing any installation work. In many jurisdictions, the installation of a gas fireplace insert must be performed by a qualified and licensed technician. This article provides a general overview of the installation process but should not be considered a substitute for professional guidance.
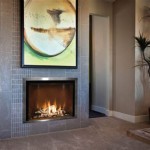
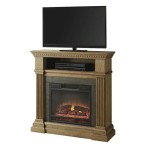
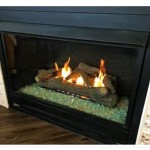
The primary benefit of installing a gas fireplace insert lies in its improved heating efficiency compared to traditional wood-burning fireplaces. Gas inserts provide controlled heat output and offer significant reduction in heat loss up the chimney when not in use. Furthermore, gas inserts often include features such as remote control operation, thermostat settings, and realistic flame displays, contributing to both convenience and ambiance.
Preparation is paramount for a successful installation. This includes selecting an insert that is appropriately sized for the existing fireplace opening and flue. Overly large or small inserts can lead to inefficient heating and potential safety hazards. Careful measurement of the fireplace opening is essential, and the selected insert model should be compatible with the existing chimney system. Reviewing the manufacturer's instructions for the specific insert model is also a crucial step.
Gathering Necessary Tools and Materials
Prior to beginning the installation, assembling the necessary tools and materials is essential for a smooth and efficient process. This includes: a gas pipe wrench, a measuring tape, a level, a drill with appropriate drill bits, safety glasses, work gloves, a screwdriver set, a chimney liner kit approved for gas appliances, refractory cement, a gas leak detector, and any hardware provided with the gas fireplace insert itself. Having these readily available will minimize interruptions and allow for focused work.
Safety equipment is non-negotiable. Wearing safety glasses is critical to protect the eyes from dust and debris. Work gloves provide a secure grip and protect hands from sharp edges. If any demolition work is required, a dust mask is also advisable to prevent inhalation of particulate matter.
The chimney liner kit is a particularly important component. It's designed to vent the combustion gases safely and efficiently to the outside. The liner must be sized appropriately for the gas fireplace insert and meet all relevant safety standards and building codes. Improper chimney venting can lead to carbon monoxide poisoning, making the correct selection and installation of the liner absolutely critical.
Preparing the Existing Fireplace
The existing fireplace must be thoroughly cleaned and inspected before installing the gas insert. Remove any ash, soot, or debris from the firebox and chimney. Inspect the chimney for cracks, damage, or obstructions. If the chimney is in poor condition, it may require repair or relining before the gas insert can be safely installed. A professional chimney sweep can perform a thorough inspection and cleaning, providing valuable recommendations for any necessary repairs.
The damper assembly within the existing fireplace should be either removed or permanently sealed. Leaving the damper open can allow drafts and reduce the efficiency of the gas insert. Sealing the damper can be achieved using refractory cement or other appropriate sealing materials. The exact method will depend on the design of the existing fireplace and the specific requirements of the gas fireplace insert manufacturer.
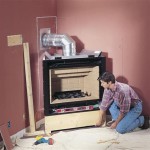
Ensure that the fireplace opening is properly prepared to accommodate the gas insert. This may involve modifying the opening to ensure a snug and secure fit. Pay close attention to the manufacturer's instructions regarding clearances to combustible materials. Maintaining proper clearances is essential to prevent overheating and potential fire hazards. The hearth extension, if required by code, must also be checked to ensure it meets minimum size requirements.
Installing the Gas Fireplace Insert and Venting System
The first step is to carefully position the gas insert within the prepared fireplace opening. Connect the chimney liner to the gas insert flue collar, ensuring a secure and airtight seal. The liner should extend to the top of the chimney and be properly terminated with a suitable cap to prevent rain and debris from entering. Refer to the manufacturer's instructions for specific details on liner installation and termination.
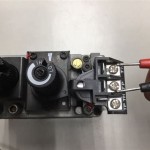
Next, connect the gas supply line to the gas insert. This step must be performed by a qualified and licensed gas technician. Ensure that all gas connections are properly tightened and tested for leaks using a gas leak detector. Any leaks must be addressed immediately before proceeding. Following local code compliance and safety standards is of utmost importance when working with gas lines.
Once the gas connections are secure, connect any electrical components required for the operation of the gas insert, such as the blower fan or electronic ignition system. Ensure that all electrical connections are made in accordance with the manufacturer's instructions and local electrical codes. A dedicated electrical circuit might be necessary depending on the electrical load of the insert.
After all connections are made, perform a thorough test of the gas insert to ensure that it is operating correctly. Check the flame pattern, blower function, and thermostat operation. Monitor the surrounding areas for any signs of overheating or gas leaks. If any issues are detected, consult the manufacturer's instructions or contact a qualified technician for assistance.
Finally, complete any finishing work around the gas insert to create a seamless and aesthetically pleasing appearance. This may involve installing a surround or trim to cover the gap between the insert and the fireplace opening. Pay attention to the placement of the surround, checking to see that it doesn't impede proper air circulation or hinder access to operational controls.

How To Install Gas Fireplace Insert Heat Glo

Convert To Gas Installing Fireplace Inserts Doctor Flue

Existing Fireplace Or A Brand New Build Lopi Fireplaces

How To Select And Install A Gas Fireplace Log Set Fireplaces Direct Learning Center

Existing Fireplace Or A Brand New Build Lopi Fireplaces

Fireplace Insert Installation Step By Forbes Home

How To Install A Fireplace Insert In An Unconventional Opening Ask This Old House

How To Install Gas Fireplace Insert Heat Glo

Fireplace Insert Guide Fireplaces Direct Learning Center

How To Frame A Gas Fireplace Insert In An Existing Masonry Structure Quora
Related Posts