How To Install A Gas Fireplace Insert: A Comprehensive Guide
Installing a gas fireplace insert can transform an existing wood-burning fireplace into an efficient and aesthetically pleasing source of heat. This project involves several steps, requiring a degree of technical skill and adherence to strict safety regulations. This article provides a detailed guide to the installation process, emphasizing critical aspects such as preparation, venting, gas line connection, and safety checks.
Before embarking on this project, it is crucial to understand that working with gas can be hazardous. If there is any doubt about one’s ability to safely and correctly perform any of the steps outlined below, it is strongly recommended to consult with or hire a qualified and licensed professional. Improper installation can lead to gas leaks, carbon monoxide poisoning, fires, and potential property damage.
1. Preparing for Installation
The initial phase involves meticulous planning and preparation, ensuring a smooth and safe installation process. This includes obtaining necessary permits, choosing the appropriate insert, and preparing the existing fireplace.
Permits and Inspections: Before commencing any work, it is essential to contact the local building department and obtain the necessary permits. Gas fireplace insert installations typically require permits to ensure compliance with building codes and safety regulations. The permit process often involves submitting plans and specifications for review and scheduling inspections at various stages of the installation. Failure to obtain the required permits can result in fines, delays, and potential safety hazards.
Selecting the Right Insert: Choosing the correct gas fireplace insert is paramount for both functionality and safety. Factors to consider include the size of the fireplace opening, the heating requirements of the room, the type of venting required (direct vent, B-vent, or vent-free), and personal aesthetic preferences. Measure the existing fireplace opening precisely to ensure the insert will fit properly. Consult with a qualified dealer or technician to determine the appropriate BTU (British Thermal Units) rating for the space. Understanding the different venting options is also crucial. Direct vent inserts draw combustion air from outside the home and exhaust directly outside, making them the safest and most efficient option. B-vent inserts use existing chimneys and require a liner to ensure proper venting. Vent-free inserts, while sometimes permitted, are generally not recommended due to potential indoor air quality concerns.
Preparing the Existing Fireplace: The existing fireplace must be thoroughly cleaned and prepared before the insert can be installed. This involves removing all ash, soot, and debris from the firebox and chimney. Inspect the chimney for any cracks, damage, or obstructions. If necessary, have the chimney professionally cleaned and inspected by a certified chimney sweep. Depending on the type of insert being installed, it may be necessary to install a chimney liner. A chimney liner helps to ensure proper venting and prevents the escape of harmful gases into the home. The firebox may also need to be modified to accommodate the insert, such as removing or altering the firebrick. This may involve chiseling or cutting the firebrick, so appropriate safety gear, including eye protection and gloves, should be worn.
Gather Tools and Materials: Assemble all necessary tools and materials before starting the installation. This will prevent delays and ensure a more efficient process. Essential tools include a measuring tape, level, drill, screwdriver set, pipe wrench, gas leak detector, and safety glasses. Materials needed will include the gas fireplace insert, venting components (liner, connectors, and termination cap), gas piping, fittings, shut-off valve, Teflon tape or pipe dope, and any necessary fasteners.
2. Installing the Venting System
Proper venting is critical for the safe and efficient operation of a gas fireplace insert. The venting system removes combustion byproducts from the home and ensures an adequate supply of fresh air for combustion.
Chimney Liner Installation (if applicable): For B-vent inserts, installing a chimney liner is often necessary to ensure proper venting. The liner should be made of stainless steel and sized appropriately for the insert. Begin by carefully lowering the liner down the chimney, ensuring it is centered and does not snag on any obstructions. Connect the liner to the insert using appropriate adapters and connectors. Secure the liner at the top of the chimney using a termination cap that is designed for gas appliance venting. The termination cap prevents rain, snow, and debris from entering the chimney while allowing exhaust gases to escape.
Direct Vent Installation: Direct vent inserts require a different venting approach. These inserts typically use a coaxial venting system, which consists of two pipes nested within each other. One pipe draws combustion air from outside the home, while the other exhausts combustion gases. The venting system is typically installed through the wall behind the fireplace or through the roof. Follow the manufacturer's instructions carefully when installing the venting system. Ensure that all connections are secure and properly sealed to prevent leaks. The termination point of the vent must be located in accordance with local building codes, ensuring adequate clearance from windows, doors, and other structures.
Venting Connections: Regardless of the venting type, all connections must be secure and gas-tight. Use appropriate sealants, such as high-temperature silicone or Teflon tape, on all threaded connections. Double-check all connections after installation to ensure there are no leaks. It's crucial to follow the specific venting configuration outlined in the manufacturer's instructions for the chosen insert. Deviation from these instructions can compromise safety and performance.
3. Connecting the Gas Line
Connecting the gas line is arguably the most critical step in the installation process. This task requires extreme caution and adherence to strict safety protocols.
Shutting Off the Gas Supply: Before commencing any work on the gas line, shut off the main gas supply to the house. This is typically done at the gas meter. Use a wrench to turn the shut-off valve to the "off" position. Ensure that all pilot lights on other gas appliances are extinguished to prevent a buildup of gas. Verify that the gas supply is indeed shut off by briefly attempting to light a gas appliance after turning off the main valve.
Running the Gas Line: The gas line must be sized appropriately for the BTU rating of the insert. Consult with a qualified plumber or gas technician to determine the correct pipe size. Use black iron pipe or CSST (Corrugated Stainless Steel Tubing) for the gas line. Run the gas line from the nearest gas supply point to the fireplace opening. Secure the gas line to the wall or floor using appropriate supports. Avoid running the gas line through walls or floors if possible. If this is unavoidable, protect the gas line with a sleeve or conduit. All connections must be made using pipe dope or Teflon tape to ensure a gas-tight seal. The gas line must be tested for leaks after installation.
Installing a Shut-Off Valve: Install a shut-off valve near the fireplace insert. This valve will allow the gas supply to be shut off in case of an emergency or for maintenance purposes. The shut-off valve should be easily accessible. Connect the gas line to the shut-off valve using appropriate fittings. Ensure that all connections are tight and leak-free.
Connecting the Insert to the Gas Line: Connect the gas line from the shut-off valve to the gas inlet on the fireplace insert. Use a flexible gas connector if necessary to facilitate easy connection. Ensure that the gas connector is sized appropriately for the insert. Tighten all connections securely. Double-check all connections to ensure there are no leaks.
4. Completing the Installation and Safety Checks
After the venting and gas line are connected, the final steps involve securing the insert, performing safety checks, and testing the functionality of the unit.
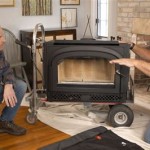
Securing the Insert: Carefully slide the gas fireplace insert into the prepared fireplace opening. Ensure that the insert is level and properly aligned. Secure the insert to the fireplace using the manufacturer's recommended fasteners. This may involve screws, bolts, or other types of hardware. Ensure that the insert is securely fastened and cannot be easily moved.
Leak Testing: With the gas line connected, it is imperative to perform a thorough leak test. Apply a non-corrosive leak detection solution (soap and water mixture) to all gas line connections, including the shut-off valve, fittings, and the connection to the insert. Look for bubbles forming, which indicate a gas leak. If a leak is detected, immediately shut off the gas supply and tighten the leaking connection. Reapply the leak detection solution and check again. Repeat this process until all leaks are eliminated. Never use a flame to check for gas leaks, as this can result in a fire or explosion.
Carbon Monoxide Detector: Install a carbon monoxide detector in the vicinity of the gas fireplace insert. Carbon monoxide is a colorless, odorless, and deadly gas that can be produced by incomplete combustion. A carbon monoxide detector will alert occupants to the presence of this gas, allowing them to take corrective action. Test the carbon monoxide detector regularly to ensure it is functioning properly.
Testing the Insert: After completing all safety checks, turn on the gas supply and test the fireplace insert. Follow the manufacturer's instructions for lighting the pilot light and operating the unit. Observe the flame pattern to ensure it is burning correctly. Listen for any unusual noises or smells. Monitor the insert for any signs of malfunction. If any problems are detected, immediately shut off the gas supply and consult with a qualified technician.
Final Inspection: Have the completed installation inspected by a qualified inspector or technician. This will help to ensure that the installation meets all applicable codes and regulations. The inspector will check the venting system, gas line connections, and the overall functionality of the insert. Addressing any issues identified during the inspection is crucial for ensuring the long-term safety and reliability of the gas fireplace insert.

How To Install A Fireplace Insert Diy Save Money

How To Install Gas Fireplace Insert Heat Glo

How To Install Gas Fireplace Insert Heat Glo

How To Select And Install A Gas Fireplace Log Set Fireplaces Direct Learning Center

Convert To Gas Installing Fireplace Inserts Doctor Flue

Fireplace Insert Installation Wood Inserts Gas Pellet And Electric

Best Fireplace Insert Repair Installs Ton Service

Lodi Wi Installing Fireplace Insert Remodel

Custom Installation Of Fireplace Inserts Insert Installations Sierra Hearth And Home

What Is A Gas Insert Comfort By Design
Related Posts