How To Install A Floating Mantel On A Stone Fireplace Surround
Installing a floating mantel on a stone fireplace surround is a popular way to enhance the aesthetic appeal of a living space. The clean lines of a floating mantel provide a contemporary contrast to the rustic texture of stone, creating a focal point that is both visually striking and functional. This project, while achievable for a moderately skilled DIY enthusiast, requires careful planning, precise measurements, and the appropriate tools and materials to ensure a secure and aesthetically pleasing installation. This article will detail the process, outlining the necessary steps to successfully mount a floating mantel onto a stone fireplace surround.
Before beginning any installation, it is crucial to understand the structural integrity of the stone surround. Different types of stone, such as natural stone, manufactured stone veneer, or brick, will have varying load-bearing capacities and require specific anchoring methods. Identifying the type of stone and its underlying support structure is the first critical step. Consult with a professional if there is any doubt about the stone's ability to support the weight of the mantel and its contents.
Safety is paramount throughout the entire process. Wear appropriate safety gear, including safety glasses to protect the eyes from dust and debris, and a dust mask or respirator to prevent inhalation of stone particles. Ear protection is also recommended when using power tools. Furthermore, ensure the work area is well-ventilated and properly lit.
Planning and Preparation
The initial phase involves meticulous planning and preparation. This includes selecting the mantel, determining its placement, and gathering the necessary tools and materials. A well-thought-out plan will minimize errors and ensure a smoother installation process.
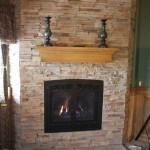
Selecting the Mantel: The choice of mantel material, size, and style will significantly impact the overall aesthetic. Consider the dimensions of the fireplace surround and the desired proportions. Common mantel materials include solid wood, engineered wood, and reclaimed wood. Solid wood mantels offer a natural aesthetic but may be heavier and more susceptible to warping and cracking. Engineered wood provides a more consistent and stable option, while reclaimed wood adds character and rustic charm. The mantel's depth should be proportional to the height and width of the fireplace, typically extending a few inches beyond the firebox on each side. The thickness will influence its visual weight and load-bearing capacity. Ensure the mantel's style complements the existing décor of the room.
Determining the Mantel Placement: The height of the mantel is a crucial consideration, typically ranging from 48 to 54 inches above the firebox opening. This height provides adequate clearance for heat dissipation and prevents damage to the mantel. Local building codes may specify minimum clearance requirements, so it is essential to verify these before proceeding. Use a measuring tape and level to accurately mark the desired location of the mantel on the stone surround. Consider the visual balance and symmetry of the fireplace when determining the placement. If the fireplace is not centered in the room, adjust the mantel height accordingly to create a more harmonious appearance.
Gathering Tools and Materials: A comprehensive list of tools and materials is essential for a successful installation. This includes:
- Mantel
- Heavy-duty floating mantel brackets or steel rods
- Drill with appropriate drill bits (masonry drill bit for stone)
- Level
- Measuring tape
- Pencil or marker
- Stud finder (if applicable, to locate wall studs behind the stone)
- Construction adhesive (suitable for stone)
- Epoxy or stone filler (for filling gaps around brackets)
- Safety glasses
- Dust mask or respirator
- Ear protection
- Hammer (if necessary)
- Shims (for leveling)
- Caulk (optional, for sealing gaps)
Double-check the tool list and ensure everything is readily available before commencing the installation process. Having all the necessary equipment on hand will prevent delays and frustration.
Installation Process
The installation process involves several key steps, including drilling pilot holes, installing the mounting brackets, securing the mantel, and finishing the installation. Precision and attention to detail are critical throughout each step.
Drilling Pilot Holes: Once the mantel's location is marked, use a masonry drill bit to drill pilot holes into the stone surround. The size of the drill bit should correspond to the diameter of the mounting hardware being used. Carefully measure and mark the locations of the pilot holes, ensuring they align with the mounting brackets or steel rods. Use a level to verify that the holes are aligned horizontally. When drilling, apply consistent pressure and allow the drill to do the work. Avoid forcing the drill, as this can damage the stone or the drill bit. If encountering particularly hard stone, consider starting with a smaller drill bit and gradually increasing the size. Ensure the holes are deep enough to fully accommodate the mounting hardware. The depth should be at least as long as the length of the anchoring part of the bracket/rod plus some extra room for the adhesive.
Installing the Mounting Brackets: Next, install the heavy-duty floating mantel brackets or steel rods into the pilot holes. Apply construction adhesive suitable for stone to the brackets or rods before inserting them into the holes. This adhesive will provide additional bonding strength and prevent the brackets from loosening over time. Carefully align the brackets with the marked locations and gently tap them into place using a hammer, if necessary. Ensure the brackets are level and securely anchored in the stone. Allow the adhesive to cure completely according to the manufacturer's instructions before proceeding.
Securing the Mantel: Carefully slide the mantel onto the mounting brackets or steel rods. Ensure the mantel is properly aligned and flush against the stone surround. If the mantel does not fit snugly, use shims to fill any gaps and ensure a level surface. Apply construction adhesive to the inside of the mantel where it contacts the brackets to further secure it in place. If necessary, use screws or nails to temporarily hold the mantel in place while the adhesive cures. Conceal the screws or nails later with wood filler.
Finishing Touches and Considerations
The final steps involve concealing any gaps, addressing aesthetic imperfections, and ensuring the mantel is structurally sound. Attention to detail in these final stages will contribute to a polished and professional-looking installation.
Filling Gaps and Imperfections: After the mantel is securely in place, inspect for any gaps between the mantel and the stone surround. Use epoxy or stone filler that matches the color of the stone to fill these gaps. Smooth the filler with a putty knife or finger to create a seamless transition. Allow the filler to dry completely according to the manufacturer's instructions. If necessary, sand the filler lightly to achieve a smooth finish.
Caulking (Optional): Applying a bead of caulk along the top edge of the mantel where it meets the stone surround can help to seal any remaining gaps and prevent moisture from entering. Choose a caulk that matches the color of the stone or the mantel. Apply the caulk evenly and smoothly, using a wet finger or caulk smoothing tool to create a clean and professional-looking finish.
Weight Distribution and Load Capacity: It is important to understand the weight limitations of the installed mantel. Avoid placing excessively heavy items on the mantel that could potentially compromise its structural integrity. If you plan to display heavy objects, consider reinforcing the mantel with additional brackets or supports. Distribute the weight evenly across the mantel to prevent stress on any one particular area.
Regular Inspection: Periodically inspect the mantel to ensure it remains securely attached to the stone surround. Check for any signs of loosening, cracking, or shifting. If any issues are detected, address them promptly to prevent further damage or potential safety hazards. Tighten any loose screws or bolts and reapply adhesive if necessary.
Professional Consultation: If you are unsure about any aspect of the installation process, or if you encounter any unexpected challenges, consult with a qualified professional. A professional can assess the situation and provide expert advice or assistance. It is always better to seek professional help than to risk damaging the stone surround or compromising the safety of the installation.
Fire Safety: Ensure the mantel installation adheres to all local fire safety regulations. Maintain adequate clearance between the mantel and the firebox opening to prevent overheating. Never place flammable materials directly on the mantel. Install a smoke detector in the vicinity of the fireplace to provide early warning in the event of a fire.
By following these detailed steps and taking necessary precautions, one can successfully install a floating mantel on a stone fireplace surround, enhancing both the aesthetic appeal and functionality of the living space. Remember that careful planning, precise execution, and attention to detail are essential for a secure and visually pleasing installation.

Installing And Making A Floating Mantle For Our Stone Fireplace

How To Build And Hang A Mantel On Stone Fireplace Shanty 2 Chic

How To Build And Hang A Mantel On Stone Fireplace Shanty 2 Chic

Floating Fireplace Mantel Installation On A Rock Wall

How To Install A Fireplace Mantel Floating Shelf

How To Hang A Wood Mantel On Stone Fireplace Using Rebar Before After

How To Install A Floating Mantle The Easy Way In Just One Afternoon

Installing And Making A Floating Mantle For Our Stone Fireplace

Installing A Wood Mantel On Stone Wall Remodelaholic

Wood How To Build A Mantel On Rough Stone Fireplace Home Improvement Stack Exchange