How To Install A Flat Screen TV On A Brick Fireplace
Mounting a flat screen television above a brick fireplace can significantly enhance the aesthetics of a living space, creating a focal point for entertainment. However, this project presents unique challenges compared to mounting on drywall or other standard wall surfaces. Brick is a hard and brittle material requiring specialized tools and techniques to ensure a secure and stable installation. This article provides a comprehensive guide on how to safely and effectively install a flat screen TV on a brick fireplace, covering everything from preparation to final mounting.
Before commencing the installation, thorough planning is crucial. The type of brick, the weight of the TV, and the availability of power outlets and cable connections must be assessed. Failure to adequately plan can lead to structural damage, unstable mounting, or the need for costly rework. This guide will navigate the necessary steps to achieve a professional and reliable installation.
Assessing the Fireplace and TV
The initial step involves a careful assessment of both the brick fireplace and the flat screen television. This assessment determines the appropriate mounting hardware, tools, and overall feasibility of the project. Key factors to consider include the type of brick, the condition of the mortar, the TV's weight and size, and the desired viewing height.
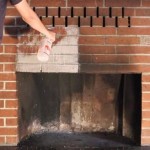
Brick fireplaces are typically constructed from either solid bricks or brick veneers. Solid brick fireplaces offer a more robust mounting surface, while brick veneers are thinner and attached to a supporting wall. Identifying the type of brick is essential for selecting the correct anchors and drilling techniques. Inspect the mortar joints for any signs of deterioration, such as crumbling or cracking. Weak mortar can compromise the stability of the mounting and should be addressed before proceeding. Re-pointing, the process of replacing damaged mortar, may be necessary to ensure a solid foundation for the TV mount.
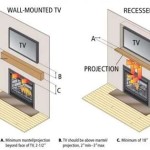
Determine the appropriate size and weight of the TV that the fireplace can reasonably support. Overloading the brick with an excessively heavy TV can lead to structural failure. Consult the TV's specifications for its exact weight, and choose a mounting bracket that is rated to handle that weight with a significant safety margin. Ensure the mount is specifically designed for brick or masonry applications. The size of the TV will also influence the viewing distance and height. Consider the dimensions of the fireplace and the desired viewing angle from the seating area to determine the optimal placement.
Evaluate the location of existing power outlets and cable connections. Running these connections behind the wall can create a cleaner, more aesthetically pleasing installation. If outlets are not readily available behind the desired TV location, consider hiring a qualified electrician to install new ones. Concealing cables within the wall also requires careful planning and adherence to local electrical codes.
Gathering Necessary Tools and Materials
A successful installation depends on having the correct tools and materials. Using the wrong tools can damage the brick or result in an unstable mounting. The following is a comprehensive list of essential items:
- Rotary Hammer Drill: A rotary hammer drill is specifically designed for drilling into hard materials like brick and concrete. A standard drill will likely be ineffective and can damage the brick.
- Masonry Drill Bits: High-quality carbide-tipped masonry drill bits are essential for creating clean and accurate holes in the brick. Ensure the bits are the correct size for the chosen anchors. Having a range of sizes is beneficial if adjustments are needed.
- Mounting Bracket: Select a TV mount that is specifically designed for brick or masonry applications. These mounts typically feature a larger mounting plate and heavier-duty hardware to distribute the weight effectively. Consider the desired viewing angle and choose between a fixed, tilting, or full-motion mount accordingly.
- Masonry Anchors: Masonry anchors are crucial for securing the mounting bracket to the brick. Choose anchors that are appropriately sized and rated for the weight of the TV and the type of brick. Wedge anchors, sleeve anchors, or concrete screws are common choices, but it is imperative to consult the anchor manufacturer's specifications for load-bearing capabilities.
- Level: A high-quality level is essential for ensuring the TV is mounted straight and even. A bubble level or a laser level can be used.
- Stud Finder (Optional): If the fireplace is a brick veneer over a framed wall, a stud finder can help locate the studs behind the brick. While the primary anchoring will be in the brick, understanding the framing can aid in cable management.
- Measuring Tape: Accurate measurements are crucial for determining the correct mounting height and ensuring the bracket is centered.
- Pencil or Marking Pen: Use a pencil or marking pen to mark the locations of the mounting holes on the brick.
- Safety Glasses and Dust Mask: Drilling into brick creates dust and debris that can be harmful to the eyes and lungs. Always wear safety glasses and a dust mask to protect yourself.
- Hammer: A hammer may be needed to tap the anchors into place.
- Socket Wrench or Adjustable Wrench: Use a socket wrench or adjustable wrench to tighten the anchor bolts.
- Wire Strippers and Electrical Tape (If Installing New Outlets): If installing new outlets or modifying existing wiring, use wire strippers and electrical tape to safely connect the wires.
- Cable Management Solutions: Cable ties, cable sleeves, or wire channels can help organize and conceal the cables for a cleaner appearance.
Performing The Installation
With the fireplace assessed and the necessary tools and materials gathered, the installation process can begin. This section outlines the step-by-step instructions for mounting the flat screen TV securely and safely.
Step 1: Mark the Mounting Location: Use a measuring tape and level to determine the desired mounting height and center point of the TV. Mark the location of the top mounting holes on the brick, ensuring they are level and properly spaced. Use the mounting bracket as a template to mark the remaining hole locations.
Step 2: Drill Pilot Holes: Using the rotary hammer drill and the appropriate size masonry drill bit, carefully drill pilot holes at the marked locations. Apply consistent pressure and maintain a steady hand to avoid damaging the brick or bit. Drill to the depth recommended by the anchor manufacturer. The drill should be set to hammer mode, providing the necessary impact to penetrate the brick effectively. Clear debris from the hole as drilling to prevent clogging and get the appropriate depth.
Step 3: Insert Masonry Anchors: Insert the masonry anchors into the drilled holes. Depending on the type of anchor, you may need to tap them into place with a hammer. Ensure the anchors are flush with the surface of the brick and securely seated. Avoid over-hammering the anchors, as this can damage them or the surrounding brick. Before proceeding, double-check the position of the mounting bracket with a level to ensure its aligned properly.
Step 4: Attach the Mounting Bracket: Align the mounting bracket with the anchors and secure it to the brick using the appropriate bolts or screws. Tighten the bolts securely with a socket wrench or adjustable wrench, but avoid over-tightening, as this can strip the threads or damage the brick. Check the bracket is firmly attached and does not wobble. Adjust the bracket, if necessary, to ensure it's level.
Step 5: Mount the TV to the Bracket: Attach the TV to the mounting bracket according to the manufacturer's instructions. This typically involves attaching mounting arms to the back of the TV and then hooking them onto the bracket. Ensure the TV is securely fastened to the bracket and cannot be easily dislodged. Double-check all connections and screws for tightness and ensure the TV is level.
Step 6: Connect Cables and Manage Wiring: Connect all necessary cables to the TV, such as power, HDMI, and coaxial cables. Use cable ties, cable sleeves, or wire channels to organize and conceal the cables for a cleaner appearance. Run the cables behind the wall if possible, or use paintable wire channels to blend them with the wall. Ensure the cables are neatly organized and out of sight. Avoid creating unnecessary loops or kinks in the cables.
Step 7: Test the Installation: Turn on the TV and test all functions to ensure everything is working properly. Check the picture quality, sound, and all input sources. Make any necessary adjustments to the TV settings for optimal viewing. Once you're satisfied with the installation, stand back and admire your work.
By following these steps meticulously, you can safely and effectively install a flat screen TV on a brick fireplace, enhancing your viewing experience and creating a stylish focal point in your living space. Remember always to prioritize safety and consult with professionals when in doubt.

How To Mount A Tv Over Brick Fireplace And Hide The Wires Designing Vibes Interior Design Diy Lifestyle

How To Mount A Tv On Brick Fireplace 7 Straightforward Steps

Can I Mount My Tv Above The Fireplace

Can I Mount My Tv Above The Fireplace

Tv Mounting Over A Brick Fireplace With Wires Concealed In Wire Molding S

Flat Screen Tv Mounting Over Brick Fireplace South Hampton Ny

How To Hang A Flat Panel Tv On Brick Fireplace

Your Tv Doesn T Belong Over The Fireplace Cnet

How To Mount A Tv On Brick Fireplace 7 Straightforward Steps

Tv Mounted On A Brick Fireplace In Lexington Cky Platinum Audio Visual
Related Posts