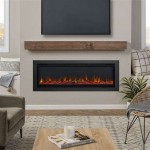
How to Install a Fireplace Mantel Kit
A fireplace mantel kit can significantly enhance the aesthetic appeal of your fireplace, adding a touch of elegance and sophistication. Installing a fireplace mantel kit is generally a straightforward process, even for novice DIY enthusiasts. This article provides a comprehensive guide on how to install a fireplace mantel kit, ensuring a successful and visually pleasing outcome.
1. Planning and Preparation
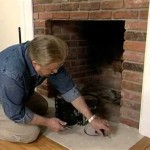
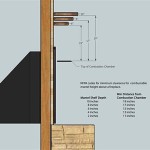
Before embarking on the installation, it's crucial to carefully plan and prepare the workspace. Begin by determining the desired location for the mantel and ensuring it aligns with the fireplace opening. Consider the dimensions of both the mantel and the fireplace opening, including the width, height, and depth. Measure twice and cut once, ensuring accurate measurements to avoid any misalignments or fitting issues.
Next, gather the necessary tools and materials. These typically include a stud finder, tape measure, level, pencil, drill, hammer, screws, saw, wood glue, and safety glasses. Additionally, ensure that the fireplace area is clear of any obstacles and that adequate lighting is available for optimal visibility during the installation process.
2. Assembling the Mantel Kit
Most fireplace mantel kits come pre-cut and pre-drilled, simplifying the assembly process. Carefully follow the provided instructions, ensuring to align the pieces accurately and securely fasten them together using the included hardware. Pay close attention to the order of assembly, as each component typically has a specific position.
When assembling the mantel kit, consider the intended purpose. If you plan to hang heavy objects on the mantel, use additional supports or reinforcement to ensure stability. Additionally, apply wood glue to the joints for added strength and durability. Allow the glue to dry completely before proceeding to the next step.
3. Installing the Mantel
Once the mantel kit is assembled, it's time to install it above the fireplace opening. Start by locating the studs in the wall using a stud finder. Mark the stud locations with a pencil, ensuring they align correctly with the mantel's mounting points. Use the provided screws or nails to attach the mantel to the studs for secure and robust support.
Prior to attaching the mantel, ensure that it is level. Use a level to check and adjust the position accordingly. If the mantel doesn't sit flush with the wall, use shims to create a level surface. Once the mantel is securely attached to the studs, double-check that it is level and stable before proceeding to the final step.
4. Finishing Touches
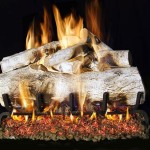
After completing the installation, there are a few finishing touches to enhance the overall appearance of the mantel. Consider installing any additional accessories, such as a mirror, decorative brackets, or a shelf. These accessories can complement the style of the mantel and enhance the fireplace's visual appeal.
If desired, paint or stain the mantel to match the existing décor. Ensure to use appropriate paint or stain for wood surfaces and follow the manufacturer's instructions for application and drying times. Once the paint or stain has dried, you can add decorative elements, such as candles, flowers, or artwork, to personalize the mantel and create a welcoming ambiance.

How To Install A Fireplace Mantel 14 Steps With S

How To Install A Surround Facing Kit In Fireplace Mantels Home Remodel

How To Install A Fireplace Mantel Woodworking Plans Available

The Best Easy To Install Fireplace Mantel Kits For Your Home Trubuild Construction

How To Install A Fireplace Mantel Howstuffworks

The Best Easy To Install Fireplace Mantel Kits For Your Home Trubuild Construction

The Best Easy To Install Fireplace Mantel Kits For Your Home Trubuild Construction

Faux Fireplace Mantel Surround

Fireplace Mantel Installation Kit Brick Custom Made Mantelsiguana Art Design

Diy Fireplace Mantel And Surround Jenna Kate At Home
Related Posts