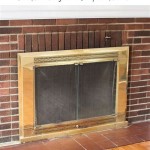
How To Install A Fireplace Mantel and Surround
Installing a fireplace mantel and surround can significantly enhance the aesthetic appeal of a living space. This project, while manageable for experienced DIY enthusiasts, requires careful planning, precise measurements, and adherence to safety guidelines. This article provides a comprehensive guide to the installation process, ensuring a professional-looking result.
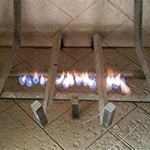
Before commencing any work, it is crucial to understand the existing fireplace structure and any applicable local building codes. Fireplace surrounds and mantels are available in a variety of materials, including wood, stone, and composite materials. The chosen material will influence the installation techniques and required tools. Furthermore, the type of fireplace (wood-burning, gas, or electric) will dictate specific clearance requirements and safety precautions.
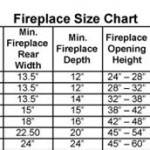
Proper planning is the foundation of a successful installation. This includes selecting the appropriate mantel and surround based on the fireplace's dimensions and style preferences. Considerations should be given to the overall room decor and the desired focal point. Once the mantel and surround are selected, a thorough inspection of the components is essential to identify any damages or imperfections.
Key Point 1: Preparatory Steps and Necessary Tools
Prior to the actual installation, several preparatory steps are necessary. These steps ensure a smooth and efficient process and contribute to a professional finish. The first step involves gathering all the necessary tools and materials. Essential tools include a measuring tape, level, stud finder, drill, screwdriver, hammer, safety glasses, and appropriate fasteners (screws, nails, or construction adhesive). Depending on the surround material, a saw (circular saw, miter saw, or tile saw) may also be required.
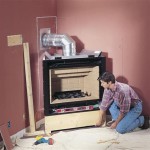
Clear the area around the fireplace to provide ample workspace. Protect the floor with drop cloths or protective sheeting to prevent damage from falling debris or spills. If the existing fireplace surround is being replaced, carefully remove it, taking care not to damage the underlying wall structure. This may involve loosening screws, prying off trim, or cutting through adhesive caulk. Disposing of the old surround responsibly is also necessary.
Locating wall studs is crucial for securely attaching the mantel and surround. Use a stud finder to identify the positions of the vertical framing members behind the wall surface. Mark the stud locations clearly with a pencil. If the wall is masonry (brick or concrete), specialized anchors and drilling techniques will be required. Consult with a professional if unsure about the proper anchoring methods for masonry walls.
Once the studs are located, measure the distance from the floor to the desired height of the mantel. Use a level to draw a horizontal line on the wall at this height. This line will serve as a visual guide for positioning the mantel and ensuring it is perfectly level. Accurate measurements are paramount to achieve a balanced and aesthetically pleasing result.
Dry-fitting the mantel and surround components is a crucial step before permanently affixing them to the wall. This allows for fine-tuning the positioning and identifying any unforeseen issues. Ensure that all pieces fit snugly and that there are no gaps or misalignments. Make any necessary adjustments before proceeding to the next stage of the installation.
Key Point 2: Mantel Installation
The installation of the mantel typically involves attaching it to the wall studs using screws or construction adhesive. The specific method will depend on the mantel's design and weight. For heavier mantels, it is recommended to use both screws and construction adhesive for enhanced stability. The screws should be long enough to penetrate the wall studs deeply, ensuring a secure hold.
Apply construction adhesive to the back of the mantel, focusing on areas that will make contact with the wall. Position the mantel carefully along the marked horizontal line, ensuring it is level. Press the mantel firmly against the wall to allow the adhesive to bond. Secure the mantel further by driving screws through the mantel's mounting brackets or directly through the mantel itself into the wall studs. Countersink the screw heads slightly to allow for a smooth finish.
If the mantel design includes decorative corbels or other embellishments, install them according to the manufacturer's instructions. These elements often require a combination of screws and adhesive for secure attachment. Ensure that the corbels are level and evenly spaced for a symmetrical appearance.
After the mantel is securely attached, check for any gaps between the mantel and the wall. Fill any gaps with paintable caulk. Smooth the caulk with a wet finger or a caulking tool to create a seamless transition. Allow the caulk to dry completely before painting or finishing the mantel.
Consider adding a support system for heavier mantels. This could involve installing additional brackets or shims behind the mantel to distribute the weight more evenly. Consult with a professional if unsure about the best support method for a particular mantel design.
Key Point 3: Surround Installation
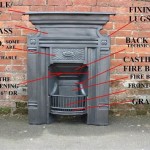
The surround installation involves affixing the surround panels to the wall around the fireplace opening. The installation process varies depending on the surround material (wood, stone, tile) and the underlying wall surface. For wooden surrounds, screws and construction adhesive are typically used. For stone or tile surrounds, mortar or thin-set adhesive is required.
Begin by applying construction adhesive to the back of the surround panels. Position the panels carefully around the fireplace opening, ensuring they are aligned properly and flush with the wall. Use shims if necessary to maintain consistent spacing and prevent gaps. Secure the panels further by driving screws through the panels into the wall studs. Ensure that the screw heads are countersunk and hidden beneath a wood filler.
If installing a stone or tile surround, apply mortar or thin-set adhesive to the back of the tiles using a notched trowel. Press the tiles firmly against the wall, ensuring they are level and evenly spaced. Use tile spacers to maintain consistent grout lines. Allow the mortar or thin-set to dry completely before grouting.
Grouting is a crucial step in completing a tile or stone surround. Apply grout to the grout lines using a grout float, pressing it firmly into the joints. Remove excess grout with a damp sponge, taking care not to remove grout from the joints. Allow the grout to dry completely before sealing. Sealing the grout will protect it from stains and moisture damage.
Inspect the completed surround for any imperfections or gaps. Fill any gaps with caulk or grout, depending on the material. Clean the surround thoroughly to remove any dust or debris. Apply a sealant to protect the surround and enhance its appearance. Follow the manufacturer's instructions for the appropriate sealant for the chosen material.
Aesthetics are important aspects of the installation. Once the mantel and surround are fully installed, it is important to ensure all screws are countersunk and covered with wood filler or matching caulk to achieve a smooth, professional finish. The entire installation can then be painted or stained to match the existing decor.
Proper maintenance of the fireplace mantel and surround is crucial to ensuring its longevity and preserving its appearance. Regularly dust the mantel and surround to prevent the buildup of grime. For wood mantels and surrounds, apply a wood polish or cleaner to protect the wood and enhance its natural beauty. For stone or tile surrounds, clean with a mild detergent and water. Avoid using harsh chemicals or abrasive cleaners, as they can damage the surface.
Periodic inspections of the fireplace mantel and surround are also recommended. Check for any signs of damage, such as cracks, chips, or discoloration. Address any issues promptly to prevent further deterioration. If the mantel or surround is exposed to extreme temperatures or moisture, consider applying a protective coating to seal and protect it from the elements. Seek professional assistance for any complex repairs or maintenance tasks.
Throughout the installation process, prioritize safety. Wear safety glasses to protect the eyes from dust and debris. Use caution when operating power tools. If working with heavy materials, enlist the help of a second person to prevent injury. Ensure adequate ventilation when using adhesives or sealants. By following these safety guidelines, the installation can be completed safely and efficiently.

How To Install A Fireplace Mantel Woodworking Plans Available

How To Install A Fireplace Mantel 14 Steps With S

How To Install A Surround Facing Kit In Fireplace Mantels Home Remodel

How To Install A Fireplace Mantel Howstuffworks

The Best Easy To Install Fireplace Mantel Kits For Your Home Trubuild Construction

How To Install A Gas Fireplace With Tile Surround And Wood Mantel Sima Spaces

How To Install A Fireplace Mantel

How To Build A Diy Fireplace Mantel Fixthisbuildthat

Diy Fireplace Mantel Surround Faux Cast Stone European Style Tidbits

Fireplace Mantle Surround A Beginners Guide And Tutorial