How To Install A Direct Vent Gas Fireplace Insert
Installing a direct vent gas fireplace insert is a complex undertaking that requires meticulous planning, a thorough understanding of gas and venting systems, and adherence to local building codes and manufacturer specifications. This article offers a comprehensive guide to the installation process, highlighting crucial stages and safety considerations. It is strongly recommended that a qualified and licensed professional perform this installation, as improper installation can lead to gas leaks, carbon monoxide poisoning, and fire hazards.
Before commencing the installation, confirm that installation is permissible in your area and obtain all necessary permits. Building codes vary, and compliance is legally mandated. Contact your local building department to inquire about permit requirements and inspection processes related to gas fireplace insert installations.
Ensure the existing fireplace is structurally sound and suitable for an insert. Inspect the firebox for cracks, damage, or deterioration. The chimney should be swept and inspected by a qualified chimney sweep to ensure it is clean and free of obstructions. Any necessary repairs to the fireplace or chimney must be completed prior to insert installation.
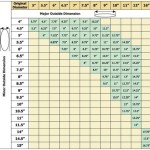
Selecting the appropriate size and type of direct vent gas fireplace insert is paramount. Measure the existing fireplace opening carefully, noting the width, height, and depth. Consult the manufacturer's specifications for the chosen insert to ensure it fits properly within the existing firebox. Overestimating the size of the insert could require significant structural modifications to the existing fireplace which are not always feasible. Similarly, selecting an insert that is too small may result in improper venting and inefficient heating.
The type of fuel source (natural gas or propane) should also be considered when selecting the insert. Verify that the insert is compatible with the available gas supply. If converting from one fuel type to another, consult a qualified gas technician to ensure the gas line and regulator are properly sized and configured for the new fuel type.
Key Point 1: Preparing the Fireplace and Installing the Gas Line
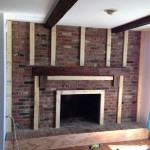
The first crucial step involves preparing the existing fireplace to receive the new insert. This often involves removing any existing fireplace components, such as the damper, grate, and decorative logs. Ensure the firebox is clean and free of debris. Inspect the firebox for any obstructions that might interfere with insert placement or venting.
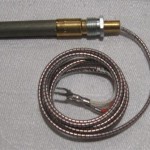
The gas line installation is a critical aspect of the process. A qualified gas technician should install or modify the gas line to meet the requirements of the new fireplace insert. The gas line must be sized appropriately to deliver the correct gas pressure and flow rate to the insert. The technician will connect the gas line to the existing gas supply, ensuring a secure and leak-free connection. A shut-off valve should be installed upstream of the insert for safety and maintenance purposes.
Leak testing is essential after the gas line is connected. The gas technician will use a manometer to check for gas leaks in the system. Any leaks must be repaired immediately before proceeding with the installation. Neglecting this step can have severe consequences, potentially leading to gas explosions or carbon monoxide poisoning.
The existing hearth should be assessed for adequate protection against radiant heat. The manufacturer's specifications will detail the minimum hearth extension requirements. If the existing hearth does not meet these requirements, it may need to be extended or replaced with a non-combustible material such as tile, stone or slate.
Consider the electrical requirements of the gas fireplace insert. Many inserts require a 120V electrical outlet to power the blower fan, ignition system, and other features. If an outlet is not readily available, a qualified electrician should install one near the fireplace opening. Ensure the outlet is properly grounded and protected by a circuit breaker.
Key Point 2: Installing the Venting System
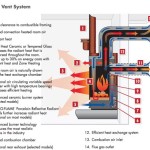
Direct vent gas fireplace inserts require a specific venting system to safely exhaust combustion gases outside the home. The venting system typically consists of two concentric pipes: an inner pipe that exhausts the combustion gases and an outer pipe that draws in fresh air for combustion. This design ensures that the insert is a sealed system, preventing combustion gases from entering the living space.
The venting system must be installed according to the manufacturer’s instructions. Improper venting can lead to carbon monoxide poisoning, fire hazards, and inefficient operation. The venting pipes must be properly connected and sealed to prevent leaks. The vent termination point must be located in accordance with local building codes and manufacturer specifications. Factors considered in vent termination include proximity to windows, doors, and air intakes.
The venting system can be installed either vertically through the roof or horizontally through an exterior wall. Vertical venting is generally preferred, as it provides better draft and reduces the risk of condensation buildup. However, horizontal venting may be necessary in certain situations, such as when a vertical vent path is not available. When using horizontal venting, the vent termination must be positioned in such a way that it prevents combustion gases from re-entering the home.
During installation, ensure that the venting pipes are properly supported and secured to prevent sagging or movement. Use the appropriate type of vent straps and fasteners to ensure a secure and reliable connection. The venting system should also be insulated to prevent heat loss and condensation.
Inspecting the vent system throughout the installation is important. Verify that all connections are tight and that there are no gaps or cracks in the venting pipes. Any imperfections need to be addressed before completing the installation. After the venting system is installed, perform a draft test to ensure proper functioning. This can be done by holding a lit match or cigarette lighter near the vent termination and observing the direction of the smoke. The smoke should be drawn away from the home, indicating that the venting system is drafting properly.
Key Point 3: Installing and Testing the Gas Fireplace Insert
Once the fireplace is prepared, the gas line is installed, and the venting system is in place, the actual installation of the gas fireplace insert can begin. Carefully slide the insert into the firebox, ensuring that it is properly aligned with the venting system. Connect the venting system to the insert, securing the connections with the appropriate hardware. Ensure the venting system is fully sealed to prevent any gas leaks.
Connect the insert to the gas line, using the appropriate fittings and sealant. Tighten all connections securely, and then perform a leak test using a specialized leak detection solution. Brush the solution on all gas connections and inspect for bubbles, which indicate a leak. If any leaks are found, tighten the connections or replace the fittings as necessary. Repeat the leak test until all connections are leak-free.
Connect the insert to the electrical outlet, if applicable. The insert may have a blower fan, ignition system, or other features that require electrical power. Ensure the electrical connections are secure and properly grounded.
Before operating the insert, carefully review the manufacturer's instructions for initial startup and operation. Turn on the gas supply and ignite the pilot light, following the manufacturer’s specific procedure. Once the pilot light is lit, allow the insert to run for a few minutes to ensure that it is operating properly.
Inspect the flame pattern to ensure it is consistent and stable. The flame should be blue with yellow tips. If the flame is excessively yellow, smoky, or erratic, it may indicate a problem with the gas supply or venting system. Consult the manufacturer's troubleshooting guide or contact a qualified gas technician to diagnose and resolve the issue.
Test all of the insert's features, including the blower fan, remote control, and any other accessories. Ensure that all features are functioning properly. Check the area around the insert for any unusual odors or sounds. These may indicate a problem with the gas supply, venting system, or insert itself.
After the installation is complete, have the insert inspected by the local building department to ensure that it complies with all applicable codes and regulations. Schedule a professional carbon monoxide test to guarantee the insert is venting correctly and not releasing dangerous gases into the living space.
Proper disposal of all packing materials and construction debris is important. Follow local regulations for disposal of gas appliances and venting materials. Provide the homeowner with the manufacturer's instructions, warranty information, and service contact information.
Installing a direct vent gas fireplace insert is a significant undertaking that requires attention to detail and adherence to safety guidelines. These instructions serve as an informative guide, however, professional installation is strongly advised to ensure a safe and reliable operation. Follow the manufacturer's instructions, comply with local building codes, and test the insert thoroughly before using it. With proper installation and maintenance, a direct vent gas fireplace insert can provide years of warmth and enjoyment.

Understanding How Direct Vent Works Heat Glo

What Is A Gas Insert Comfort By Design

What Is A Direct Vent Fireplace Fireplaces Learning Center

Gas Fireplace Venting Explained Heat Glo

What Are The Best Ways To Vent A Gas Fireplace Zoroast

How To Install A Fireplace Insert Diy Save Money
.aspx?strip=all "Benefits Of Direct Vent Fireplaces Regency Fireplace S")
Benefits Of Direct Vent Fireplaces Regency Fireplace S

Benefits Of Direct Vent Fireplaces

What Is A Direct Vent Fireplace Fireplaces Learning Center

Direct Vent B Gas Free S Mazzeo Stoves Fireplaces
Related Posts