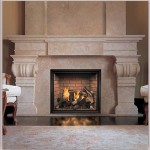
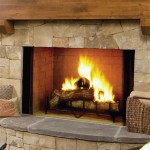
How To Frame A Fireplace Surround
Framing a fireplace surround is a crucial step in creating a visually appealing and structurally sound focal point for any living space. A well-framed surround not only enhances the aesthetic of the fireplace but also provides a stable base for decorative finishes, such as stone, tile, or wood. This process requires careful planning, precise measurements, and adherence to safety protocols. The following outlines the necessary steps and considerations for successfully framing a fireplace surround.
Before commencing the framing process, it is imperative to understand the existing structural conditions and any applicable building codes. In many jurisdictions, fireplaces are subject to specific regulations regarding clearances to combustible materials and fire-resistant construction. Local building officials should be consulted to ensure compliance with all relevant codes. Furthermore, the type of fireplace – whether wood-burning, gas, or electric – will influence the framing requirements. Ensure that the framing design accommodates any necessary venting or gas lines.
Proper material selection is paramount for a durable and safe fireplace surround. Framing lumber should be of appropriate grade and size, typically 2x4 or 2x6 dimensional lumber, depending on the size and design of the surround. For areas close to the firebox, non-combustible materials such as metal studs or cement board may be required to meet fire safety standards. All lumber should be inspected for defects such as warping or knots, which can compromise structural integrity. Fasteners, including nails and screws, should be selected based on their compatibility with the framing lumber and the expected loads.
Planning and Measurement
The initial stage involves detailed planning and precise measurements. Begin by sketching the desired appearance of the framed surround, including its dimensions, shape, and any architectural details. This sketch will serve as a blueprint for the framing process. Measure the existing fireplace opening and the available space surrounding it. Account for any existing mantel or hearth, and determine how the new surround will integrate with these elements. Ensure that the final dimensions of the finished surround are aesthetically pleasing and proportional to the room. Record all measurements accurately, as even minor discrepancies can lead to problems during the framing stage.
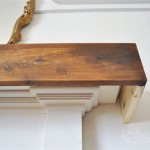
Consider the type and thickness of the finishing materials that will be applied to the framed surround. This factor will influence the final dimensions of the framing. For instance, if applying a thick layer of stone veneer, the framing should be recessed slightly to accommodate the veneer's thickness and ensure a flush finish with the surrounding wall. Similarly, if using a wood mantel, the framing should provide adequate support for the mantel's weight. Plan for any electrical outlets or wiring that may be needed for decorative lighting or other accessories. These should be planned and installed before the framing is enclosed.
Once the preliminary measurements and sketch are complete, create a detailed cut list for all the framing members. This list will help streamline the construction process and minimize waste. Before cutting any lumber, double-check all measurements to ensure accuracy. Using a miter saw or circular saw, carefully cut the lumber to the specified lengths. It is recommended to cut slightly long initially, allowing for minor adjustments during assembly. Always prioritize safety when using power tools, wearing appropriate personal protective equipment such as safety glasses and hearing protection.
Assembling the Frame
The assembly of the frame involves constructing the individual components and then joining them together to form the complete surround. Begin by building the base frame, which will typically consist of horizontal and vertical members. Ensure that the corners are square using a framing square or level. Secure the framing members using nails or screws. Screws generally provide a stronger and more durable connection than nails, especially in areas subjected to significant stress. Check the squareness of the frame frequently during assembly to prevent cumulative errors.
Next, construct the vertical supports that will extend from the base frame to the top of the surround. These supports should be spaced evenly along the length of the frame, providing adequate support for the finishing materials. Ensure that the vertical supports are plumb using a level. Secure the supports to the base frame and any other horizontal members. If the surround includes any decorative elements, such as arches or curves, these should be framed at this stage. Use appropriate techniques, such as bending plywood or creating curved framing members, to achieve the desired shape.
The top of the frame should be constructed in a similar manner to the base frame, ensuring that it is level and square. Connect the top frame to the vertical supports, creating a rigid and stable structure. At this point, the basic frame is complete. However, additional framing may be required to accommodate specific design features or to provide additional support for heavy finishing materials. For example, if the surround will support a heavy stone mantel, additional bracing may be needed to distribute the load evenly. Inspect the entire frame for any weaknesses or imperfections, and make any necessary corrections before proceeding.
Installation and Finishing
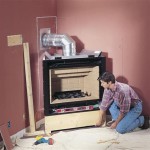
Once the frame is assembled, it must be installed around the fireplace opening. Carefully position the frame in place, ensuring that it is centered and aligned with the existing fireplace. Use shims to level the frame and to correct any minor imperfections in the wall or floor. Secure the frame to the surrounding wall structure using screws or nails. Be mindful of any existing wiring or plumbing that may be present in the wall. In some cases, it may be necessary to remove or relocate these utilities before installing the frame.
After the frame is secured, install any necessary blocking or backing to support the finishing materials. This blocking provides a solid surface for attaching the stone, tile, or wood veneer. Ensure that the blocking is flush with the framing members and that it is securely fastened. If using cement board as an underlayment for tile or stone, install it at this stage. Cement board is a moisture-resistant material that provides a stable and durable substrate for these finishes. Follow the manufacturer's instructions for installation, including the use of appropriate fasteners and joint tape.
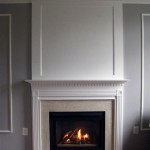
Finally, inspect the completed frame to ensure that it is structurally sound and that it meets all applicable building codes. Check the clearances to combustible materials and verify that any necessary venting or gas lines are properly installed. Once the inspection is complete, the framing is ready for the application of the finishing materials. The selection and installation of these materials will depend on the desired aesthetic and the overall design of the fireplace surround. Proper planning, careful execution, and attention to detail are essential for creating a fireplace surround that is both beautiful and safe.

How To Build A Fireplace Surround Beneath My Heart

How To Build A Fireplace Surround Beneath My Heart

Diy Fireplace Mantel Designatedspacedesign Com

Build An Electric Fireplace Wall Insert Mantle Fireplacegenius

How To Build A Fireplace Surround Beneath My Heart

Diy Custom Fireplace Surround The Honeycomb Home

Easy Fireplace Mantel Diy

Diy Fireplace With Electric Insert Angela Marie Made

Diy Fireplace With Electric Insert Angela Marie Made

How To Diy Built In Electric Fireplace Jenna Sue Design