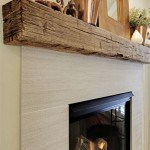
How To Finish A Fireplace Mantel
Finishing a fireplace mantel is a meticulous process that significantly impacts the aesthetic appeal of a living space. It's not merely decorative; it's a functional element that can define the style of a room. Whether the mantel is crafted from wood, stone, or a combination of materials, a well-executed finish enhances its natural beauty, protects it from wear and tear, and complements the surrounding décor.
The process involves preparation, application of the chosen finish, and sealing. Each step requires careful attention to detail to achieve a professional and lasting result. This article outlines the essential steps and considerations involved in finishing a fireplace mantel, offering a comprehensive guide for achieving a beautiful and durable outcome.
Preparation is Paramount
Before applying any finish, proper preparation is critical. This stage involves cleaning, sanding, and repairing any imperfections in the mantel's surface. Failing to adequately prepare the surface can lead to uneven finishes, poor adhesion, and ultimately, a less-than-desirable final product.
The first step is to thoroughly clean the mantel. Remove any dust, dirt, grime, or existing finishes. For wooden mantels, use a mild soap and water solution, followed by a clean, damp cloth to remove any soap residue. For stone or brick mantels, use a stiff brush and a specialized masonry cleaner, ensuring to rinse thoroughly. Allow the mantel to dry completely before proceeding.
Sanding is crucial for creating a smooth and even surface. The grit paper required will be determined by the condition of the mantel. If the mantel has an existing finish, start with a coarser grit, such as 80-grit, to remove the old finish. Gradually progress to finer grits, like 120-grit and then 220-grit, to refine the surface. For new or bare wood, start with 120-grit sandpaper, followed by 220-grit. Sand with the grain of the wood, using a sanding block to ensure even pressure and avoid creating uneven surfaces.
Inspect the mantel for any imperfections, such as cracks, dents, or holes. Fill these imperfections with wood filler or epoxy filler, depending on the material of the mantel. Apply the filler according to the manufacturer's instructions, ensuring it is level with the surrounding surface. Once the filler is dry, sand it smooth, blending it seamlessly with the rest of the mantel. For larger cracks or damages in stone, consider consulting a professional stone restorer.
After sanding, remove all sanding dust with a tack cloth or a vacuum cleaner with a brush attachment. This step is essential for ensuring proper adhesion of the chosen finish. A dust-free surface is a prerequisite for a flawless finish.
Protect the surrounding area with drop cloths and painter's tape. This will prevent any accidental spills or splatters from damaging the fireplace surround, walls, or flooring. Taking the time to properly protect the surrounding area will save time and effort in the long run.
Selecting and Applying the Finish
Choosing the right finish is crucial for achieving the desired aesthetic and providing adequate protection. Several factors influence this decision, including the type of material the mantel is made from, the desired look, and the level of protection required. Common finish options include paint, stain, varnish, lacquer, and oil-based finishes.
For wooden mantels, stain is a popular choice for highlighting the natural grain and adding warmth to the wood. Stains are available in a wide range of colors, allowing for customization to match existing décor. Apply stain evenly with a brush, cloth, or sprayer, following the manufacturer's instructions. Allow the stain to penetrate the wood for the recommended time, then wipe off any excess stain with a clean cloth. Multiple coats may be necessary to achieve the desired color intensity.
Paint provides a durable and opaque finish, offering a broader range of color options than stain. Choose a high-quality paint that is suitable for wood or masonry, depending on the mantel's material. Apply paint in thin, even coats with a brush, roller, or sprayer, allowing each coat to dry completely before applying the next. Sand lightly between coats to ensure a smooth finish. Two or three coats of paint are typically required for optimal coverage and durability.
Varnish and lacquer provide a clear, protective topcoat that enhances the natural beauty of wood and protects it from scratches, stains, and moisture. Varnish is typically more durable and water-resistant than lacquer, making it a good choice for mantels that are exposed to moisture. Lacquer dries quickly and provides a smooth, glossy finish. Apply varnish or lacquer in thin, even coats with a brush or sprayer, following the manufacturer's instructions. Sand lightly between coats to ensure a smooth finish.
Oil-based finishes, such as linseed oil or tung oil, penetrate the wood and provide a natural, matte finish. These finishes are relatively easy to apply and maintain, but they may not offer as much protection as varnish or lacquer. Apply oil-based finishes with a cloth, allowing the oil to penetrate the wood for the recommended time. Wipe off any excess oil with a clean cloth. Multiple coats may be necessary to achieve the desired level of protection.
When applying any finish, work in a well-ventilated area and wear appropriate safety gear, such as gloves and a respirator. Follow the manufacturer's instructions carefully, paying attention to drying times and application techniques. Proper ventilation is critical to avoid inhaling harmful fumes, especially when using oil-based finishes, varnishes, or lacquers.
Sealing for Protection and Longevity
Sealing the finished mantel is the final step in the process, and it is essential for protecting the finish from moisture, stains, and scratches. A sealant creates a barrier that prevents liquids from penetrating the finish and damaging the underlying material. This step is particularly important for mantels that are exposed to heat from the fireplace or that are located in areas with high humidity.
For wooden mantels, polyurethane is a popular sealant choice. Polyurethane is a durable and water-resistant sealant that provides excellent protection against scratches and stains. It is available in a variety of sheens, from matte to glossy, allowing for customization of the final appearance. Apply polyurethane in thin, even coats with a brush or sprayer, following the manufacturer's instructions. Sand lightly between coats to ensure a smooth finish.
For stone or brick mantels, use a specialized masonry sealant that is designed to protect against moisture and staining. These sealants are typically clear and will not alter the appearance of the stone or brick. Apply the sealant according to the manufacturer's instructions, ensuring to cover all surfaces evenly. Allow the sealant to dry completely before exposing the mantel to moisture or heat.
Regardless of the sealant chosen, it is crucial to apply it properly. Ensure the surface is clean and dry before applying the sealant. Apply the sealant in thin, even coats, avoiding drips or runs. Allow each coat to dry completely before applying the next. Two or three coats of sealant are typically required for optimal protection. Follow the manufacturer's instructions carefully, paying attention to drying times and application techniques.
Regular maintenance is essential for preserving the finish of the fireplace mantel. Clean the mantel regularly with a soft cloth and a mild cleaning solution. Avoid using harsh chemicals or abrasive cleaners, as these can damage the finish. Inspect the mantel periodically for any signs of damage, such as scratches, cracks, or stains. Repair any damage promptly to prevent it from worsening. Apply a fresh coat of sealant every few years to maintain the protection of the finish.
By following these steps, individuals can successfully finish a fireplace mantel, enhancing its beauty and protecting it from wear and tear. A well-finished mantel can become a focal point in a room, adding character and charm to the living space. The key is to take the time to prepare the surface properly, choose the right finish, and apply it with care. With proper maintenance, a finished fireplace mantel can provide years of enjoyment and enhance the value of a home.

Building An Easy Modern Fireplace Mantel Young House Love

How To Create An Antique Finish Janet Clark At Home

How To Install A Mantel On Brick Fireplace 1905 Farmhouse

Easy Fireplace Mantel Diy

Fireplace Mantel Wood N Finish Kit Drift

Diy Faux Cast Stone Fireplace Part 2 Building The Mantel Top Shelf
:max_bytes(150000):strip_icc()/ablossominglife-4151b41015a64193a437e981c3aad037.jpg?strip=all "17 Diy Fireplace Mantel Plans")
17 Diy Fireplace Mantel Plans

Build A Colonial Style Fireplace Mantel Jlc

Paint A Fireplace To Look Like Cast Stone Porch Daydreamer

Diy Fireplace Mantel With A Driftwood Finish Designertrapped Com