How to Create a Cardboard Fireplace
Creating a cardboard fireplace is a cost-effective and engaging project that can add a touch of warmth and festivity to any room, especially during the holiday season. This project is suitable for individuals with varying levels of crafting experience, and it allows for a high degree of customization to match existing décor and personal preferences. The key to a successful cardboard fireplace lies in careful planning, accurate measurements, and a methodical approach to construction and decoration.
The following guide outlines the steps involved in creating a sturdy and visually appealing cardboard fireplace, covering everything from material gathering to final embellishments. By following these instructions and exercising a bit of creativity, one can transform ordinary cardboard boxes into a charming focal point for any living space.
Gathering Necessary Materials and Tools
The first step in creating a cardboard fireplace is to gather the necessary materials and tools. The primary material will be cardboard boxes. The size and quantity of boxes will depend on the desired dimensions of the fireplace. Larger boxes, such as those from refrigerators or furniture, are ideal for the main structure. Smaller boxes can be used for decorative elements or internal supports.
Beyond cardboard, one will need a cutting tool. A utility knife is recommended for its precision and ability to cut through thicker cardboard. However, a box cutter or even sturdy scissors can also be used. Ensure that the cutting tool is sharp and used with caution to avoid accidents.
A measuring tool, such as a ruler or measuring tape, is crucial for accurate dimensions and ensuring that all pieces fit together properly. A pencil or marker will also be needed to mark cutting lines on the cardboard. A hot glue gun or strong adhesive tape is essential for assembling the various cardboard pieces. Hot glue provides a quick and strong bond, while adhesive tape is a good alternative for those who prefer a less permanent solution or are concerned about using heat-based adhesives.
For decoration, a variety of materials can be used. Paint, such as acrylic or latex paint, can be used to color the fireplace. Faux brick or stone contact paper can be applied to create a realistic look. Decorative elements such as garlands, lights, and stockings can further enhance the fireplace's appearance. Safety glasses are also a good idea to protect eyes when cutting cardboard.
Constructing the Fireplace Frame
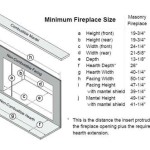
With the materials gathered, the next step is to construct the fireplace frame. Begin by determining the desired dimensions of the fireplace. Consider the width, height, and depth of the structure. It's helpful to sketch a simple design on paper to visualize the final product. This sketch should include the overall shape and the placement of any decorative elements, such as a mantel or firebox opening.
Based on the design, cut the cardboard boxes into the necessary shapes and sizes. The main structure will typically consist of a large rectangular piece for the front of the fireplace, two side pieces for the depth, and a top piece to cover the structure. Ensure that all pieces are cut accurately and with clean edges. If using multiple boxes to create a single piece, overlap and reinforce the seams with hot glue or adhesive tape.
Assemble the frame by attaching the side pieces to the front piece using hot glue or adhesive tape. Ensure that the joints are strong and secure. The side pieces should be perpendicular to the front piece, creating a solid rectangular base. Next, attach the top piece to complete the frame. Again, ensure that the joints are secure and that the top piece is flush with the sides and front.
To create the firebox opening, measure and mark the desired size and location on the front of the fireplace. Use the cutting tool to carefully cut out the opening. The edges of the opening can be reinforced with additional cardboard strips to provide a cleaner and more durable finish. A cardboard ledge can also be added at the bottom of the firebox opening to create a more realistic look.
For added stability, internal supports can be added to the frame. These supports can be made from smaller pieces of cardboard and attached to the inside of the structure using hot glue or adhesive tape. The supports should be strategically placed to reinforce the corners and prevent the frame from buckling or collapsing. For fireplaces with a mantel, additional supports may be needed to support the weight of any items placed on the mantel. These supports can be vertical cardboard pieces running from the base to the underside of the mantel.
Decorating and Embellishing the Fireplace
Once the frame is constructed, the final step is to decorate and embellish the fireplace. This is where creativity can truly shine and personalize the project to match individual taste and style. Start by painting the entire fireplace with the desired color. Acrylic or latex paint works well on cardboard. Multiple coats may be necessary to achieve a smooth and even finish. Allow the paint to dry completely before proceeding to the next step.
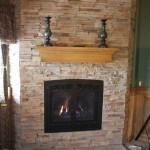
For a more realistic look, consider applying faux brick or stone contact paper to the front of the fireplace. This contact paper can be found at most home improvement stores and comes in a variety of colors and textures. Simply cut the contact paper to size and apply it to the front of the fireplace, smoothing out any bubbles or wrinkles. Alternatively, one can create a faux brick or stone effect by painting the cardboard with textured paint or by using a stencil to apply individual brick or stone patterns.
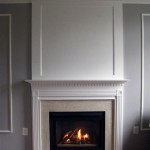
The mantel is a key decorative element of the fireplace. A simple cardboard shelf can be attached to the top of the fireplace to serve as a mantel. The shelf can be painted, covered with contact paper, or decorated with trim. The mantel can then be decorated with garlands, lights, candles, or other decorative items. For a more rustic look, consider using reclaimed wood or driftwood to create a mantel.
To simulate a fire in the firebox opening, various options can be explored. Battery-operated LED lights can be placed inside the firebox to create a flickering flame effect. Alternatively, one can create a paper or fabric flame and attach it to a small fan to simulate movement. Another option is to use a small electric fireplace insert to provide both light and warmth.
Finally, add any additional decorative elements to complete the fireplace. Stockings can be hung from the mantel, garlands can be draped around the fireplace, and decorative lights can be added to create a festive atmosphere. The possibilities are endless, and the only limitation is one's imagination. Consider adding personal touches, such as family photos or handmade ornaments, to make the fireplace a truly unique and special addition to any home.
Remember to consider safety when using any electrical components or flammable materials. Ensure that all lights and electrical items are properly grounded and that flammable materials are kept away from any heat sources. With careful planning and execution, a cardboard fireplace can be a fun, creative, and rewarding project that adds warmth and charm to any home.

How To Make A Cardboard Holiday Fireplace

How To Make A Cardboard Holiday Fireplace

Diy Faux Fireplace Made Of Cardboard Handmade

Wonderful Diy Cardboard Fireplace

Easy To Make Diy Faux Fireplace Using Cardboard

Make A Faux Fireplace For My Poppet Makes

How To Make A Cardboard Holiday Fireplace

You Can Make A Fake Fireplace Out Of Cardboard Boxes For The Holidays And It Looks Amazing

Diy Faux Fireplace Made Of Cardboard Handmade

Easy Diy Mini Faux Fireplace Cardboard Gina Tepper
Related Posts