How to Cover a Marble Fireplace Surround
A marble fireplace surround, while often a beautiful feature, can sometimes clash with evolving interior design preferences. Covering the marble, rather than replacing it, offers a cost-effective and less labor-intensive solution. This article explores various methods for covering a marble fireplace surround, outlining the necessary materials, tools, and steps involved in each process.
Covering with Paint
Painting offers a dramatic transformation with relatively minimal effort. Careful preparation is crucial for achieving a durable and aesthetically pleasing finish.
Materials:
- Degreaser
- Painter's tape
- Drop cloths
- Sandpaper (150-grit and 220-grit)
- Primer for glossy surfaces
- High-quality latex or acrylic paint
- Paintbrushes and rollers
- Mineral spirits (optional, for cleaning brushes)
Steps:
- Thoroughly clean the marble surface with a degreaser to remove dirt, grime, and soot.
- Mask off adjacent areas with painter's tape and protect the floor with drop cloths.
- Lightly sand the marble with 150-grit sandpaper to create a better surface for primer adhesion. Follow with 220-grit sandpaper for a smoother finish. Wipe away dust with a damp cloth.
- Apply a primer specifically designed for glossy surfaces. Allow the primer to dry completely according to the manufacturer's instructions.
- Apply two or more coats of high-quality latex or acrylic paint, allowing sufficient drying time between each coat.
- Remove the painter's tape carefully once the final coat is dry.
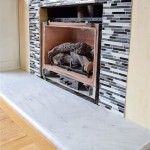
Covering with Tile
Tile provides a durable and versatile covering option, offering a wide range of styles and designs to complement any decor.
Materials:
- Thin-set mortar
- Notched trowel
- Tiles
- Tile spacers
- Grout
- Grout float
- Sponge and bucket of clean water
- Tile sealant
Steps:
- Clean the marble surface thoroughly and ensure it is level. Roughen the surface slightly with sandpaper to improve adhesion.
- Apply thin-set mortar to the marble using a notched trowel, working in small sections.
- Place the tiles firmly onto the mortar, using spacers to maintain even gaps.
- Allow the thin-set to dry completely according to the manufacturer's instructions.
- Mix the grout and apply it to the tile joints using a grout float, pressing it firmly into the gaps.
- Remove excess grout with a damp sponge before it hardens completely.
- After the grout cures, apply a tile sealant to protect the grout from stains and moisture.
Covering with Wood
A wood covering can create a warm and inviting atmosphere, adding a rustic or contemporary touch depending on the wood type and finish chosen.
Materials:
- Wood planks or panels
- Construction adhesive
- Finishing nails
- Nail gun or hammer
- Wood stain or paint (optional)
- Polyurethane sealant
- Measuring tape
- Saw (circular saw or miter saw)
- Safety glasses and dust mask
Steps:
- Measure the fireplace surround accurately and cut the wood planks or panels to the appropriate size.
- Clean the marble surface to ensure proper adhesion.
- Apply construction adhesive to the back of the wood pieces.
- Position the wood pieces on the marble surround and secure them with finishing nails.
- Apply wood stain or paint if desired, followed by a polyurethane sealant to protect the wood.
Covering with Stone Veneer
Stone veneer offers the look of natural stone at a fraction of the cost and weight, making it a practical and attractive option.
Materials:
- Stone veneer
- Type N mortar mix
- Notched trowel
- Grout (optional)
- Grout bag (optional)
- Stone sealant
Steps:
- Prepare the marble surface by cleaning it thoroughly and ensuring it is level.
- Mix the Type N mortar according to the manufacturer’s instructions.
- Apply a layer of mortar to the back of each stone veneer piece using a notched trowel. Also apply a thin layer of mortar to the marble surface (back buttering).
- Press the stone veneer firmly onto the marble surface, holding it in place for a few seconds to ensure proper adhesion.
- Grout the joints between the stone veneer pieces, if desired, using a grout bag.
- Once the mortar and grout are dry, apply a stone sealant to protect the veneer from moisture and staining.
Choosing the right method depends on individual preferences, budget, and the desired aesthetic. Each material offers unique benefits and drawbacks, warranting careful consideration before commencing the project.

Diy Marble Fireplace And Mantel Makeover Top Shelf

Fireplace Makeover How To Tile Over A Surround Love Remodeled

Never Liked My Marble Fireplace Was Excited To Find Annie Sloan Chalk Paint In Coco No Prep Needed Very Easy Fireplaces Surrounds

Easy Diy Marble Hearth And A Fireplace Makeover The Painted Hive

How To Update An Outdated Marble Fireplace Fireplaces Hearth Surround

How To Paint A Marble Fireplace Surround With Chalk

How To Tile Over A Marble Fireplace Surround Porch Daydreamer

How To Update The Fireplace Without Ripping Out Existing Marble Hometalk

This Is My Fireplace Or Fire Surround Makeover Mosaics Over Peach Marble Painted With As Chalk Paint Remodel

Easy Diy Marble Hearth And A Fireplace Makeover The Painted Hive
Related Posts