How To Clean A Thermocouple On A Gas Fireplace
A gas fireplace offers warmth and ambiance with the convenience of a switch or remote. However, a common issue that can arise is a malfunctioning pilot light, often traced back to a dirty or faulty thermocouple. The thermocouple is a safety device that senses the heat from the pilot light and allows the main gas valve to open. When it becomes coated with soot or other deposits, it may not function correctly, preventing the fireplace from operating. Cleaning the thermocouple can often resolve this problem, restoring the fireplace to proper working order. This article provides a detailed guide on how to safely and effectively clean a thermocouple in a gas fireplace.
Before beginning any work on a gas appliance, safety should be the primary concern. Gas leaks can be dangerous, and improper handling can lead to further damage or even injury. It is crucial to understand the components of the gas fireplace and the potential risks involved. If there is any doubt about one's ability to perform the cleaning safely, it is always best to consult a qualified gas appliance technician.
Safety Precautions
Prior to undertaking any cleaning or maintenance on a gas fireplace, several safety precautions must be strictly adhered to. These measures are designed to prevent gas leaks, electrical shocks, and other potential hazards.
First and foremost,
turn off the gas supply to the fireplace
. This is typically achieved by locating the gas shut-off valve, usually found near the fireplace or in the vicinity of the gas supply line. Turn the valve to the "off" position. This will prevent any gas from flowing into the fireplace during the cleaning process. Double-check that the pilot light is extinguished and the fireplace is completely cool before proceeding.Secondly,
ensure proper ventilation
. Open windows and doors in the room to allow any residual gas fumes to dissipate. This will minimize the risk of inhaling any gas that may be present. If there is a strong odor of gas, evacuate the premises immediately and contact the gas company or a qualified technician.Thirdly,
exercise caution when handling tools and components
. The thermocouple and other parts of the fireplace can be fragile. Avoid applying excessive force that could damage them. Use the appropriate tools for the task and handle them with care. If electrical components are present, be sure to avoid contact with water to prevent electric shock.Finally,
if you are unsure about any step of the process, stop and consult a qualified technician
. It is better to seek professional assistance than to risk damaging the fireplace or causing a safety hazard.Tools and Materials Required
Having the necessary tools and materials prepared beforehand will make the cleaning process more efficient and streamlined. The following items are typically required:
Screwdrivers:
A set of screwdrivers, including both flathead and Phillips head, is essential for removing the fireplace components and accessing the thermocouple.Wrench:
A small adjustable wrench may be needed to loosen or tighten gas fittings, although this should be done carefully and only if necessary.Wire Brush or Steel Wool:
A small wire brush or fine-grade steel wool is used to gently clean the thermocouple without damaging its surface.Emery Cloth or Fine Sandpaper:
Emery cloth or very fine sandpaper can also be used for cleaning, but use it with utmost care to avoid abrasion of the thermocouple's surface.Vacuum Cleaner:
A vacuum cleaner with a hose attachment is useful for removing loose debris and soot from the fireplace interior.Clean Cloth or Rags:
Clean cloths or rags are needed to wipe down the thermocouple and other components after cleaning.Safety Glasses:
Always wear safety glasses to protect your eyes from debris and particles that may become dislodged during the cleaning process.Gloves:
Gloves will protect your hands from dirt and soot and provide a better grip on the tools.Flashlight or Work Light:
Good lighting is crucial for seeing the components clearly and working safely.Gas Leak Detector (Optional):
A gas leak detector can be used after reassembling the fireplace to ensure there are no gas leaks.
It is recommended to gather all these tools and materials before starting the cleaning process to avoid interruptions and ensure a smooth workflow.
Step-by-Step Cleaning Process
With the necessary safety precautions taken and the required tools gathered, the cleaning process can begin. The following steps provide a comprehensive guide to cleaning a thermocouple:
1. Accessing the Thermocouple:
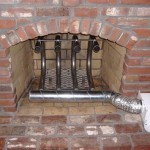
The first step involves gaining access to the thermocouple. This usually requires removing the decorative front panel or grate of the fireplace. The method for removing this panel will vary depending on the fireplace model, so consult the owner's manual for specific instructions. Typically, the panel is held in place by screws, clips, or magnets. Once the panel is removed, the pilot light assembly and the thermocouple will be visible. The thermocouple is a small, metal rod that is positioned directly in the pilot light flame.2. Locating the Thermocouple Connection:
Trace the thermocouple from the pilot light assembly back to its connection point. This connection is usually a small nut that attaches the thermocouple to the gas valve. Use a small wrench to carefully loosen this nut. Do not overtighten or strip the threads. Once the nut is loose, the thermocouple can be gently detached from the gas valve. Be mindful not to bend or damage the thermocouple during this process.3. Cleaning the Thermocouple:
With the thermocouple detached, carefully clean the metal rod. Use a wire brush, steel wool, emery cloth, or fine sandpaper to gently remove any soot, carbon deposits, or other debris. It is important to avoid applying excessive pressure or using abrasive materials that could damage the thermocouple's surface. The goal is to remove the buildup without scratching or weakening the metal. Work methodically along the entire length of the rod, ensuring that all surfaces are clean and free of obstructions. Inspect the tip of the thermocouple for any signs of damage or corrosion. If the thermocouple is severely damaged, it may need to be replaced.4. Reinstalling the Thermocouple:
Once the thermocouple is clean, carefully reattach it to the gas valve. Tighten the nut securely, but avoid over-tightening. Ensure that the thermocouple is positioned correctly in the pilot light flame. It should be directly in the path of the flame, but not touching the pilot light assembly. Double-check that the connections are secure and that the thermocouple is not bent or damaged.5. Testing the Pilot Light:
After reassembling the fireplace, turn the gas supply back on. Follow the manufacturer's instructions for lighting the pilot light. Typically, this involves pressing and holding down the pilot light button while lighting the pilot with a match or lighter. If the pilot light stays lit after releasing the button, the thermocouple is functioning correctly. If the pilot light goes out, the thermocouple may still be dirty or faulty. In this case, repeat the cleaning process or consider replacing the thermocouple. If the pilot light still fails to stay lit after cleaning or replacing the thermocouple, there may be a problem with the gas valve or other components of the fireplace. Consult a qualified technician for further assistance.6. Reassembling the Fireplace:
Once the pilot light is functioning correctly, reassemble the fireplace by replacing the decorative front panel or grate. Ensure that all screws, clips, or magnets are securely fastened. Test the fireplace to ensure that it is operating properly. Turn the fireplace on and off several times to verify that the main burner ignites and extinguishes as expected. Monitor the fireplace for any unusual noises, odors, or other signs of malfunction.7. Checking for Gas Leaks (Optional):
As an extra precaution, use a gas leak detector to check for any gas leaks around the connections and fittings. If a gas leak is detected, turn off the gas supply immediately and contact a qualified technician.By following these steps carefully, one can effectively clean a thermocouple and restore the proper function of their gas fireplace. Regular maintenance, including cleaning the thermocouple, can help prevent future problems and ensure the safe and efficient operation of the appliance.
Troubleshooting Common Issues
Even after cleaning the thermocouple, some issues might persist. These issues and possible solutions are outlined below:
1. Pilot Light Still Won't Stay Lit:
Even after cleaning, the pilot light might extinguish when the control knob is released. This could indicate a weak thermocouple, a problem with the pilot light assembly, or insufficient gas pressure.-
Weak Thermocouple:
The thermocouple might be nearing the end of its lifespan. Replacement might be necessary. A multimeter can be used to test the thermocouple's millivolt output while the pilot light is lit. Consult the fireplace's manual for the correct output range.-
Pilot Light Assembly:
The pilot light orifice could be partially blocked. Clean the orifice with a small wire or needle, being careful not to enlarge the opening. A compressed air can also be used to blow out any debris.-
Gas Pressure:
Low gas pressure can affect the pilot light's ability to heat the thermocouple adequately. Contact the gas company or a qualified technician to check the gas pressure.2. Difficulty Lighting the Pilot Light:
If there's difficulty initially lighting the pilot light, the issue might stem from trapped air in the gas line or a faulty igniter.-
Purging Air:
Hold down the control knob for a longer duration initially to allow any trapped air to escape from the gas line. Follow the manufacturer's instructions for purging the gas line.-
Faulty Igniter:
If the igniter isn't producing a spark, it might need to be cleaned or replaced. Check the igniter's electrode for any carbon buildup or corrosion. Clean the electrode with fine-grit sandpaper.3. Yellow or Flickering Pilot Light Flame:
A yellow or flickering pilot light flame indicates incomplete combustion and potential carbon monoxide production. This can be caused by a dirty pilot light orifice or insufficient airflow.-
Pilot Light Orifice:
Clean the pilot light orifice thoroughly as described in the previous section.-
Airflow:
Ensure that the fireplace and surrounding area are free from obstructions that could restrict airflow. Clean any dust or debris from the fireplace's air vents.4. Gas Odor:
A distinct gas odor warrants immediate attention. Evacuate the area and contact the gas company or a qualified technician immediately.-
Gas Leaks:
Do not attempt to locate the source of the leak yourself. Leave the premises and allow trained professionals to handle the situation.Addressing these issues promptly ensures the safe and efficient operation of the gas fireplace. If unresolved, seeking professional assistance is recommended.

Gas Fireplace Won T Stay Lit Magic Touch Mechanical

Gas Fireplace Won T Stay Lit Magic Touch Mechanical

How To Clean Thermocouple On Gas Fireplace Go Firepit

How A Pilot Light Works Www Mygasfireplacerepair Com

How To Clean Thermocouple

How To Clean Your Gas Fireplace Pilot Cleaning

Knowledgebase Ventless Gas Logs Fireplaces Inserts Stoves And Accessories By Com Specializing In

Gas Fireplace Pilot Lights Your Complete Guide Universe

How To Replace A Thermocouple The Home Depot

Propane Gas Log Manual Control Pilot Light Assembly Fine S
Related Posts