How to Build Your Own Fireplace Surround
A fireplace serves as a focal point in many homes, providing warmth and aesthetic appeal. Enhancing its visual presence with a custom-built fireplace surround offers homeowners an opportunity to personalize their living space and complement existing interior design. This article details the process of constructing a fireplace surround, outlining the necessary materials, tools, and steps involved in achieving a successful and safe installation.
Before embarking on the project, it is crucial to understand local building codes and regulations pertaining to fireplace construction. These codes are designed to ensure fire safety and structural integrity. Contacting local authorities or a certified building inspector is highly recommended to obtain the necessary permits and guidance. Ignoring regulations can result in costly rework or even legal penalties.
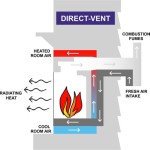
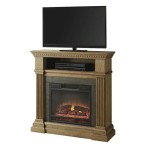
Selecting the appropriate materials is paramount to the overall look and durability of the fireplace surround. Common choices include wood, stone, brick, and tile. Each material offers unique aesthetic qualities and varying levels of fire resistance. Wood surrounds typically incorporate a fire-resistant barrier, such as cement board, to protect combustible materials from the heat of the fireplace. Stone, brick, and tile are inherently fire-resistant and often used for the facing that surrounds the firebox opening.
The design of the fireplace surround is a critical consideration. Factors to consider include the desired style (e.g., modern, traditional, rustic), the size and shape of the firebox opening, and the overall dimensions of the room. Creating detailed drawings or using online design tools can help visualize the finished product and ensure accurate measurements. The surround should be proportional to the size of the fireplace and the room's dimensions. A surround that is too large can overwhelm the space, while one that is too small may appear insignificant.
Key Point 1: Planning and Preparation
Successful fireplace surround construction hinges on meticulous planning and preparation. This phase involves accurate measurements, material selection, and the creation of a detailed project plan. Neglecting these initial steps can lead to errors, wasted materials, and increased project costs.
The first step is to accurately measure the existing fireplace opening and the surrounding wall space. These measurements will dictate the dimensions of the new surround. Consider the desired overhang or projection of the surround from the wall. Mark the measurements clearly on the wall using a level and a measuring tape. These markings will serve as a guide during the construction process.
Once the measurements are established, create a detailed cut list for all the materials required. This list specifies the dimensions and quantity of each piece of wood, stone, brick, or tile needed for the project. Accurate cutting reduces waste and ensures a professional-looking finish. Pre-cut materials can be ordered from a lumberyard or home improvement store, streamlining the construction process.
Gather all the necessary tools before starting the construction phase. Essential tools include a circular saw for cutting wood, a miter saw for creating precise angles, a level for ensuring plumb and horizontal alignment, a measuring tape, a pencil, a drill with various drill bits, a hammer, a chisel, a tile saw (if using tile), and a mortar trowel (if using stone or brick). Safety glasses and gloves are also essential for protecting against injury.
Protect the surrounding area with drop cloths or plastic sheeting. Fireplace construction can generate dust and debris. Covering the floor and furniture will minimize cleanup and prevent damage. Ensure adequate ventilation in the work area. Sawing and sanding can produce harmful particles, so a well-ventilated space is crucial for maintaining air quality.
Key Point 2: Framing the Fireplace Surround
The frame serves as the structural foundation upon which the decorative facing is attached. A sturdy and accurately constructed frame is essential for ensuring the stability and longevity of the fireplace surround.
Construct the frame using lumber, typically 2x4s or 2x6s, depending on the desired depth and thickness of the surround. Cut the lumber according to the dimensions specified in the cut list. Assemble the frame using screws or nails, ensuring all joints are square and secure. A framing square can be used to verify the accuracy of the corners.
Attach the frame to the wall using construction adhesive and screws or nails. Locate the wall studs using a stud finder and fasten the frame directly to the studs. This provides a strong and stable connection. If the wall is made of drywall, use drywall anchors to securely attach the frame. Ensure the frame is level and plumb before permanently attaching it to the wall.
If a fire-resistant barrier is required, attach cement board to the frame. Cement board is a non-combustible material that protects the wood frame from the heat of the fireplace. Cut the cement board to size using a utility knife or a circular saw equipped with a cement board blade. Attach the cement board to the frame using cement board screws, spacing them according to the manufacturer's instructions. Ensure all seams are properly sealed with cement board tape and thin-set mortar.
Consider incorporating a mantel into the frame design. The mantel provides a decorative shelf above the fireplace opening. It can be constructed from wood, stone, or other materials. Attach the mantel to the frame using screws or nails, ensuring it is securely fastened and level. The mantel should be positioned at a safe distance above the fireplace opening to prevent overheating.
Key Point 3: Applying the Facing Material
The facing material is the visible surface of the fireplace surround, providing the desired aesthetic appeal. Whether using wood, stone, brick, or tile, proper installation techniques are crucial for achieving a professional and durable finish.
When using wood as the facing material, cut the wood to size according to the cut list. Apply a finish to the wood, such as paint, stain, or varnish, to protect it from moisture and enhance its appearance. Attach the wood to the frame using finishing nails or screws. Ensure the nails or screws are countersunk and filled with wood filler to create a smooth surface. Caulk any gaps between the wood and the wall to prevent drafts and create a seamless look.
For stone or brick facing, apply a layer of thin-set mortar to the cement board or the wall surface. Use a notched trowel to create ridges in the mortar, providing a better bond for the stone or brick. Press the stone or brick firmly into the mortar, ensuring it is level and aligned with the surrounding pieces. Use spacers to maintain consistent grout lines. Allow the mortar to dry completely according to the manufacturer's instructions. Apply grout to the grout lines, using a grout float to push the grout into the gaps. Wipe away excess grout with a damp sponge. Seal the grout to protect it from staining and moisture damage.
When using tile as the facing material, follow a similar procedure to stone or brick installation. Apply thin-set mortar to the cement board or the wall surface. Press the tile firmly into the mortar, using spacers to maintain consistent grout lines. Allow the mortar to dry completely. Apply grout to the grout lines and wipe away excess grout. Seal the grout to protect it from staining and moisture damage. Consider using a tile saw to cut tiles to fit around the fireplace opening and any other obstructions.
Inspect the finished fireplace surround for any imperfections or gaps. Caulk any gaps between the facing material and the wall to prevent drafts and create a seamless look. Clean the surface of the facing material to remove any dust or debris. Allow the caulk and grout to cure completely before using the fireplace.
After completing the installation, conduct a thorough inspection to ensure that all connections are secure and that the fireplace surround is stable. Verify that the firebox opening is unobstructed and that the damper operates smoothly. If any issues are identified, address them promptly to ensure the safety and functionality of the fireplace.

Diy Fireplace Mantel And Surround Jenna Kate At Home

Diy Fireplace Mantel Designatedspacedesign Com

How To Make An Easy Diy Fireplace Mantel Sprucing Up Mamahood

Easy Fireplace Mantel Diy

Diy Rustic Fireplace Mantel The Cure For A Boring

How To Build A Faux Fireplace Mantel And Surround The Home Depot

Easy Diy Wooden Fireplace Mantel

How To Build A Diy Built In Fireplace With An Electric Insert The Creative Mom

How To Build A Fireplace Mantel Easy Diy Blossoming Life

How To Diy An Amazing Electric Fireplace Surround And Mantle Drawer
Related Posts