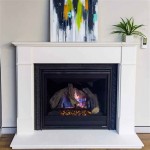
How To Build a Stone Fireplace Hearth
A stone fireplace hearth is a durable and aesthetically pleasing addition to any home. It provides a safe, non-combustible surface in front of the fireplace, protecting the surrounding flooring from sparks and embers. Constructing a stone hearth requires careful planning, precise execution, and adherence to building codes. This article outlines the steps involved in building a robust and visually appealing stone fireplace hearth.
Before commencing any work, it is crucial to confirm local building codes and regulations regarding fireplace hearth construction. These codes often specify dimensional requirements, materials that are permitted, and necessary clearances from combustible materials. Failure to comply with these regulations could result in safety hazards and potential legal issues. A thorough understanding of these regulations is the starting point for a successful and safe hearth construction project.
Planning and Preparation
The initial phase of building a stone hearth involves meticulous planning and preparation. Dimensions are a primary consideration. The hearth's size and shape should be proportionate to the fireplace opening and the overall room design. Typically, the hearth extends at least 16 inches in front of the fireplace opening and 8 inches to each side. However, these measurements can vary based on local codes and the fireplace manufacturer's specifications. Sketching a detailed plan, including accurate dimensions, is a critical step.
Once the dimensions are established, selecting the appropriate stone is the next task. Options range from natural stone, such as slate, granite, and limestone, to manufactured stone veneer. The choice depends on aesthetic preferences, budget, and the desired level of durability. Natural stone offers unique variations in color and texture, while manufactured stone provides consistent appearance and ease of installation. The weight of the chosen stone is also a factor, as it will influence the structural support required for the hearth.
Preparing the subfloor is equally important. The subfloor must be structurally sound and level to provide a stable base for the stone. If the existing subfloor is not level, self-leveling compound can be used to create a flat surface. For heavier stones, reinforcing the subfloor may be necessary to prevent sagging or settling over time. This reinforcement could involve adding additional joists or a layer of plywood.
Gathering the necessary tools and materials is the final step in the preparation phase. This includes mortar or thin-set adhesive, depending on the type of stone being used, a trowel, a level, a measuring tape, a saw (for cutting stone), a mixing bucket, a sponge, safety glasses, and gloves. Having all the necessary tools and materials readily available will streamline the construction process and ensure a smoother, more efficient workflow.
Installation Process
With the planning and preparation complete, the installation process can commence. The first step is to create a mortar bed or apply thin-set adhesive to the prepared subfloor. The consistency of the mortar or adhesive should be thick enough to support the stone but pliable enough to allow for adjustments. Using a notched trowel, spread the mortar or adhesive evenly across the area where the first stone will be placed.
Carefully position the first stone onto the mortar bed or adhesive, ensuring it is level and properly aligned. Use a level to check both horizontally and vertically. If necessary, gently tap the stone with a rubber mallet to achieve the desired level. Remove any excess mortar or adhesive that squeezes out from under the stone with a damp sponge.
Continue laying the remaining stones, maintaining consistent spacing between them. Spacers can be used to ensure uniform grout lines. As each stone is placed, double-check for level and alignment. Adjustments can be made before the mortar or adhesive sets completely. For stones that require cutting, use a wet saw or angle grinder with a diamond blade to achieve clean, precise cuts. Always wear safety glasses and gloves when cutting stone.
Once all the stones are laid, allow the mortar or adhesive to cure according to the manufacturer's instructions. This typically takes 24 to 48 hours. Avoid walking on the hearth during the curing process to prevent the stones from shifting or settling unevenly.
Grouting and Finishing
After the mortar or adhesive has fully cured, the grout can be applied. Select a grout color that complements the stone's tones and enhances the overall aesthetic. Mix the grout according to the manufacturer's instructions, ensuring a smooth, consistent texture.
Using a grout float, apply the grout to the spaces between the stones, pressing it firmly into the joints. Work in small sections, ensuring that the grout fills all the voids completely. Once the grout has been applied, use the grout float to remove any excess from the surface of the stones. A damp sponge can be used to further clean the stones, but avoid over-saturating the grout, as this can weaken it.
Allow the grout to haze over slightly, then use a clean, damp sponge to wipe the surface, removing any remaining residue. Rinse the sponge frequently in clean water. The key is to remove the grout haze without disturbing the grout within the joints. Several passes with the sponge may be required to achieve a clean, professional finish.
After the grout has fully cured, which typically takes several days, a grout sealer can be applied. This will help protect the grout from staining and moisture penetration, extending the life of the hearth. Follow the manufacturer's instructions for applying the sealer. Regular cleaning and maintenance will further preserve the appearance and integrity of the stone fireplace hearth for years to come. A well-maintained stone hearth not only enhances the visual appeal of the fireplace but also ensures a safe and functional space for enjoying the warmth and ambiance of a fire.

Diy Faux Cast Stone Fireplace Part 1 Demo And Tiling The Hearth Top Shelf

How To Build And Hang A Mantel On Stone Fireplace Shanty 2 Chic

Stone Fireplace With Barn Wood Mantel Diy Making A Space

How To Build A Fireplace Hearth Storables

Diy Fireplace Hearth And Stacked Stone Wall Tile Newlywoodwards

Building A Stone Fireplace Hearth Jenron Designs

How To Install A Stone Veneer Fireplace Shoe Makes New

Building A Stone Fireplace Hearth Jenron Designs

Building A Stone Fireplace Ideas And Plans

Diy Fireplace Hearth And Stacked Stone Wall Tile Newlywoodwards
Related Posts