How To Build Built-In Cabinets Next to a Fireplace
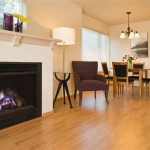
Built-in cabinets flanking a fireplace can dramatically enhance a living space, adding both functionality and aesthetic appeal. Not only do they provide valuable storage space for books, media equipment, or decorative items, but they also create a focal point that complements the fireplace itself. This article will outline a comprehensive approach to designing and building built-in cabinets next to a fireplace, emphasizing safety considerations and practical construction techniques.
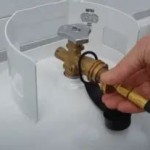
Before embarking on this project, it's crucial to assess the existing space and identify relevant building codes. Measurements must be accurate to ensure a seamless fit, and any electrical wiring or gas lines near the fireplace must be carefully considered and handled by qualified professionals if necessary. Furthermore, local building codes may dictate specific requirements for fire-resistant materials and clearances around the fireplace.
Careful planning is paramount to the success of any built-in cabinet project. This includes determining the desired style, dimensions, and features of the cabinets, as well as selecting appropriate materials and hardware. A detailed design will serve as a roadmap throughout the construction process, minimizing errors and ensuring a professional-looking finished product.
Planning and Design Considerations
The planning phase is arguably the most important aspect of building built-in cabinets. It involves taking precise measurements, developing a detailed design, and selecting the right materials. Neglecting this step can lead to costly mistakes and a less-than-satisfactory outcome.
Begin by measuring the available space on either side of the fireplace. Pay close attention to the height, width, and depth of the area, as well as any architectural features that might affect the cabinet design, such as windows, doors, or uneven walls. It is advisable to create a scaled drawing or use computer-aided design (CAD) software to visualize the cabinets in the space.
Consider the intended use of the cabinets. Will they be used primarily for storage or display? Will they house electronic equipment? These factors will influence the design and layout of the shelves, drawers, and doors. Different types of storage solutions are necessary depending on what will be stored. Deep shelves may be preferred for larger items, while adjustable shelves offer flexibility for accommodating items of varying sizes. Drawers can be used for smaller items or media controls. Concealed storage will hide items and provide a cleaner look, while open shelves will display decorative items.
Style consistency with the existing decor is also crucial, and should be considered throughout the process. Choose a design that complements the fireplace and the overall aesthetic of the room. Options could include a traditional style with raised panel doors, a modern style with sleek lines and minimalist hardware, or a rustic style with reclaimed wood and exposed hardware. The cabinet style should match the fireplace mantel and materials. The color of the cabinets should also match the room and fireplace.
Material selection is another important consideration. Plywood, medium-density fiberboard (MDF), and solid wood are all common choices for cabinet construction. Each material has its own advantages and disadvantages in terms of cost, durability, and workability. Plywood is a cost-effective option that is strong and stable. MDF is a smooth, paintable surface that is ideal for intricate designs, but it is also heavy. Solid wood provides a natural look and feel, but it can be more expensive and prone to warping.
Hardware selection, including hinges, drawer slides, and knobs or pulls, can greatly impact the functionality and aesthetics of the cabinets. Choose high-quality hardware that is durable and easy to use. Consider soft-close hinges and drawer slides for a more luxurious feel.
Construction Techniques and Safety Measures
Once the planning phase is complete, the next step is to begin the construction of the cabinet boxes. This involves cutting the chosen material to size, assembling the boxes using screws or nails, and ensuring that the boxes are square and level. Precision is crucial at this stage, as any errors will be magnified later in the process.
Start by building the base cabinets. The base cabinets will provide a level and stable foundation for the upper cabinets. The base frame can be built using 2x4 lumber, and the cabinet sides, top, and bottom can be constructed from plywood or MDF. Consider adding adjustable feet to the base cabinets to compensate for uneven floors.
Assemble the cabinet boxes using wood screws and wood glue. Clamping the pieces together while the glue dries will ensure strong and square joints. Verify that all corners are square using a framing square. Once the glue has dried, reinforce the joints with screws. Next, attach the face frame to the cabinet boxes. The face frame provides a finished look and adds structural support to the cabinets.
Safety is paramount when working with power tools and construction materials. Always wear safety glasses, gloves, and a dust mask. Use caution when operating power tools, and follow the manufacturer's instructions carefully. Ensure that the workspace is well-ventilated to avoid inhaling dust or fumes.
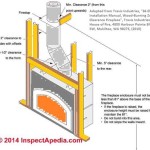
Fire safety is of utmost importance when building cabinets next to a fireplace. Maintain adequate clearance between the cabinets and the fireplace to prevent overheating and fire hazards. Consult local building codes for specific requirements regarding fire-resistant materials and clearances. Consider using fire-retardant paint or coatings on the cabinets to further enhance fire safety.
For the upper cabinets, measure and cut the plywood or MDF to size. Assemble the cabinet boxes using the same techniques as the base cabinets. Install shelves inside the upper cabinets. Shelves can be fixed or adjustable, depending on the desired functionality. For adjustable shelves, use shelf pins and drill holes at evenly spaced intervals.
When installing drawers, measure the opening and construct the drawer boxes to fit. Use dovetail joints or other strong joinery techniques to ensure that the drawer boxes are durable and long-lasting. Install drawer slides on the cabinet boxes and drawer boxes to allow for smooth and easy operation. Remember that drawer slides come in three different versions, side mounted, under mounted and center mounted, each having different characteristics.
Once all the elements are built, carefully install the cabinets, ensuring they are level and securely attached to the wall. Use shims to level the cabinets if necessary and secure them to the wall studs using screws. Conceal the screws with wood filler or trim.
Finishing and Installation
The finishing stage is where the cabinets truly come to life. This involves sanding the surfaces, applying primer and paint or stain, and installing the hardware. A well-executed finish can transform a basic cabinet into a beautiful and durable piece of furniture.
Start by sanding all surfaces of the cabinets to create a smooth and even finish. Use progressively finer grits of sandpaper, starting with 120-grit and ending with 220-grit. Remove all dust with a tack cloth before applying primer.
Apply a coat of primer to the cabinets to seal the wood and provide a base for the paint or stain. Choose a primer that is compatible with the chosen finish. Allow the primer to dry completely before proceeding.
If painting the cabinets, apply two or more coats of paint, allowing each coat to dry completely before applying the next. Use a high-quality paint that is durable and easy to clean. Consider using a paint sprayer for a smooth and even finish.
If staining the cabinets, apply the stain evenly and allow it to penetrate the wood for the recommended amount of time. Wipe off any excess stain with a clean cloth. Apply a clear coat of varnish or polyurethane to protect the stain and provide a durable finish. Applying a satin or gloss clear coat will affect the final look.
Install the doors and drawers, ensuring that they align properly and operate smoothly. Adjust the hinges and drawer slides as needed. Attach the chosen hardware, such as knobs or pulls. Remember to allow enough space for the door to swing and clear any adjacent object.
Finally, add any finishing touches, such as trim or molding, to conceal gaps or imperfections. Caulk any seams to create a seamless look. Clean the cabinets thoroughly before use.
Installing built-in cabinets next to a fireplace is a significant undertaking that requires careful planning, precise execution, and attention to detail. By following these guidelines, homeowners can create a beautiful and functional addition to their living space while ensuring the safety of their home.

Diy Built Ins Cabinets Designing In For The Johnson Files

Diy Fireplace Surround And Built Ins Our Blessed Life

Built In Cabinets Designatedspacedesign Com

Custom Built In Cabinets Floating Shelves And Fireplace Mantel

Diy Fireplace Surround And Built Ins Our Blessed Life

Diy Built In Cabinets Around The Fireplace Part 2 Honeybear Lane

Built In Cabinets Designatedspacedesign Com

White Built In Bookshelves Around The Fireplace Green With Decor

White Built In Bookshelves Around The Fireplace Green With Decor

Fireplace And Built In Shelving Reveal Jenuine Home
Related Posts