How to Build a Wood Fireplace Mantel Shelf
A wood fireplace mantel shelf serves as a focal point in a living space, adding warmth, character, and functional display space above a fireplace. Building one requires careful planning, precise execution, and an understanding of basic woodworking techniques. This article outlines the process of constructing a wood fireplace mantel shelf, covering material selection, construction methods, installation considerations, and safety precautions.
Planning and Design
Before beginning construction, a detailed plan is crucial. This involves determining the desired dimensions, style, and material for the mantel shelf. Accurate measurements of the fireplace and surrounding wall are essential to ensure the mantel shelf fits properly and complements the existing architecture. Consider the following aspects during the planning phase:
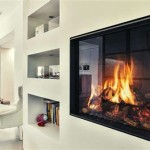
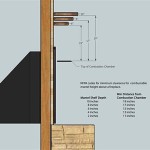
1. Dimensions: Measure the width of the fireplace opening and the surrounding wall space. The mantel shelf should extend beyond the fireplace opening on both sides to create a balanced visual appearance. Typical overhangs range from 6 to 12 inches on each side. The depth of the mantel shelf will determine the amount of display space available. Common depths range from 8 to 12 inches. The height of the mantel shelf above the fireplace opening is critical for safety and aesthetic reasons. Building codes often specify minimum clearances between the top of the fireplace opening and the bottom of the mantel shelf to prevent the mantel from overheating. Consult local building codes for specific requirements. A general rule of thumb is to maintain a clearance of at least 12 inches for non-combustible fireplaces and 18 inches for wood-burning fireplaces.
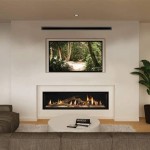
2. Style: The style of the mantel shelf should complement the overall design of the room. Consider factors such as the architectural style of the house, the existing furniture, and the desired aesthetic. Options range from simple, minimalist designs to more elaborate, traditional styles with decorative moldings and carvings. A rustic mantel shelf might feature reclaimed wood with a distressed finish, while a modern mantel shelf might have clean lines and a smooth, painted surface.
3. Material Selection: The choice of wood will significantly impact the appearance, durability, and cost of the mantel shelf. Common wood species for mantel shelves include pine, oak, maple, cherry, and walnut. Pine is a relatively inexpensive and readily available option, but it is also softer and more prone to dents and scratches. Oak is a durable and versatile hardwood with a distinctive grain pattern. Maple is a dense, fine-grained hardwood that is well-suited for painted finishes. Cherry is a beautiful reddish-brown hardwood that is known for its rich color and smooth texture. Walnut is a dark, luxurious hardwood that is prized for its elegant appearance. Consider using reclaimed wood for a rustic or environmentally friendly option. Reclaimed wood can add character and history to a mantel shelf, but it may require more preparation and cleaning to remove nails, screws, and other debris. In addition to solid wood, engineered wood products such as plywood and MDF (medium-density fiberboard) can be used for certain components of the mantel shelf. Plywood is a strong and stable material that is often used for the inner structure of the mantel shelf. MDF is a smooth, uniform material that is well-suited for painting and can be used for decorative moldings and trim.
4. Fire Safety: When designing a wood fireplace mantel shelf, fire safety is of paramount importance. Ensure that the mantel shelf meets all local building codes and regulations regarding clearances from the fireplace opening. Consider using fire-resistant materials, such as fire-retardant-treated wood or non-combustible materials, for the portions of the mantel shelf that are closest to the fireplace. Properly sealing and finishing the wood can also help to reduce its flammability.
Construction Process
The construction of the mantel shelf involves several steps, including cutting the wood, assembling the components, and finishing the surface. Here's a general outline of the construction process:
1. Cutting the Wood: Using the dimensions determined during the planning phase, cut the wood to the required lengths and widths. Use a table saw, circular saw, or miter saw to ensure accurate and square cuts. Wear safety glasses and hearing protection when operating power tools. When cutting long pieces of wood, use a sawhorse or other support to prevent the wood from bending or breaking. If using reclaimed wood, carefully inspect the wood for nails, screws, or other debris before cutting. Remove any debris before cutting to avoid damaging the saw blade.
2. Assembling the Components: The method of assembly will depend on the design of the mantel shelf. A simple mantel shelf may consist of a single piece of wood, while a more complex mantel shelf may be constructed from multiple pieces of wood joined together. Common joinery methods include butt joints, miter joints, and mortise-and-tenon joints. Butt joints are the simplest type of joint, where two pieces of wood are joined end-to-end. Miter joints are used to join two pieces of wood at an angle, typically 45 degrees, to create a corner. Mortise-and-tenon joints are stronger and more durable than butt joints or miter joints. They involve cutting a mortise (a hole) in one piece of wood and a tenon (a projecting tongue) on the other piece of wood. The tenon is then inserted into the mortise and secured with glue or fasteners. Use wood glue and screws or nails to secure the joints. Clamps can be used to hold the pieces of wood together while the glue dries. Allow the glue to dry completely before removing the clamps. For a hollow mantel shelf, construct a frame using 2x4 lumber or similar material. This frame will provide support for the mantel shelf and allow it to be securely attached to the wall. Cover the frame with plywood or MDF to create a smooth, paintable surface.
3. Sanding and Smoothing: After the mantel shelf has been assembled, sand all surfaces to remove any rough edges or imperfections. Start with a coarse grit sandpaper (e.g., 80 grit) and gradually work your way up to a finer grit sandpaper (e.g., 220 grit). Use a sanding block or orbital sander to ensure a smooth and even surface. Pay particular attention to the edges and corners of the mantel shelf. Rounding over the edges and corners can help to prevent splintering and make the mantel shelf more comfortable to touch. After sanding, remove any sanding dust with a tack cloth or vacuum cleaner.
4. Finishing: The finish will protect the wood and enhance its appearance. Options include paint, stain, varnish, and polyurethane. Paint is a good option for a modern or contemporary style mantel shelf. Choose a paint color that complements the overall design of the room. Stain is a good option for highlighting the natural grain of the wood. Choose a stain color that complements the wood species. Varnish and polyurethane are clear finishes that provide a durable and water-resistant coating. Apply the finish according to the manufacturer's instructions. Multiple coats may be required for optimal protection. Allow each coat to dry completely before applying the next coat. Sand lightly between coats to remove any imperfections. For a rustic finish, consider using a distressed paint technique or applying a dark wax to highlight the grain of the wood.
Installation
Proper installation is crucial for the safety and stability of the mantel shelf. Before installing the mantel shelf, locate the wall studs using a stud finder. The mantel shelf should be securely attached to the wall studs to prevent it from falling down. Consider the following installation methods:
1. French Cleat: A French cleat is a simple and effective way to hang a mantel shelf. It consists of two pieces of wood, one attached to the wall and the other attached to the back of the mantel shelf. The two pieces of wood are cut at a 45-degree angle, allowing them to interlock and support the weight of the mantel shelf. Attach the wall cleat to the wall studs using screws. Make sure the cleat is level before attaching it. Attach the mantel cleat to the back of the mantel shelf using screws and glue. Make sure the cleat is positioned so that the mantel shelf will be level when it is hung on the wall. Hang the mantel shelf on the wall by sliding the mantel cleat onto the wall cleat.
2. Mounting Brackets: Mounting brackets are another option for installing a mantel shelf. Choose brackets that are strong enough to support the weight of the mantel shelf and any items that will be placed on it. Attach the brackets to the wall studs using screws. Make sure the brackets are level and spaced evenly apart. Position the mantel shelf on the brackets and secure it with screws from underneath. Concealed mounting brackets offer a clean, streamlined look, as they are not visible from the front of the mantel shelf.
3. Mortar Installation: If the fireplace is constructed of brick or stone, the mantel shelf can be mortared directly into the masonry. This method requires specialized tools and experience, and it is best left to a professional mason. Before mortaring the mantel shelf into place, make sure the masonry is clean and free of any loose debris. Apply a layer of mortar to the back of the mantel shelf and carefully position it against the masonry. Use shims to hold the mantel shelf in place while the mortar dries. Allow the mortar to dry completely before removing the shims.
4. Safety Considerations: Ensure the mantel shelf is securely fastened to the wall to prevent it from falling and causing injury. Regularly inspect the mantel shelf for any signs of damage or instability. If the mantel shelf is located near a wood-burning fireplace, be sure to keep flammable items away from the heat. Never leave a fire unattended.
Final Touches
Once the mantel shelf is installed, add decorative items to personalize the space. Consider displaying photographs, artwork, candles, or other decorative objects. Avoid placing flammable items too close to the fireplace. Ensure the items are arranged in a visually appealing and balanced manner. Consider adding lighting to the mantel shelf to highlight the decorative items. Install recessed lighting or use spotlights to create a warm and inviting atmosphere.

I Love How This Simple Diy Mantel Changes The Fireplace Find Out To Build A Or F Shelves

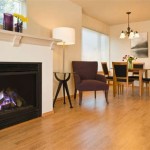
See How Our Modern Diy Fireplace Mantel Shelf Updated Living Space

Diy Floating Mantel Shelf

Diy Rustic Fireplace Mantel The Cure For A Boring
:max_bytes(150000):strip_icc()/ablossominglife-4151b41015a64193a437e981c3aad037.jpg?strip=all "17 Diy Fireplace Mantel Plans")
17 Diy Fireplace Mantel Plans

How To Build A Diy Mantel Shelf Simply Home

Easy Fireplace Mantel Diy

See How Our Modern Diy Fireplace Mantel Shelf Updated Living Space

How To Build And Hang A Mantel On Stone Fireplace Shanty 2 Chic

Diy Wood Mantel Simple To Make Artsy Rule
Related Posts