How To Build A Wall Over a Brick Fireplace
Many homeowners eventually consider repurposing a brick fireplace. Whether the fireplace is no longer in use, or a room redesign necessitates its removal from view, building a wall over a brick fireplace is a common solution. This article outlines the process of constructing a wall over a brick fireplace, detailing crucial steps and considerations for achieving a structurally sound and aesthetically pleasing result.
Before initiating any construction, a thorough assessment of the existing fireplace and surrounding structure is essential. This assessment should include an inspection for structural integrity, potential hazards, and local building codes. Ignoring these preliminary steps can lead to costly and potentially dangerous problems down the line.
Specifically, the fireplace should be checked for any signs of cracking, crumbling, or water damage. These issues need addressing before any further work commences, as they may compromise the stability of the new wall. Furthermore, understanding local building codes is paramount. Some municipalities may have specific regulations regarding the covering or removal of fireplaces, particularly concerning ventilation requirements. Contacting the local building department is advised to ensure compliance and secure any necessary permits.
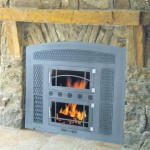
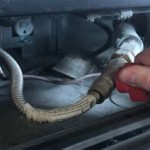
Moreover, the type of fireplace (wood-burning, gas, or electric) influences the preparatory steps. Gas fireplaces necessitate a professional to disconnect the gas line safely and cap it off according to code. Wood-burning fireplaces, even if unused, may require specific procedures for sealing the chimney to prevent drafts and potential animal ingress. Electric fireplaces are more straightforward to disconnect, but it is still recommended to consult with a qualified electrician to ensure safe disconnection procedures.
Key Point 1: Preparing the Brick Surface
The initial stage of building a wall over a brick fireplace involves preparing the brick surface to ensure proper adhesion of the new wall. This process primarily entails cleaning the brick and creating a suitable bonding surface. Proper preparation is critical for the longevity and stability of the wall.
The first step is to thoroughly clean the brick surface. This removes dust, soot, grease, and any other contaminants that could hinder adhesion. A wire brush and a solution of trisodium phosphate (TSP) dissolved in water are effective for cleaning brick. Always wear appropriate safety gear, including gloves and eye protection, when working with TSP.
Scrub the brick surface vigorously with the wire brush and TSP solution, paying particular attention to areas with heavy soot or grease buildup. After scrubbing, rinse the surface thoroughly with clean water to remove any remaining TSP residue. Allow the brick to dry completely before proceeding. A pressure washer can also be used for cleaning, but care must be taken not to damage the brick or mortar.
Once the brick is clean and dry, the next step is to create a bonding surface. Since brick is relatively smooth, it may not provide sufficient grip for the new wall. One method to improve adhesion is to apply a bonding adhesive specifically designed for masonry surfaces. Follow the manufacturer's instructions for application, ensuring the adhesive is applied evenly and allowed to dry for the specified time. Alternatively, a scratch coat of mortar can be applied to the brick surface. This involves applying a thin layer of mortar to the brick and scratching it with a notched trowel to create a textured surface for better adhesion. The scratch coat should be allowed to cure for at least 24 hours before proceeding with the construction of the wall.
Another key consideration is the potential for moisture migration through the brick. Applying a vapor barrier to the brick surface before building the wall can help prevent moisture from seeping into the new structure, which can lead to mold growth and structural damage. The vapor barrier should be applied according to the manufacturer’s instructions, ensuring it is properly sealed to the surrounding surfaces.
Key Point 2: Framing the Wall
With the brick surface prepared, the next phase involves framing the wall. This typically involves constructing a stud wall directly in front of the fireplace. The framing provides the structural support for the wall and determines its overall shape and dimensions. Accurate framing is essential for a stable and aesthetically pleasing wall.
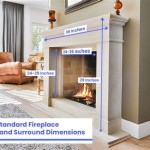
The first step in framing the wall is to determine the desired dimensions and layout. The wall should extend far enough to completely cover the fireplace and blend seamlessly with the existing walls. Measure the width and height of the fireplace, adding extra allowance for the thickness of the drywall and any desired aesthetic finishes. Use a level and plumb bob to ensure the wall is straight and aligned with the existing structure.
Next, construct the stud wall using lumber of appropriate dimensions (typically 2x4 or 2x6 studs, depending on the desired wall thickness and structural requirements). The studs should be spaced 16 inches on center (OC) for standard drywall application. Start by constructing the top and bottom plates of the wall. These plates are typically made of the same lumber as the studs and are attached to the floor and ceiling using construction adhesive and fasteners (such as screws or nails).
Once the top and bottom plates are in place, install the vertical studs. Measure and cut the studs to the appropriate length, ensuring they fit snugly between the top and bottom plates. Use a level to ensure each stud is plumb before securing it to the plates with nails or screws. At minimum, two fasteners should be used at each connection point. Add additional studs around doors or windows, if any are planned in the wall design.
Securing the framed wall to the existing structure is crucial for stability. This can be achieved by attaching the top and bottom plates to the surrounding walls and floors using construction adhesive and fasteners. If the fireplace is located against an exterior wall, ensure proper insulation and sealing to prevent air leaks and energy loss. Consider using pressure-treated lumber for the bottom plate if it is in contact with concrete or masonry to prevent rot.
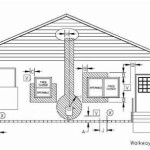
When framing around a chimney stack, be sure to leave a sufficient air gap to prevent direct contact between the framing and the chimney. This is important because the chimney can get extremely hot, especially if the fireplace is ever used again. Direct contact between the framing and the chimney could create a fire hazard. Consult local building codes for specific requirements regarding clearances around chimneys.
Key Point 3: Covering and Finishing the Wall
With the framing complete, the final stage involves covering and finishing the wall. This typically involves installing drywall, applying joint compound, sanding, and painting. The goal is to create a smooth, seamless surface that blends seamlessly with the surrounding walls.
The first step in covering the wall is to install drywall. Measure and cut the drywall sheets to fit the framed wall, using a utility knife and T-square for accurate cuts. Drywall should be installed with the paper side facing out and secured to the studs using drywall screws. The screws should be driven in just deep enough to dimple the paper without tearing it.
Stagger the drywall seams for added strength and to minimize the risk of cracking. Leave a small gap (approximately 1/8 inch) between the drywall sheets to accommodate joint compound. After the drywall is installed, apply joint compound to the seams and screw holes. Use a taping knife to spread the joint compound evenly, feathering the edges to create a smooth transition. Apply multiple coats of joint compound, allowing each coat to dry completely before applying the next.
Once the joint compound is dry, sand the surface smooth using fine-grit sandpaper. Use a sanding block or pole sander to avoid creating uneven surfaces. Wear a dust mask or respirator to protect yourself from drywall dust. Wipe the surface clean with a damp cloth to remove any remaining dust.
Before painting, apply a primer to the drywall surface. Primer helps to seal the drywall and provides a uniform surface for the paint to adhere to. Apply the primer according to the manufacturer’s instructions, ensuring it is applied evenly and allowed to dry completely before painting.
Finally, paint the wall with the desired color and finish. Apply multiple coats of paint, allowing each coat to dry completely before applying the next. Use a high-quality brush or roller for best results. Consider the surrounding décor when choosing the paint color and finish. Once the paint is dry, the wall is complete. Inspect the wall for any imperfections and touch up as needed.
Beyond these basic steps, consider adding decorative elements to the wall to further enhance its aesthetic appeal. For example, you could install crown molding along the top of the wall or add a decorative baseboard. You could also install a floating shelf or other decorative accents. The possibilities are endless, and the key is to choose elements that complement the overall style of the room.
Throughout the entire process, safety should be the top priority. Wear appropriate safety gear, including gloves, eye protection, and a dust mask. Work in a well-ventilated area and follow all safety instructions provided by the manufacturers of the materials used. If you are not comfortable performing any of these tasks yourself, it is best to hire a qualified contractor to complete the work.

Diy Fireplace Makeover Wood Slat

How To Build A Fireplace Surround Beneath My Heart

How To Build A Fireplace Surround Beneath My Heart

Diy Concrete Fireplace Makeover Before After Cherished Bliss

Diy Fireplace Makeover Wood Slat

Build A Mantel Over Brick Fireplace

Diy Fireplace Makeover Wood Slat

How To Build A Fireplace Surround Beneath My Heart

How To Install A Mantel On Brick Fireplace 1905 Farmhouse

How To Cover A Brick Fireplace With Wood Stone Nina Hendrick Home
Related Posts