How to Build a Stacked Stone Fireplace Surround
A stacked stone fireplace surround adds a rustic and elegant focal point to any living space. This project, while requiring some time and effort, is manageable for a homeowner with basic DIY skills and a careful approach. The following guide outlines the steps involved in constructing a durable and aesthetically pleasing stacked stone fireplace surround.
Before commencing any construction, it is essential to consult local building codes and regulations regarding fireplace surrounds and fire safety standards. These codes often dictate clearance requirements from combustible materials and may necessitate professional inspection upon completion of the project. Ignorance of these regulations can lead to costly corrections and potential safety hazards.
The selection of materials is crucial for achieving the desired aesthetic and ensuring the longevity of the fireplace surround. Natural stone offers a unique and varied appearance, while manufactured stone provides a more consistent and often more cost-effective alternative. Regardless of the choice, the stones should be of appropriate size and thickness for easy handling and secure installation. Other necessary materials include mortar mix, a mixing tub, trowels, a level, a wet saw with a diamond blade (for cutting stone), safety glasses, work gloves, and a moisture barrier for the underlying surface.
Preparing the Fireplace Area
The first step in the construction process involves preparing the existing fireplace area. This typically entails removing any existing surround material, such as wood, tile, or brick. The surface beneath the old surround must be clean, structurally sound, and level. It is critical to remove any loose debris, dust, or grease that could compromise the adhesion of the mortar.
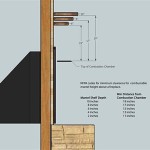
Once the existing surround is removed, inspect the underlying structure for any signs of damage, such as cracks or crumbling masonry. Repair any damage before proceeding. If the underlying surface is combustible, such as wood framing, it is essential to install a non-combustible moisture barrier, such as cement backer board, to provide a fire-resistant base for the stone. The moisture barrier should be securely fastened to the framing with appropriate screws.
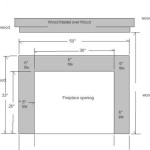
Accurate measurements are essential for a successful project. Measure the dimensions of the fireplace opening and the area intended to be covered with stacked stone. Create a scaled drawing or template to visualize the layout and calculate the amount of stone required. This planning stage will help minimize waste and ensure a balanced and symmetrical appearance.
Applying the Mortar and Setting the Stone
Mortar is the binding agent that holds the stones together and to the underlying surface. Prepare the mortar mix according to the manufacturer's instructions, adding water gradually until achieving a smooth, workable consistency. Avoid mixing too much mortar at once, as it can dry out before it can be used. A small batch, mixed frequently, is preferable.
Apply a layer of mortar to the back of each stone, ensuring that it is thick enough to create a strong bond but not so thick that it oozes out excessively when the stone is pressed into place. Position the first stone at the base of the surround, ensuring it is level and aligned with the planned layout. Press the stone firmly against the moisture barrier, allowing the mortar to adhere securely.
Continue setting the stones, working from the bottom up and outward. stagger the joints between the stones to create a more visually appealing and structurally sound wall. Use shims, if necessary, to maintain consistent spacing and alignment. After setting each stone, use a level to verify that it is plumb and aligned with the adjacent stones. Periodically step back and assess the overall appearance to ensure that the layout is progressing as planned.
Cutting and Shaping Stones
Inevitably, achieving a seamless stacked stone surround requires cutting and shaping stones to fit around the fireplace opening and at the edges of the surround. A wet saw equipped with a diamond blade is the ideal tool for this purpose. Mark the desired cut line on the stone with a pencil.
When using the wet saw, wear safety glasses to protect the eyes from flying debris. Slowly guide the stone through the blade, allowing the water to cool the blade and minimize dust. For more intricate shapes, consider using a masonry hammer and chisel to carefully shape the stone. Practice on scrap pieces of stone before attempting cuts on the final pieces.
After cutting a stone, dry fit it in place to ensure a proper fit. Make any necessary adjustments before mortaring it into position. Pay close attention to the joints between the cut stones and the adjacent stones, ensuring they are consistent in width and alignment.
Grouting and Finishing the Surround
Once all the stones are set and the mortar has partially cured (typically after 24-48 hours), it is time to grout the joints. Grouting is the process of filling the gaps between the stones with mortar to create a more finished and weather-resistant surface. Although, with stacked stone, the mortar often serves as the grout, in which case after cleaning off any excess mortar, the look and feel of natural stone can be achieved.
Prepare a batch of mortar mix that is slightly thinner than the mortar used for setting the stones. Use a grout bag or a small trowel to carefully fill the joints between the stones with mortar. Avoid overfilling the joints, as this can make cleanup more difficult. After applying the grout, use a damp sponge to wipe away any excess mortar from the surface of the stones.
Once the grout has fully cured according to the manufacturer's instructions, apply a sealant to the stone surface. This will help protect the stone from moisture and stains, and it will make it easier to clean. Choose a sealant that is specifically designed for use on natural stone or manufactured stone. Apply the sealant according to the manufacturer's instructions, ensuring that all surfaces are evenly coated.
Check for any loose mortar or grout and touch up as needed. A final cleaning of the stone surface will remove any residual dust or debris. With proper installation and maintenance, a stacked stone fireplace surround will provide years of beauty and enjoyment.

B S Diy Stacked Stone Fireplace Surround Genstone

Hirondelle Rustique Diy Stacked Stone Fireplace First Remodeling Project Part 2 Fireplaces Brick Makeover Remodel

Diy Fireplace Surround With Stacked Stone Panels Barron Designs

How To Build An Outdoor Stacked Stone Fireplace

Stacked Stone Fireplace How To Diy

Thin Stone Veneers Make A Fireplace Update Easy Swenson Granite 100 Natural Stones

Installed Stacked Stone Fireplace Stained Built In Cabinets Basement Build 18

Stacked Stone Fireplace Cost Installation Examples Ideas

12 Stacked Stone Fireplace Ideas For Optimal Coziness

Diy Stacked Stone Fireplace First Remodeling Project Part 2 Designs Design Fireplaces
Related Posts