How to Build an Outdoor Fireplace Throat
An outdoor fireplace throat is a crucial component of the structure, acting as a transition zone between the firebox and the chimney. It ensures efficient airflow, optimal draft, and safe burning conditions. Constructing a well-designed throat is essential for maximizing performance and longevity of your outdoor fireplace. This article will guide you through the process of building a fireplace throat, providing you with essential information and step-by-step instructions.
Understanding Fireplace Throat Function
The fireplace throat serves several important functions that directly impact the fireplace's performance and safety:
- Directs Smoke and Gases: The throat efficiently channels smoke and combustion gases upward into the chimney, preventing them from escaping into the surrounding area.
- Controls Draft: The size and shape of the throat play a crucial role in regulating the draft, ensuring sufficient airflow to sustain a strong flame while preventing excessive backdraft.
- Reduces Creosote Buildup: Proper throat design promotes faster and cleaner burning, reducing the likelihood of creosote buildup in the chimney, which can lead to fires.
- Protects Walls and Structures: The throat helps prevent heat and smoke from escaping into surrounding walls and structures, ensuring safety and structural integrity.
Choosing the Right Throat Design
There are various fireplace throat designs available, each with its advantages and disadvantages. When selecting the right design, consider factors such as the fireplace size, chimney height, fuels used, and personal preferences. Here are some common throat designs:
- Damper Throat: This design incorporates a damper that allows for airflow control. It provides flexibility in regulating the draft for different burning conditions.
- Fixed Throat: A fixed throat design features a permanent opening that allows for a consistent airflow. It is a simple and cost-effective option, offering good draft control and durability.
- Adjustable Throat: This design allows for adjustments in the throat opening, offering precise control over draft levels. It is ideal for fireplaces with varying fuel types and burning conditions.
Consult with a qualified fireplace professional to determine the most suitable throat design based on your specific needs and fireplace specifications.
Constructing the Fireplace Throat
The construction of a fireplace throat involves creating a narrow passageway between the firebox and the chimney. The process typically involves the following steps:
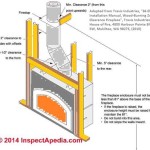
1. Prepare the Opening
Begin by carefully measuring and marking the desired throat opening on the firebox. It should be a rectangular shape, ensuring a smooth transition from the firebox to the chimney. Cut the opening precisely using a masonry saw or a suitable power tool, ensuring clean edges.
2. Install Throat Liner
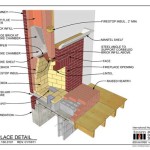
Install a firebrick or refractory mortar liner within the throat opening. These materials are designed to withstand high temperatures and provide a durable and heat-resistant surface. The liner should extend about 2-3 inches into the firebox and the chimney, creating a smooth and consistent passageway for smoke and gases.
3. Construct the Throat
Build a supporting structure around the throat opening using firebrick or refractory mortar. This structure should form a narrow passageway that aligns with the chimney. The throat should be sloped slightly upward towards the chimney to facilitate efficient upward airflow.
4. Install Damper (Optional)
If you have chosen a damper throat design, carefully install the damper within the throat opening. The damper should function smoothly and seal tightly when closed. Ensure the damper is properly secured and aligned with the throat opening.
Considerations for Building a Fireplace Throat
While constructing the fireplace throat, consider these important factors:
- Throat Size: The throat opening area should be appropriately sized to the firebox and chimney dimensions. A too-large opening can result in weak draft and excessive smoke, while a too-small opening can hinder airflow and create backdraft conditions.
- Material Selection: Choose firebrick or refractory mortar specifically designed for high-temperature applications. These durable materials can withstand the heat and harsh conditions within the fireplace.
- Proper Sealing: Ensure all joints and seams are properly sealed using refractory mortar. This will prevent air leaks and ensure efficient airflow.
- Chimney Height: The chimney height significantly impacts draft. Ensure the chimney extends at least 3 feet above the highest roof point, and consider local building codes and regulations.
Remember, building a fireplace throat requires careful planning and execution. If you have any doubts or concerns, consult with a qualified fireplace professional for guidance and assistance.

Stoneblog Living Stone Masonry

Stonetutorials Living Stone Masonry

Casting Rumford Throat Fireplace Design Diy Outdoor

Build An Outdoor Fireplace The Shed

Stonetutorials Living Stone Masonry

Home Dzine Garden Tips On Building An Outdoor Fireplace Build A Backyard

Build An Outdoor Fireplace The Shed

The Fastest Est And Best Way To Build An Outdoor Fireplace

How To Build Outdoor Fireplaces With S Wikihow

Build An Outdoor Fireplace The Shed
Related Posts