How To Build a Mantel For an Electric Fireplace Insert
An electric fireplace insert offers a convenient and aesthetically pleasing alternative to traditional wood-burning fireplaces. They provide warmth without the need for venting or fuel storage, making them suitable for apartments, condos, and homes without existing fireplaces. To enhance the visual appeal of an electric fireplace insert, constructing a custom mantel can significantly improve its integration into the room's decor. This article provides a comprehensive guide on building a mantel specifically designed for an electric fireplace insert.
Before embarking on the construction process, meticulous planning is crucial. This involves accurately measuring the dimensions of the electric fireplace insert, considering the desired style and materials for the mantel, and ensuring compliance with any local building codes or regulations. A well-thought-out plan will streamline the building process and minimize potential errors.
Electric fireplace inserts generate heat, although less than traditional fireplaces. It's essential to adhere to the manufacturer's guidelines regarding heat clearances. These guidelines specify the minimum distances required between the insert and combustible materials, such as wood. Failure to observe these clearances can pose a fire hazard. Consult the insert's user manual for specific clearance requirements.
Key Point 1: Planning and Design Considerations
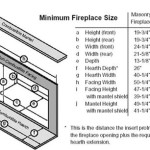
The first step involves accurately measuring the electric fireplace insert. This includes the width, height, and depth of the unit, as well as the dimensions of any trim or surrounding features. Record these measurements precisely, as they will serve as the foundation for the mantel design. Consider adding extra space around the insert for ease of installation and ventilation, typically a minimum of one inch on all sides.
Next, determine the desired style of the mantel. Common styles include traditional, modern, farmhouse, and rustic. Research different mantel designs to find inspiration and select a style that complements the existing decor of the room. Consider the overall aesthetic and choose a design that integrates seamlessly with the existing furniture and architectural elements.
Selecting the appropriate materials is critical for both aesthetics and safety. Wood is a common choice for mantel construction due to its versatility and natural appeal. Options include solid wood, such as pine, oak, or maple, as well as engineered wood products like plywood or MDF (medium-density fiberboard). Solid wood offers superior durability and a more premium appearance, while engineered wood products are more cost-effective and less prone to warping. If using engineered wood, ensure it is of sufficient thickness to support the weight of the mantel and any decorative items placed on it. When selecting materials, also consider the overall budget and availability.
Develop a detailed sketch or blueprint of the mantel design, incorporating the measurements of the electric fireplace insert and the chosen style. This blueprint should include dimensions for all components, such as the mantel shelf, legs or supports, and any decorative elements. A detailed blueprint will serve as a guide during the construction process and help ensure accurate execution of the design.
Consider the placement of electrical outlets. Electric fireplace inserts require a power source, so ensure there is a readily accessible outlet nearby. If necessary, consult with a qualified electrician to install a new outlet or relocate an existing one. Plan to conceal the power cord for a cleaner, more aesthetically pleasing appearance. Running the cord through the wall cavity or using a cord management system are viable options.
Key Point 2: Construction Process
Once the planning stage is complete, gather the necessary tools and materials. This includes safety glasses, a dust mask, a measuring tape, a level, a stud finder, a pencil, a saw (either a circular saw or a miter saw), a drill, screws, wood glue, sandpaper, and a finish of your choice (paint, stain, or varnish). Ensuring you have all the required tools and materials on hand will streamline the construction process.
Begin by cutting the wood according to the dimensions outlined in the blueprint. Use a saw to accurately cut each piece to the specified size. Ensure the cuts are clean and square for a professional finish. Take extra care to avoid splintering or chipping the wood. If using a circular saw, utilize a guide rail to ensure straight cuts. A miter saw is ideal for making precise angle cuts.
Assemble the mantel shelf first. This typically involves joining the top, front, and side pieces of the shelf using wood glue and screws. Ensure the pieces are properly aligned and securely fastened. Use clamps to hold the pieces together while the glue dries. After the glue has dried, sand the edges and surfaces of the shelf to create a smooth, even finish.
Construct the legs or supports for the mantel. These can be simple vertical pieces of wood or more elaborate designs with moldings or carvings. Attach the legs to the underside of the mantel shelf using wood glue and screws. Ensure the legs are evenly spaced and securely fastened to provide adequate support for the shelf. Use a level to ensure the legs are plumb.
If desired, add decorative elements to the mantel. This can include moldings, trim, corbels, or other embellishments. Attach these elements using wood glue and nails or screws. Pay attention to detail and ensure the decorative elements are properly aligned and securely fastened. Experiment with different decorative elements to achieve the desired aesthetic.
Sand all surfaces of the mantel to create a smooth, even finish. Start with a coarse-grit sandpaper and gradually progress to finer-grit sandpaper. Pay particular attention to the edges and corners. Remove any dust or debris before applying the finish. Sanding is crucial for achieving a professional-looking finish.
Apply the finish of your choice to the mantel. This can be paint, stain, or varnish. Choose a finish that complements the existing decor of the room and provides adequate protection for the wood. Apply the finish in thin, even coats, allowing each coat to dry completely before applying the next. Follow the manufacturer's instructions for the specific finish you are using. Multiple coats of finish will provide better protection and durability.
Key Point 3: Installation and Safety
Before installing the mantel, locate the wall studs using a stud finder. Mark the location of the studs on the wall. The mantel will need to be securely attached to the studs to provide adequate support. Using a stud finder is essential for ensuring a secure installation.
Position the mantel on the wall, ensuring it is centered above the electric fireplace insert and complies with the manufacturer's heat clearance guidelines. Use a level to ensure the mantel is perfectly horizontal. Mark the location of the mounting holes on the wall through the back of the mantel.
Drill pilot holes into the wall studs at the marked locations. The pilot holes should be slightly smaller than the screws you will be using to attach the mantel. Drilling pilot holes will prevent the wood from splitting and make it easier to drive the screws.
Attach the mantel to the wall studs using long screws. Ensure the screws are driven securely into the studs to provide adequate support. Use washers under the screw heads to prevent the screws from pulling through the wood. Check the stability of the mantel after attaching it to the wall.
Conceal the screw heads by using wood filler or decorative caps. Sand the wood filler smooth after it has dried. Touch up the finish as needed to blend the concealed screw heads with the surrounding surface.
Once the mantel is installed, install the electric fireplace insert according to the manufacturer's instructions. Ensure the insert is properly positioned and securely connected to the power source. Test the insert to ensure it is functioning correctly.
Finally, inspect the installation to ensure it is safe and secure. Verify that the mantel is firmly attached to the wall, that the electric fireplace insert is properly installed, and that all electrical connections are safe and secure. Address any issues or concerns promptly to ensure the safety and longevity of the installation.
Building a mantel for an electric fireplace insert is a rewarding project that can significantly enhance the aesthetic appeal of a room. By following these detailed steps and prioritizing safety, it is possible to create a beautiful and functional mantel that complements the electric fireplace insert and integrates seamlessly into the existing decor.

Diy Electric Fireplace Jenna Sue Design

Electric Fireplace Mantle Diy She Holds Dearly

Diy Fireplace With Electric Insert Angela Marie Made

Diy Fireplace With Electric Insert Angela Marie Made

How To Build A Diy Built In Fireplace With An Electric Insert The Creative Mom

Diy Electric Fireplace Full Hearted Home

How To Diy Built In Electric Fireplace Jenna Sue Design

Diy Shiplap Electric Fireplace Build With Mantel Hgg Home Series

Diy Shiplap Electric Fireplace Build With Mantel Healthy Grocery Girl

Diy Faux Plaster Electric Fireplace Chelsey Freng
Related Posts