How To Build A Floating Fireplace Mantel Shelf
A floating fireplace mantel shelf offers a clean, contemporary aesthetic, eliminating the need for visible supports and creating the illusion of suspension. Constructing one requires careful planning, precise measurements, and adherence to safety guidelines, especially given its proximity to heat. This article provides a comprehensive guide to building a durable and visually appealing floating fireplace mantel shelf.
Before commencing any work, it is crucial to understand local building codes and regulations pertaining to fireplace mantels. Clearance requirements between the firebox opening and combustible materials are paramount to prevent fire hazards. Consult the fireplace manufacturer's specifications as well as relevant ANSI standards. The following instructions outline a general approach, but may need adaptation to meet specific local requirements.
The project necessitates a moderate level of woodworking skill and familiarity with power tools. Safety is paramount. Always wear safety glasses, hearing protection, and a dust mask when cutting or sanding wood. Work in a well-ventilated area.
Planning and Design Considerations
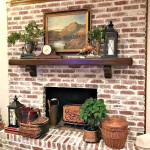
The planning stage is critical for ensuring the success of the project. Accurate measurements and a well-defined design are essential. Determine the desired length, depth, and thickness of the mantel shelf. Consider the overall style of the room and the fireplace itself. The mantel should complement the existing decor and not overpower the space.
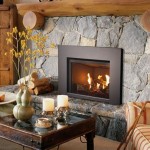
The length should be proportionate to the width of the fireplace. A common rule of thumb is to extend the mantel a few inches beyond the firebox opening on each side. The depth, or distance the mantel projects from the wall, should be adequate to hold decorative items without appearing too bulky. A depth of 8 to 12 inches is generally appropriate. The thickness of the mantel contributes to its visual weight; a thicker mantel will appear more substantial and may be appropriate for larger fireplaces.
A crucial aspect of the design is the internal support structure. Since the mantel will appear to float, the support system must be concealed within the shelf itself. This typically involves a framework constructed from wood or metal that is securely attached to the wall and provides the necessary load-bearing capacity. The type of support system will depend on the size and weight of the mantel, as well as the type of wall construction.
Consider the material selection carefully. Wood is a popular choice for fireplace mantels due to its natural beauty and versatility. Common options include hardwoods such as oak, maple, and cherry, as well as softwoods like pine and cedar. Ensure that the wood is properly dried and seasoned to prevent warping or cracking. Alternatively, manufactured wood products like MDF or plywood can be used for the internal support structure, although solid wood is generally preferred for the visible exterior.
Finally, sketch a detailed plan, including dimensions and specifications for all components. This will serve as a blueprint during the construction process.
Construction of the Mantel Shelf
Once the plan is finalized, the construction process can begin. This involves building the internal support structure, crafting the exterior shell, and assembling the components.
Building the Internal Support Structure: The support structure is the backbone of the floating mantel shelf. It is responsible for transferring the weight of the mantel and any items placed on it to the wall. A common approach is to construct a series of horizontal cleats that are securely attached to the wall studs. These cleats will then support the mantel shell.
Begin by locating the wall studs using a stud finder. Mark the locations of the studs on the wall. Cut the cleats from high-quality lumber, such as 2x4s or 2x6s. The length of the cleats should be slightly shorter than the overall length of the mantel shell to allow for a clean, concealed installation.
Attach the cleats to the wall studs using long screws, ensuring that they are level and securely fastened. The spacing between the cleats will depend on the size and weight of the mantel. Typically, a spacing of 16 to 24 inches is sufficient. For heavier mantels, consider using more closely spaced cleats. If studs are not conveniently located, consider installing a ledger board that spans multiple studs. The ledger board is then used to mount the cleats.
For masonry fireplaces, a different approach is required. Instead of attaching cleats to studs, consider using concrete anchors or epoxy to secure the support structure to the brick or stone. Ensure that the anchors are rated for the weight of the mantel and any potential load. Metal brackets can also be embedded into the masonry for added support.
Crafting the Exterior Shell: The exterior shell provides the visual appeal of the mantel shelf. It can be constructed from solid wood, veneer-covered plywood, or a combination of materials. The method of construction will depend on the desired aesthetic and the available budget.
For solid wood mantels, select lumber that is free of knots and defects. Cut the lumber to the required dimensions, ensuring that the edges are straight and square. Join the pieces together using wood glue and clamps. Depending on the size of the mantel, it may be necessary to use biscuits or dowels to reinforce the joints. Allow the glue to dry completely before proceeding.
For veneer-covered plywood mantels, cut the plywood to size and then apply a wood veneer to the exposed edges. The veneer can be attached with contact cement or edge banding. Trim the veneer flush with the plywood using a veneer trimmer or a sharp utility knife. Sand the edges smooth to create a seamless appearance.
Another common approach involves creating a hollow box-like structure. This can be achieved by building a frame from lumber and then attaching plywood or solid wood panels to the frame. This method allows for a lightweight yet strong mantel.
Assembly and Installation: Once the support structure and the exterior shell are complete, the final step is to assemble the components and install the mantel shelf. This requires careful alignment and secure attachment.
Carefully slide the mantel shell over the support cleats. Ensure that the shell fits snugly against the wall and that the cleats are fully concealed. If necessary, use shims to level the mantel. Secure the shell to the cleats using construction adhesive and screws. Drive the screws through the shell and into the cleats at an angle. This will help to conceal the screw heads.
For mantels that are installed on masonry fireplaces, ensure that the support structure is securely anchored to the wall before sliding the shell into place. Use construction adhesive to bond the shell to the support structure. If necessary, use temporary clamps to hold the shell in place while the adhesive dries.
After the adhesive has dried, fill any screw holes with wood filler. Sand the filler smooth and then apply a finish to match the surrounding decor. Common finishes include stain, paint, and varnish. Apply multiple coats of finish, allowing each coat to dry completely before applying the next. Lightly sand between coats to create a smooth, even surface.
Safety Considerations and Fire Codes
Adherence to safety standards is non-negotiable when constructing a fireplace mantel. The proximity to open flames necessitates meticulous attention to detail and compliance with relevant fire codes. Failure to do so can result in a significant fire hazard.
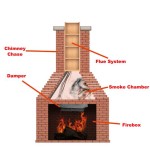
Clearance to Combustibles: Maintaining adequate clearance between the firebox opening and the mantel shelf is paramount. Most building codes specify minimum clearance distances for combustible materials surrounding a fireplace. These distances vary depending on the type of fireplace and the type of material used for the mantel. Consult local building codes and the fireplace manufacturer's specifications to determine the required clearances.
As a general guideline, mantels should be located at least 12 inches above the top of the firebox opening. For projecting mantels, the clearance may need to be increased. In some cases, a non-combustible heat shield may be required to reduce the temperature of the mantel. Heat shields are typically constructed from metal or ceramic materials and are designed to deflect heat away from the mantel.
Material Selection: The choice of materials for the mantel shelf is also crucial from a safety perspective. Combustible materials, such as wood, should be treated with a fire-retardant coating to reduce the risk of ignition. Fire-retardant coatings can be applied to the wood before installation. For extra safety, use fire-resistant materials for areas closest to heat sources. Certain types of wood are more fire-resistant than others. For example, hardwoods like oak and maple are generally more fire-resistant than softwoods like pine.
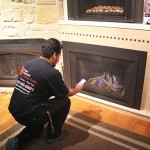
Professional Inspection: It is highly recommended to have the finished mantel shelf inspected by a qualified professional before using the fireplace. A professional can verify that the installation meets all applicable safety codes and that the mantel is properly secured. This will provide peace of mind and help to prevent potential fire hazards.
By carefully following these steps and adhering to all safety guidelines, it is possible to build a beautiful and functional floating fireplace mantel shelf that will enhance the aesthetic appeal of any room. Always prioritize safety and consult with professionals when in doubt.

Diy Floating Mantel Shelf

Diy Floating Rustic Shelf Or Mantle Shanty 2 Chic

ᑕ❶ᑐ Level Up Your Diy Skills With A Floating Fireplace Mantel Magikflame

How To Install A Floating Mantle The Easy Way In Just One Afternoon

How To Build A Floating Wood Mantel For Your Fireplace Hand Treated Home

How To Install A Floating Mantle The Easy Way In Just One Afternoon

Diy Floating Rustic Shelf Or Mantle Shanty 2 Chic

Diy Floating Mantel Fireplace Mantle

How To Build A Floating Wood Mantel For Your Fireplace Hand Treated Home

See How Our Modern Diy Fireplace Mantel Shelf Updated Living Space
Related Posts