How To Build A Fireplace Surround With Stone
A fireplace surround serves both aesthetic and functional purposes. It enhances the visual appeal of the fireplace while offering protection from heat and sparks. Building a fireplace surround with stone adds a timeless, rustic elegance that complements various home decor styles. This guide provides an extensive overview of the process, outlining the necessary steps and considerations for a successful project.
Planning and Preparation
Before embarking on the construction, thorough planning is essential. This includes selecting the right type of stone, determining the desired style, and gathering necessary materials.
Stone Selection: The choice of stone depends on personal preference, budget, and the existing fireplace design. Popular options include:
- Limestone: Natural, porous, and readily available.
- Marble: Luxurious, elegant, and comes in various colors and patterns.
- Granite: Durable, heat-resistant, and available in a wide range of colors and textures.
- Slate: Durable, naturally cleft, and offers a rustic aesthetic.
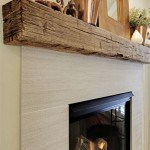
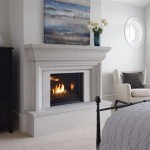
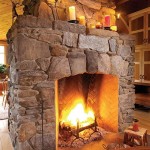
Design and Style: Consider the overall aesthetics of the room and fireplace. A simple, geometric design with clean lines complements modern spaces, while a more rustic, asymmetrical style fits traditional settings. Research different fireplace surround styles and choose one that aligns with the desired ambiance.
Materials: Gather the necessary tools and materials, including:
- Stone (based on the chosen design)
- Mortar mix
- Grout
- Level
- Tape measure
- Masonry trowel
- Bucket
- Safety glasses
- Gloves
- Chisel and hammer (for shaping stone)
- Grout float
- Sponge
Laying the Foundation
The foundation serves as the base for the stone surround. It should be level, strong, and able to support the weight of the stones.
Existing Hearth: If the fireplace has an existing hearth, inspect its condition for any cracks or damage. If necessary, repair or replace the hearth before proceeding.
New Hearth: If there’s no existing hearth, build one by following these steps:
- Measure and Mark: Determine the desired dimensions for the hearth and mark them on the floor.
- Install Support: Lay down a layer of concrete blocks or pavers as support for the hearth.
- Pour Concrete: Mix concrete according to package instructions and pour it onto the support layer. Ensure it’s level.
- Finish and Cure: Smooth the concrete surface and allow it to cure for at least 24 hours before proceeding.
Building the Stone Surround
Once the foundation is ready, start laying the stone surround, following these steps:
- Prepare Mortar: Mix mortar according to the manufacturer’s instructions. The consistency should be thick enough to hold the stone but thin enough to be easily spread.
- Start with Base Row: Apply mortar to the hearth surface, creating a bed for the first row of stones. Use a level to ensure the base row is straight and level.
- Lay Stone: Place the first stone on the mortar bed, pressing it firmly into place. Use a hammer and chisel to shape the stone if necessary.
- Continue Laying: Continue laying the stone, using a trowel to apply mortar between each stone. Ensure the stones are close together and tightly packed.
- Level and Align: Use a level to check for any gaps and adjust the stones as needed.
- Repeat Stages: Repeat the process for each subsequent row of stones, ensuring the stones are staggered to create a strong and stable structure.
Finishing Touches
After building the surround, complete the finishing touches to enhance its appearance and increase its durability.
Grouting: Apply grout between the stones to fill the gaps and prevent moisture penetration. Choose a grout color that complements the stone.
Sealing: Apply a sealant to the stone to protect it from water and stains. This will also enhance the stone’s natural beauty.
Cleaning: Once the grout and sealant are dry, clean the stone surround with a damp cloth. Ensure any excess grout or sealant is removed.

Diy Faux Cast Stone Fireplace Part 1 Demo And Tiling The Hearth Top Shelf

How To Build And Hang A Mantel On Stone Fireplace Shanty 2 Chic

Guide Diy Over Grouted Stone Fireplace Honing Home

Hirondelle Rustique Diy Stacked Stone Fireplace First Remodeling Project Part 2 Fireplaces Brick Makeover Remodel

Diy Faux Stone Fireplace Chimney H2obungalow

Diy Overgrouted Stone Fireplace Shoe Makes New

Diy Fireplace Mantel Surround Faux Cast Stone European Style Tidbits

Diy Faux Plaster Fireplace Surround Chelsey Freng

Diy Faux Cast Stone Fireplace Part 2 Building The Mantel Top Shelf

See How Our Modern Diy Fireplace Mantel Shelf Updated Living Space
Related Posts