How To Build A Fireplace Surround With Shelves
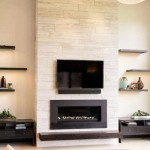
A fireplace surround with shelves offers a significant aesthetic and functional upgrade to any living space. It transforms a basic fireplace from a purely utilitarian feature into a focal point that provides storage and display opportunities. Building such a structure requires careful planning, precise measurements, and a solid understanding of basic carpentry techniques. This article provides a comprehensive guide to constructing a fireplace surround with shelves, covering everything from initial design considerations to the final finishing touches.
Before embarking on the project, it is crucial to thoroughly assess the existing fireplace and surrounding area. Dimensions need to be meticulously recorded, and any potential obstructions, such as electrical outlets or gas lines, must be identified and accounted for. Furthermore, it is essential to verify local building codes and regulations regarding fireplace modifications. Adherence to these codes ensures safety and prevents future compliance issues.
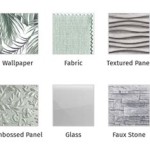
The choice of materials plays a critical role in the overall appearance and durability of the fireplace surround. Common materials include wood, such as pine, oak, or maple, as well as MDF (Medium-Density Fiberboard) for paint-grade finishes. The selection should consider the desired aesthetic, budget constraints, and the level of skill required to work with each material. In addition to the primary framing and shelving materials, fasteners, adhesives, and finishing supplies are also necessary. A detailed materials list ensures that all required components are readily available before the construction process begins.
Safety is paramount throughout the entire project. Eye protection, hearing protection, and dust masks are essential when cutting, sanding, and working with wood. A well-ventilated workspace is also crucial, especially when using adhesives and finishes. Furthermore, it is vital to exercise caution when working with power tools, following all manufacturer's instructions and safety guidelines. Disconnecting power to the area before working near electrical components is also a necessary safety precaution.
Planning and Design Considerations
The design phase is arguably the most important aspect of building a fireplace surround with shelves. A well-thought-out design ensures that the finished product meets both aesthetic and functional requirements. This stage involves creating detailed plans and drawings that specify the dimensions, materials, and construction methods.
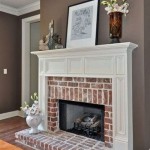
First, the overall style of the fireplace surround should complement the existing décor of the room. Whether the desired look is traditional, modern, rustic, or minimalist, the design should reflect the homeowner's preferences and the overall aesthetic of the space. Consider the existing architectural details of the room, such as crown molding, baseboards, and window trim, and incorporate similar elements into the fireplace surround design.
Next, the dimensions of the fireplace opening must be precisely measured to ensure that the surround fits snugly and safely around the firebox. The surrounding area, including the height, width, and depth, should also be measured to determine the optimal size and placement of the shelves. Consider the scale of the room when determining the size of the fireplace surround. A large, imposing surround may overwhelm a small room, while a small, understated surround may get lost in a large room.
The number, size, and configuration of the shelves should be carefully planned to meet specific storage and display needs. Consider what items will be stored or displayed on the shelves, such as books, decorative objects, or electronics, and design the shelves accordingly. Adjustable shelves offer flexibility in terms of storage capacity and can be reconfigured as needed. The depth of the shelves should also be considered to accommodate larger items. Consider adding lighting to the shelves to highlight displayed objects and create a warm, inviting atmosphere. Recessed lighting, strip lighting, or individual spotlights can be used to achieve different effects.
The plans must include detailed drawings of each component of the fireplace surround, showing the dimensions, materials, and joinery methods. These drawings will serve as a roadmap throughout the construction process, ensuring that all components fit together properly. Consider using computer-aided design (CAD) software to create detailed and accurate drawings. CAD software allows for easy modification and visualization of the design, ensuring that all aspects of the fireplace surround are carefully considered.
Construction Process
The construction phase involves cutting, assembling, and installing the various components of the fireplace surround. This requires a solid understanding of basic carpentry techniques and the ability to work accurately with power tools. The process should be approached methodically, following the plans and drawings closely.
The first step in the construction process is to build the frame of the fireplace surround. The frame provides the structural support for the entire assembly and should be constructed from sturdy, durable materials, such as wood or metal. The frame should be built according to the dimensions specified in the plans, ensuring that it fits snugly around the fireplace opening.
Next, the shelves should be cut to size according to the dimensions specified in the plans. Use a table saw or circular saw to cut the shelves accurately and cleanly. Sand the edges of the shelves to remove any splinters or rough spots. The shelves can be made from a variety of materials, such as wood, MDF, or plywood, depending on the desired aesthetic and budget.
The shelves should then be attached to the frame using screws, nails, or glue. The method of attachment will depend on the type of materials used and the desired level of stability. Ensure that the shelves are level and securely fastened to the frame. Consider using pocket screws to create strong, hidden joints between the shelves and the frame.
Once the shelves are installed, any trim or molding should be added to the fireplace surround. Trim and molding can be used to enhance the aesthetic appeal of the surround and to conceal any exposed edges or joints. The trim and molding should be cut to size and attached to the surround using nails or glue.
After the main structure is complete it can be installed around the existing fireplace. This frequently involves securing the new surround to the wall using appropriate fasteners. Ensure the surround is plumb and level before permanently attaching it.
Finishing and Installation
The finishing stage involves preparing the surface of the fireplace surround for painting or staining, applying the chosen finish, and installing any hardware or accessories. This stage is crucial for achieving a professional and aesthetically pleasing result.
Begin by sanding the entire fireplace surround to create a smooth, even surface. Use progressively finer grits of sandpaper, starting with a coarser grit to remove any imperfections and ending with a finer grit to create a smooth finish. Sanding helps to ensure that the paint or stain adheres properly and creates a flawless finish.
After sanding, apply a primer to the fireplace surround. Primer helps to seal the surface and provides a good base for the paint or stain. Choose a primer that is compatible with the type of paint or stain being used. Apply the primer evenly and allow it to dry completely before proceeding to the next step.
Then, the chosen paint or stain should be applied. Follow the manufacturer's instructions carefully, applying multiple thin coats rather than one thick coat. This will help to prevent drips and runs and create a more even finish. Allow each coat to dry completely before applying the next coat. Consider using a sprayer to apply the paint or stain for a more professional and even finish.
After the paint or stain has dried completely, apply a clear coat to protect the finish and enhance its durability. Choose a clear coat that is compatible with the type of paint or stain being used. Apply the clear coat evenly and allow it to dry completely. A clear coat also adds a protective layer against scratches and wear, ensuring that the fireplace surround looks its best for years to come.
Finally, install any hardware or accessories, such as knobs, pulls, or decorative trim. These finishing touches can add a personal touch to the fireplace surround and enhance its overall aesthetic appeal. Ensure that all hardware is securely fastened and that it complements the style of the fireplace surround.
Following these guidelines will enable the creation of a fireplace surround with shelves that enhances the beauty, functionality, and value of any home. Remember that patience, precision, and attention to detail are essential for achieving a successful outcome.

How To Design And Build Gorgeous Diy Fireplace Built Ins The Sweetest Digs

Diy Fireplace Surround And Built Ins Our Blessed Life

How To Build A Fireplace Mantel Easy Diy Blossoming Life

Easy Fireplace Mantel Diy

Fireplace Mantel Surround Pt 2 Bookcase

Diy Fireplace Mantel And Surround Jenna Kate At Home

Building Our Fireplace The Diy Mantel House Mommy

Diy Fireplace Mantel Designatedspacedesign Com

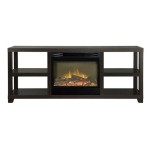
How To Build A Diy Built In Fireplace With An Electric Insert The Creative Mom

Diy Fireplace Surround And Built Ins Our Blessed Life
Related Posts