How to Build a Faux Fireplace Mantel
A fireplace mantel serves as a focal point in a room, adding character and architectural interest. However, not all homes are equipped with functional fireplaces. Installing a traditional fireplace can be a costly and complex undertaking. A faux fireplace mantel offers an alternative solution, providing the aesthetic benefits of a fireplace without the need for a chimney or gas line. Constructing a faux fireplace mantel is a manageable DIY project that can enhance the ambiance of any living space.
Successfully building a faux fireplace mantel requires careful planning, accurate measurements, and the use of appropriate materials. The design should complement the existing architectural style of the room, ensuring a cohesive and visually appealing result. The following guide outlines the steps involved in constructing a faux fireplace mantel, from initial design considerations to the final installation.
Planning and Design
The first step in building a faux fireplace mantel is to carefully consider the design and dimensions. The design should align with the overall aesthetic of the room, considering factors such as the existing trim, molding, and furniture style. A modern room might benefit from a sleek, minimalist mantel, while a more traditional space might call for a mantel with ornate detailing.
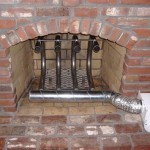
Accurate measurements are crucial for a successful project. Measure the wall space where the mantel will be installed, taking into account the height, width, and depth. Consider the proportions of the room and ensure that the mantel is appropriately sized. A mantel that is too large can overwhelm the space, while one that is too small may appear insignificant. Also, consider what will be placed inside the 'firebox.' Will it be candles, a heater, or a decorative insert? This will affect the dimensions of the inner opening.
Sketch out the design, including all dimensions, to visualize the final product. This sketch will serve as a guide throughout the construction process. It is helpful to create a detailed drawing with all the measurements clearly labeled. This drawing should include the overall dimensions of the mantel, as well as the dimensions of individual components such as the mantel shelf, legs, and firebox surround.
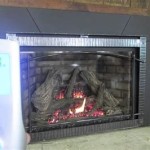
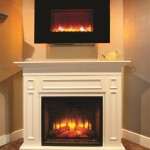
Consider different design options for the firebox opening. The firebox surround can be simple and square, or it can be more elaborate with curved or angled details. The surround can also be finished with tile, brick veneer, or other decorative materials to create a realistic fireplace effect.
Finally, decide on the materials to be used. Common materials include wood, MDF (medium-density fiberboard), and plywood. Wood provides a classic and durable option, but it can be more expensive than MDF or plywood. MDF is a cost-effective option that is easy to work with and can be painted or finished to resemble wood. Plywood is another affordable option that can be used for the structural components of the mantel.
Material Selection and Preparation
Choosing the right materials depends on the desired aesthetic, budget, and skill level. Solid wood offers a rich, natural look but requires more skill to work with and is generally more expensive. MDF, while less expensive and easier to cut, may not be as durable and requires careful finishing to prevent moisture damage.
Once the materials are selected, it is important to prepare them properly. Begin by inspecting the wood for any defects, such as knots, cracks, or warping. Remove any loose knots and fill any cracks with wood filler. Sand the wood smooth using progressively finer grits of sandpaper, starting with a coarse grit and finishing with a fine grit. This will create a smooth surface for painting or staining.
If using MDF, prime the surface with a high-quality primer to seal the material and prevent it from absorbing moisture. Apply multiple coats of primer, sanding lightly between coats, to achieve a smooth and even surface. Proper priming is essential for a durable and long-lasting finish.
Gather all necessary tools for the project. These may include a measuring tape, pencil, square, saw (circular saw or miter saw), drill, screwdriver, wood glue, clamps, sandpaper, and paint or stain. Having all the tools readily available will streamline the construction process.
Cut all the wood pieces according to the dimensions specified in the design. Accuracy is essential at this stage to ensure that the mantel fits together properly. Use a miter saw for precise cuts and ensure that all angles are accurate. It is best to double-check all measurements before cutting to avoid costly mistakes.
Construction and Assembly
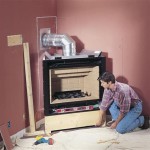
The assembly process involves piecing together the cut materials to form the mantel's structure. Start with the base of the mantel, which typically consists of the legs or side supports and the firebox surround. Assemble these components using wood glue and screws or nails. Clamps can be used to hold the pieces together while the glue dries.
Ensure that the legs or side supports are perfectly aligned to provide a stable base for the mantel. Use a level to check that the base is perfectly plumb and square. Any imperfections at this stage will be magnified as the mantel is assembled.
Next, attach the top of the firebox surround to the base. Again, use wood glue and screws or nails to secure the pieces together. Ensure that the top is flush with the sides and that all joints are tight and secure.
The mantel shelf is typically the final component to be attached. Position the mantel shelf on top of the base and secure it with wood glue and screws or nails. Ensure that the mantel shelf is centered and that it overhangs the base by an equal amount on all sides.
After the glue has dried, fill any nail holes or screw holes with wood filler. Sand the filler smooth and blend it into the surrounding wood. Inspect the entire mantel for any imperfections and address them as needed.
Finishing and Installation
Once the mantel is assembled and sanded, it is time to apply the finish. The finish can be paint, stain, or a combination of both. If painting, apply multiple coats of primer and paint, sanding lightly between coats, to achieve a smooth and even finish. Choose a paint color that complements the existing décor of the room.
If staining, apply the stain according to the manufacturer's instructions. Use a brush or rag to apply the stain evenly, and then wipe off any excess stain. Allow the stain to dry completely before applying a clear coat of varnish or polyurethane to protect the finish.
Before installing the mantel, locate the wall studs using a stud finder. The mantel should be securely attached to the wall studs to ensure that it is stable and can support any items placed on the mantel shelf. Mark the locations of the studs on the wall.
Position the mantel against the wall in the desired location. Use a level to ensure that the mantel is perfectly level. Drill pilot holes through the back of the mantel and into the wall studs. Secure the mantel to the wall studs using screws. Use shims if necessary to ensure that the mantel is perfectly flush against the wall.
Conceal the screws with wood filler or decorative plugs. Touch up the paint or stain as needed to blend the repairs into the surrounding finish. Once the mantel is securely installed, it is ready to be decorated and enjoyed.
Adding Decorative Elements
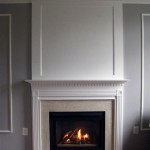
A faux fireplace mantel serves as a blank canvas for decorative expression. The addition of carefully chosen elements can enhance the overall aesthetic and create a focal point in the room. Consider incorporating elements that reflect the personal style and complement the existing decor.
One popular option is to place candles of varying heights and sizes within the firebox. The soft glow of candlelight creates a warm and inviting ambiance. Alternatively, a decorative fireplace insert can be used to simulate the appearance of a real fire without the heat or maintenance.
Consider adding a mirror above the mantel to create the illusion of more space and to reflect light throughout the room. A large antique mirror can add a touch of elegance and sophistication, while a modern mirror can complement a contemporary design.
Seasonal decorations can also be incorporated to celebrate holidays and special occasions. Garland, wreaths, and other festive decorations can be draped across the mantel to create a cheerful and inviting atmosphere.
Finally, personal items such as family photos, artwork, and collectibles can be displayed on the mantel shelf to add a personal touch and create a unique focal point in the room. Arrange the items in a visually appealing manner, considering factors such as height, color, and texture.

Diy Faux Fireplace Mantel Rebecca Propes Design

Easy Diy Faux Fireplace And Mantel Zucchini Sisters

5 Diy Faux Mantel Ideas Stow Tellu Fireplace Mantels

Mimi S Faux Mantle Ana White

How To Make A Faux Fireplace Mantel Surround Shiplap And Ss

Diy Faux Fireplace Mantel With Tile And Brick

Diy Faux Fireplace Mantel Tutorial Grace In My Space

Diy Faux Fireplace For Under 600 The Big Reveal Bless Er House

Faux Fireplace Mantel Surround Rogue Engineer

Diy Faux Fireplace Mantel Rebecca Propes Design