How To Build A Faux Corner Fireplace
A fireplace often serves as a focal point in a room, providing warmth and ambiance. However, installing a traditional fireplace can be a costly and disruptive undertaking, often requiring structural modifications and professional expertise. Therefore, a faux corner fireplace presents an attractive alternative. It offers the aesthetic appeal of a real fireplace without the associated expenses and complexities. This article provides a comprehensive guide on constructing a faux corner fireplace, outlining the necessary materials, tools, and steps involved in this project.
Before commencing the construction process, it's crucial to carefully consider the desired design and dimensions of the faux fireplace. The size and style should be proportionate to the room's overall scale and aesthetic. Several design options exist, ranging from contemporary minimalist styles to more traditional and ornate designs. A thorough assessment of the available space and personal preferences will guide the selection of the most suitable design. This planning stage is essential for ensuring that the finished faux fireplace not only looks aesthetically pleasing but also integrates seamlessly into the existing décor.
Proper planning extends to ensuring compliance with any local building codes or restrictions, even though the project does not involve a functioning firebox. Furthermore, identify the desired placement for the faux fireplace unit within the corner, taking into account existing electrical outlets and other fixtures. The design should also accommodate the intended use of the space within the firebox, whether for displaying decorative items, housing an electric fireplace insert, or simply creating a visual illusion of depth.
Key Point 1: Gathering Materials and Tools
The successful construction of a faux corner fireplace relies on acquiring the necessary materials and tools. The primary material will be the framework, typically constructed from wood, such as 2x4 lumber or plywood. The choice of wood depends on the desired structural integrity and the overall budget. Plywood provides a smooth surface for subsequent finishing, while 2x4 lumber offers greater structural support. Once the primary wood is determined, the builder must determine the quantity needed to frame out the structure. Be sure to account for waste when ordering materials.
For the exterior finish, various options are available, including drywall, faux brick panels, stone veneer, or even reclaimed wood. The selection of the finish material significantly impacts the final aesthetic appeal of the faux fireplace. Drywall provides a smooth, paintable surface, while faux brick or stone veneer replicates the look and feel of a traditional fireplace. Reclaimed wood offers a rustic and unique touch.
In addition to the core materials, essential tools include a measuring tape, level, circular saw or miter saw, drill, screwdriver, hammer, and safety glasses. A stud finder will also be useful for locating wall studs to secure the faux fireplace frame. Depending on the chosen finish material, additional tools may be required, such as a trowel for applying mortar or adhesive, or a grinder for cutting stone veneer.
Safety is paramount throughout the construction process. It is highly recommended to wear appropriate personal protective equipment (PPE), including safety glasses, gloves, and a dust mask, especially when cutting or sanding wood or other materials. Proper ventilation is also crucial when working with adhesives or paints.
Key Point 2: Constructing the Frame
The construction of the frame forms the foundation of the faux corner fireplace. The frame should be built to match the specific plan that was devised in the intial planning stages. Before beginning, double-check dimensions to ensure that the frame is correct before proceeding further.
Begin constructing the frame, ensuring that all corners are square and properly aligned. Use a level to verify that the frame is plumb. Once the basic frame is assembled, secure it to the wall studs using screws or nails. This step is critical for ensuring the stability and safety of the faux fireplace. Use a stud finder to locate the wall studs and pre-drill pilot holes to prevent the wood from splitting.
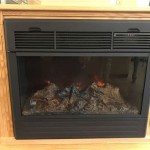
Depending on the design, the frame may incorporate additional features, such as a mantel support or a recess for an electric fireplace insert. These features should be integrated into the frame during the construction phase. The mantel support should be securely attached to the frame, providing a stable base for the mantelpiece. If incorporating an electric fireplace insert, ensure that the recess is sized appropriately to accommodate the unit and that proper ventilation is provided.
Once the frame is built and secured, prepare the surface for the chosen exterior finish. If using drywall, apply it to the frame using screws and tape the seams. If planning to paint the drywall, apply the paint before decorating. If incorporating faux brick or stone veneer, ensure that the surface is clean and prepared according to the manufacturer's instructions. If using reclaimed wood, sand and seal the wood to protect it from moisture and pests.
Key Point 3: Finishing and Detailing
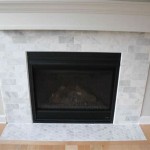
The final stages of building a faux corner fireplace involve applying the chosen finish and adding decorative details to achieve the desired aesthetic appearance. Carefully apply the finish material to the frame, ensuring that it is securely attached and properly aligned. If using faux brick or stone veneer, apply mortar or adhesive to the back of each piece and press it firmly against the frame. Use spacers to maintain consistent spacing between the pieces and allow the mortar or adhesive to dry completely before proceeding further.
Once the finish material is applied, add decorative details to enhance the visual appeal of the faux fireplace. This may include installing a mantelpiece, adding trim or molding, or incorporating decorative accessories, such as candles, vases, or artwork. The mantelpiece can be made from wood, stone, or other materials and should be securely attached to the mantel support. Trim or molding can be used to conceal the edges of the finish material and add a touch of elegance to the faux fireplace. Decorative accessories can be used to personalize the space and create a cozy and inviting atmosphere.
If an electric fireplace insert is being used, install it according to the manufacturer's instructions. Ensure that the unit is properly ventilated and that all electrical connections are made safely and correctly. Test the unit to ensure that it is functioning properly before completing the final detailing.
Inspect the finished faux corner fireplace for any imperfections and make any necessary adjustments or repairs. Ensure that all surfaces are clean and that the unit is securely attached to the wall. Once the final inspection is complete, the faux corner fireplace is ready to be enjoyed.

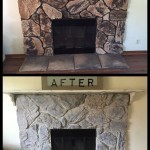
How To Build A Faux Diy Corner Fireplace With German Schmear Brick Treatment This Life

How To Build A Faux Diy Corner Fireplace With German Schmear Brick Treatment This Life

How To Build A Faux Diy Corner Fireplace With German Schmear Brick Treatment This Life

How To Build A Faux Diy Corner Fireplace With German Schmear Brick Treatment This Life

Faux Stone Corner Fireplace Genstone

How To Build A Faux Diy Corner Fireplace With German Schmear Brick Treatment Story This Life

Corner Electric Fireplace Build Start To Finish Aspenackley

How To Build A Gorgeous Diy Corner Fireplace Plus Mantel With Storage Remodelaholic

How To Build A Gorgeous Diy Corner Fireplace Plus Mantel With Storage Remodelaholic

Cozy Corner Fireplace Ideas Barron Designs