How To Build A Concrete Fireplace Mantel Shelf
A concrete fireplace mantel shelf offers a modern and durable alternative to traditional wood mantels. Its inherent strength and resistance to heat make it a safe and visually appealing addition to any fireplace. Constructing a concrete mantel shelf involves careful planning, precise formwork, concrete mixing, and a patient curing process. This article details the steps involved in building a DIY concrete fireplace mantel shelf, ensuring a successful and aesthetically pleasing outcome.
Planning and Design Considerations
Before embarking on the construction process, meticulous planning is crucial. This stage involves determining the desired dimensions of the mantel, considering the overall aesthetic of the room, and ensuring the structural integrity of the supporting wall. Accurate measurements and a detailed design blueprint are essential for a successful project.
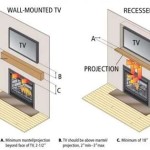
First, measure the width of the fireplace opening. The mantel shelf should extend beyond the opening on both sides, typically by 6 to 12 inches. Determine the desired depth of the mantel. A depth of 8 to 12 inches is generally adequate, but this can be adjusted based on personal preference and the room's scale. Decide on the thickness of the mantel. A thickness of 4 to 6 inches is common, providing a substantial look without being overly heavy. Document all measurements precisely.
Next, consider the style of the mantel. Will it be a simple, rectangular slab, or will it have a more complex profile with beveled edges or decorative features? Choose a style that complements the architectural style of the room. The choice of concrete mix will also impact the final appearance. A smoother mix will result in a more polished look, while a coarser mix will have a more rustic texture. The addition of pigments can customize the color of the concrete to match or complement the surrounding décor.
Crucially, evaluate the structural capacity of the wall that will support the mantel. Concrete is heavy, and the wall must be able to bear the weight of the finished mantel shelf. Consider the wall’s composition (brick, concrete block, wood studs) and its construction. If the wall's structural integrity is questionable, consult a structural engineer to determine the necessary reinforcement. The mounting method will also affect the wall’s load-bearing requirements. Securely anchoring the mantel to the wall is paramount for safety.
Finally, create a detailed design blueprint that includes all dimensions, style details, and mounting specifications. This blueprint will serve as a guide throughout the construction process, minimizing errors and ensuring a consistent outcome. This is also the time to consider any embedded features, such as lighting or decorative inlays, that might require special planning and formwork.
Building the Formwork
The formwork is the mold that will shape the concrete mantel shelf. Its construction requires precision and careful attention to detail to ensure the final product meets the desired specifications. The formwork must be sturdy, watertight, and easily demoldable.
Gather the necessary materials: melamine-coated particleboard, screws, silicone caulk, and release agent. Melamine is recommended because its smooth surface allows for easy removal of the cured concrete. Cut the melamine board to the dimensions specified in the design blueprint. This includes the bottom, sides, and end pieces of the formwork. The dimensions should account for the desired thickness and depth of the mantel shelf.
Assemble the formwork by screwing the side and end pieces to the bottom piece. Ensure that the corners are square and the joints are tight. Use clamps to hold the pieces in place while screwing them together. The screws should be countersunk to prevent them from interfering with the concrete surface. Reinforce the corners with additional screws for added stability.
Seal all the seams and corners of the formwork with silicone caulk. This prevents the concrete from leaking out during the pouring process and ensures the edges of the mantel shelf are clean and well-defined. Apply the caulk generously and smooth it out with a wet finger. Allow the caulk to dry completely before proceeding.
Apply a release agent to the inside of the formwork. This will prevent the concrete from sticking to the melamine and make it easier to remove the mantel shelf after it has cured. Several types of release agents are available, including commercial concrete release agents and vegetable oil. Apply the release agent evenly and sparingly, following the manufacturer's instructions.
Consider adding reinforcement to the formwork to prevent it from bowing or warping under the weight of the concrete. This can be achieved by adding external bracing or internal support structures. The level of reinforcement needed will depend on the size and thickness of the mantel shelf. For larger mantels, consider using steel rebar embedded within the concrete for added strength.
Mixing and Pouring the Concrete
The concrete mix is a critical factor in determining the strength, durability, and appearance of the mantel shelf. Choosing the right mix, carefully measuring the ingredients, and properly mixing the concrete are essential for a successful outcome.
Select a concrete mix that is appropriate for the project. A high-strength concrete mix is recommended for fireplace mantels due to the potential for exposure to heat. Consider using a pre-blended concrete mix for consistency, or mix your own using Portland cement, sand, and aggregate. The aggregate size should be appropriate for the thickness of the mantel shelf. A finer aggregate will result in a smoother surface, while a coarser aggregate will have a more rustic texture.
Carefully measure the ingredients according to the concrete mix instructions. Use a scale or measuring containers to ensure accuracy. Adding too much or too little water can affect the strength and workability of the concrete. Mix the concrete in a concrete mixer or using a shovel in a wheelbarrow. Add the water gradually while mixing, until the concrete reaches a workable consistency. The concrete should be wet enough to flow easily into the formwork but not so wet that it separates.
Pour the concrete into the formwork in layers, compacting each layer to remove air bubbles. Use a rubber mallet or a vibrating tool to consolidate the concrete. This will ensure that the concrete fills all the corners and crevices of the formwork and eliminates voids that could weaken the mantel shelf. Pay particular attention to the edges and corners, as these are the most susceptible to air pockets.
If using rebar for reinforcement, position it within the formwork before pouring the concrete. Ensure that the rebar is properly spaced and covered with concrete to prevent corrosion. The rebar should extend throughout the length of the mantel shelf to provide maximum strength.
Once the formwork is filled with concrete, use a screed board to level the surface. A screed board is a straight piece of wood or metal that is used to remove excess concrete and create a smooth, even surface. Run the screed board across the top of the formwork, using a sawing motion to remove any excess concrete. After screeding, use a trowel to smooth the surface further and remove any imperfections.
Curing and Finishing the Concrete
Curing is a critical process that allows the concrete to gain strength and durability. Proper curing involves keeping the concrete moist for a period of time, allowing the hydration process to complete fully. Finishing the concrete involves refining the surface to achieve the desired aesthetic.
Cover the concrete with plastic sheeting or wet burlap to prevent it from drying out too quickly. Keep the concrete moist for at least seven days. This can be achieved by periodically spraying the concrete with water or by using a self-curing compound. The curing process allows the concrete to gain strength and prevents cracking.
After the curing period, carefully remove the formwork. Loosen the screws and gently tap the sides of the formwork to release it from the concrete. Avoid using excessive force, as this could damage the mantel shelf. If the concrete is sticking to the formwork, use a pry bar to gently separate it. Remove any remaining formwork material, such as silicone caulk or release agent.
Inspect the surface of the mantel shelf for any imperfections, such as air bubbles or rough spots. Repair any imperfections with a concrete patching compound. Apply the patching compound according to the manufacturer's instructions and allow it to dry completely. Sand the surface of the mantel shelf with progressively finer grits of sandpaper to achieve the desired smoothness. Start with a coarse grit to remove any large imperfections and then gradually move to finer grits to polish the surface.
Apply a concrete sealer to protect the mantel shelf from stains and moisture. Choose a sealer that is appropriate for concrete and follow the manufacturer's instructions. The sealer will penetrate the concrete and create a barrier that prevents water and other substances from penetrating the surface. This will prolong the life of the mantel shelf and keep it looking its best.
Consider applying a concrete stain or dye to enhance the color and appearance of the mantel shelf. Concrete stains and dyes are available in a wide range of colors and can be used to create a variety of effects. Apply the stain or dye according to the manufacturer's instructions and allow it to dry completely. Seal the surface after staining or dyeing to protect the color.
Installation and Mounting
Installing the concrete mantel shelf requires careful planning and execution to ensure it is securely mounted to the wall. The mounting method will depend on the type of wall and the weight of the mantel shelf.
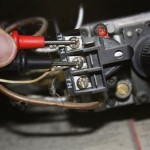
Determine the appropriate mounting method for the wall. For brick or concrete block walls, use concrete anchors or bolts. For wood stud walls, use lag screws or heavy-duty wall anchors. The mounting hardware must be strong enough to support the weight of the mantel shelf and any additional weight that may be placed on it.
Mark the location of the mounting holes on the wall, using the design blueprint as a guide. Use a level to ensure that the mantel shelf will be installed horizontally. Drill pilot holes into the wall at the marked locations. The size of the pilot holes should be slightly smaller than the diameter of the mounting hardware.
Position the mantel shelf against the wall and align the mounting holes. Insert the mounting hardware through the holes in the mantel shelf and into the pilot holes in the wall. Tighten the mounting hardware securely. Use a wrench or screwdriver to tighten the hardware until the mantel shelf is firmly attached to the wall. Avoid over-tightening, as this could damage the wall or the mantel shelf.
Conceal the mounting hardware with decorative caps or plugs. These caps or plugs can be made from concrete, wood, or metal and should match the style of the mantel shelf. The caps or plugs will provide a clean, finished look and prevent the mounting hardware from being visible.
Finally, inspect the installation to ensure that the mantel shelf is securely mounted and level. Use a level to check the horizontal alignment and a tape measure to check the vertical alignment. Make any necessary adjustments to ensure that the mantel shelf is properly installed. A properly installed concrete fireplace mantel shelf will provide a functional and aesthetic focal point for years to come.

See How Our Modern Diy Fireplace Mantel Shelf Updated Living Space

Better Than Wood Concrete Fireplace Mantel

Diy Concrete Fireplace Makeover Before After Cherished Bliss

Diy Faux Cast Stone Fireplace Part 2 Building The Mantel Top Shelf

The Making Of A Slip Covered Mantel Made By Carli

How To Build And Hang A Mantel On Stone Fireplace Shanty 2 Chic

How To Install A Wood Mantel On Masonry Fireplace Remodelaholic

Building Our Fireplace The Diy Mantel House Shelf

Modern Concrete Floating Mantel Shelf Beam

Concrete Fireplace Surrounds Hearths Mantels Network
Related Posts