How To Build Built-In Fireplace Cabinets: A Comprehensive Guide
Built-in fireplace cabinets offer a significant upgrade to any living space, providing both aesthetic appeal and functional storage. These custom units enhance the architectural features of a fireplace while offering a designated area for storing media devices, books, decorative items, or firewood. Constructing built-in fireplace cabinets requires careful planning, precise measurements, and a moderate level of woodworking skill. This article outlines the process of building built-in fireplace cabinets, providing a step-by-step guide for achieving a professional-looking result.
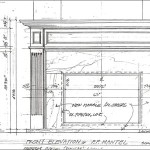
Before embarking on the construction process, it is crucial to accurately assess the available space around the fireplace. This involves measuring the width, height, and depth of the area where the cabinets will be installed. Consider any existing architectural features, such as baseboards, crown molding, or electrical outlets, that may impact the design and installation. Precise measurements are fundamental to ensuring a seamless fit and a visually appealing outcome.
Planning and Design Considerations
The design phase is critical to the success of the project. It is essential to determine the intended function of the cabinets, as this will influence the dimensions, layout, and features. Consider the types of items that will be stored in the cabinets and design the shelves, drawers, or compartments accordingly. A well-thought-out design should also integrate seamlessly with the existing style and décor of the room. Decide on the desired style, whether it's modern and minimalist, traditional and ornate, or somewhere in between. Sketch out the design, including dimensions, materials, and hardware, to provide a clear roadmap for the construction process. Consider using design software to create a detailed rendering of the finished product.
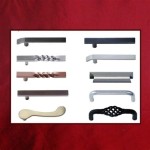
Choosing the right materials is another important consideration. Commonly used materials for built-in fireplace cabinets include plywood, MDF (Medium-Density Fiberboard), and solid wood. Plywood is a cost-effective option that offers good strength and stability. MDF is a smooth, paintable surface ideal for cabinets with intricate details. Solid wood offers a premium look and feel but is typically more expensive. Select hardware, such as hinges, drawer slides, and knobs or pulls, that complement the chosen material and style. Ensure the hardware is durable and of high quality to withstand regular use.
Safety is paramount when working on any construction project. Always wear appropriate safety gear, including safety glasses, gloves, and a dust mask. Use power tools with caution and follow the manufacturer's instructions. Ensure the work area is well-ventilated, especially when working with paints, stains, or adhesives. When working around a fireplace, take precautions to prevent fire hazards. Keep flammable materials away from the fireplace and ensure the area is clear of debris.
Construction Process: Building the Cabinet Frames
The initial step in the construction process involves building the cabinet frames. Cut the plywood or MDF to the required dimensions according to the design plan. Assemble the frames using wood glue and screws or nails. Ensure the frames are square and level before securing the joints. Use clamps to hold the pieces together while the glue dries.
Next, create the face frame of the cabinets. The face frame adds structural support and a finished look to the cabinets. Cut the face frame pieces to size and assemble them using wood glue and nails or screws. Attach the face frame to the cabinet frame, ensuring it is flush and aligned properly. Fill any nail or screw holes with wood filler and sand smooth.
Install the shelves inside the cabinet frames. Decide whether the shelves will be fixed or adjustable. For fixed shelves, cut the shelves to size and attach them to the cabinet frames using wood glue and screws. For adjustable shelves, install shelf pins or shelf supports at the desired locations. Ensure the shelves are level and securely attached to the frames.
Installation and Finishing Touches
Prior to installing the cabinets, prepare the area around the fireplace. Remove any baseboards or molding that may interfere with the installation. Clean the area and ensure it is level. Use shims to level the cabinets if necessary.
Position the cabinets around the fireplace and secure them to the wall using screws or nails. Ensure the cabinets are aligned properly and that there are no gaps between the cabinets and the wall. Use a level to ensure the cabinets are plumb and level. If necessary, adjust the position of the cabinets using shims.
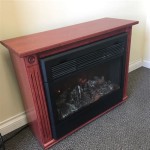
The final stage involves finishing the cabinets. Apply primer to the cabinets to create a smooth, even surface for painting or staining. After the primer has dried, sand the cabinets lightly to remove any imperfections. Apply two coats of paint or stain, allowing each coat to dry completely before applying the next. Choose a paint or stain that complements the style and décor of the room.
Install the hardware, such as knobs, pulls, hinges, and drawer slides. Ensure the hardware is properly aligned and securely attached to the cabinets. Install any decorative trim or molding to enhance the appearance of the cabinets. Caulk any gaps between the cabinets and the wall to create a seamless finish.
Clean the cabinets and the surrounding area to remove any dust or debris. Inspect the cabinets for any imperfections and make any necessary repairs or adjustments. Arrange the items that will be stored in the cabinets, taking care to maximize space and create an organized appearance. Consider adding decorative elements, such as artwork, plants, or personal photos, to personalize the space and make it more inviting.
Key Considerations for a Successful Outcome
Accuracy in measurements and meticulous attention to detail are key to a successful outcome. The dimensions need to be precise to ensure a seamless fit within the designated space. This will contribute significantly to a professional-looking built-in feature. Every cut should be carefully measured and executed cleanly, and every joint should be securely fastened.
Choosing the right finish is crucial for both aesthetics and durability. The chosen finish should complement the room's existing décor and provide long-lasting protection against wear and tear. Consider factors such as moisture resistance, scratch resistance, and ease of cleaning when selecting a finish. Properly preparing the surface and applying multiple coats of finish will ensure a smooth, even, and durable result.
The functional design of the cabinets is just as important as their appearance. The cabinets should be designed to meet specific storage needs and facilitate easy access to stored items. Consider the size and shape of the items that will be stored in the cabinets and design the shelves, drawers, and compartments accordingly. Incorporating adjustable shelves, pull-out drawers, or hidden compartments can enhance the functionality and versatility of the cabinets.

How To Design And Build Gorgeous Diy Fireplace Built Ins The Sweetest Digs

Diy Fireplace Surround And Built Ins Our Blessed Life

Diy Fireplace Surround And Built Ins Our Blessed Life

How To Build Easy Custom Built In Shelving Basic

Diy Fireplace Surround And Built Ins Our Blessed Life

How To Design And Build Gorgeous Diy Fireplace Built Ins The Sweetest Digs

Diy Electric Fireplace With Built Ins The Dabbling Crafter

How To Design And Build Gorgeous Diy Fireplace Built Ins The Sweetest Digs

S Built In Bookshelves Fireplace Around Ins

My Big Finish Diy Fireplace Built Ins
Related Posts