How To Attach Fireplace Surround Brick: A Comprehensive Guide
Attaching a brick surround to a fireplace can dramatically enhance the aesthetic appeal of a room, providing a focal point that combines visual warmth with a timeless architectural element. This process, while seemingly straightforward, requires careful planning, precise execution, and adherence to safety protocols. This article provides a detailed guide on how to successfully attach a fireplace surround using brick, ensuring a durable and visually pleasing result.
Before embarking on this project, it is crucial to determine the existing fireplace’s structural integrity and adherence to local building codes. Ensure the fireplace itself is functioning safely and efficiently. Consider consulting with a qualified professional for both inspection and advice, particularly if structural issues or code compliance concerns arise. Safety should always be the paramount concern.
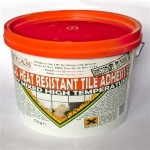
The chosen bricks must be compatible with the existing fireplace and its surrounding materials. Consider both aesthetic factors like color and texture, as well as practical considerations like size and weight. The selection of appropriate mortar is equally important; it must be formulated to withstand the high temperatures and potential thermal expansion associated with fireplace usage. Refractory mortar is generally recommended for its heat-resistant properties.
Tools required for this project typically include a brick saw or wet saw for cutting bricks, a margin trowel and brick trowel for applying mortar, a level for ensuring accurate placement, a rubber mallet for gently tapping bricks into position, a chisel and hammer for removing excess mortar or making minor adjustments, safety glasses, gloves, and a dust mask. Proper safety equipment is non-negotiable. The use of ear protection is also recommended when operating power tools.
Key Point 1: Preparing the Surface for Brick Installation
The success of a brick surround heavily relies on proper surface preparation. The existing fireplace surface must be thoroughly cleaned to remove any existing paint, wallpaper, dust, dirt, or loose debris. These contaminants can compromise the bond between the mortar and the substrate, leading to premature failure of the brick surround.
A wire brush, scraper, and detergent solution can be used to effectively clean the surface. Rinse the surface thoroughly with clean water and allow it to dry completely before proceeding. For particularly stubborn residues, a chemical stripper designed for masonry surfaces may be necessary. Always follow the manufacturer’s instructions and safety precautions when using chemical strippers.
If the existing surface is uneven or damaged, it may be necessary to apply a scratch coat of mortar. This provides a level and stable base for the brick installation. The scratch coat should be allowed to cure completely before the bricks are attached. The thickness of the scratch coat will depend on the degree of unevenness of the existing surface. A thicker scratch coat will require a longer curing time.
For surfaces that are particularly smooth or non-porous, applying a bonding agent can improve the adhesion of the mortar. Bonding agents are typically applied with a brush or roller and allowed to dry before the mortar is applied. Choose a bonding agent specifically designed for masonry applications. It is crucial to read and follow the manufacturer's recommendations for application and drying times.
Marking the layout of the brick surround on the prepared surface is a critical step. Use a level and measuring tape to accurately determine the desired dimensions and position of the brick surround. Draw guidelines on the surface to ensure that the bricks are installed straight and evenly spaced. Consider using a dry run to visualize the final appearance and make any necessary adjustments before applying mortar.
Key Point 2: Mortar Application and Brick Placement
The correct consistency of the mortar is essential for a strong and durable bond. Mix the mortar according to the manufacturer’s instructions, typically achieving a workable consistency resembling a thick paste. Avoid adding too much water, as this can weaken the mortar and lead to cracking. It is generally preferable to mix smaller batches of mortar to ensure that it remains workable throughout the installation process.
Apply a generous layer of mortar to the back of each brick, ensuring that the entire surface is covered. Use a margin trowel to scoop the mortar and a brick trowel to spread it evenly. The thickness of the mortar joint will depend on the desired aesthetic and the size of the bricks. Typically, a mortar joint of approximately 3/8 inch is standard. Pay attention to weather conditions, as extreme temperatures can affect the mortar's curing time. Consider adjusting the mortar mix based on the temperature and humidity.
Carefully position each brick onto the prepared surface, aligning it with the marked guidelines. Press the brick firmly into the mortar, ensuring that it is level and plumb. Use a rubber mallet to gently tap the brick into place if necessary. Remove any excess mortar that squeezes out from the joints using a margin trowel. Clean the face of the brick with a damp sponge to remove any mortar residue. Consistent level checking is paramount to achieving a professional finish.
Maintain consistent spacing between the bricks by using spacers or shims. This ensures that the mortar joints are uniform and aesthetically pleasing. Remove the spacers or shims once the mortar has partially set. The curing time for the mortar will vary depending on the type of mortar used and the environmental conditions. Avoid disturbing the bricks until the mortar has fully cured. Refer to the mortar manufacturer's instructions for specific curing times.
When cutting bricks to fit around corners or other architectural features, use a brick saw or wet saw. Always wear safety glasses and other appropriate safety equipment when operating power tools. Cut the bricks precisely to ensure a tight and professional fit. Mitering the corners can create a more refined and seamless look. Measure twice, cut once to avoid wasting materials and time.
Key Point 3: Finishing and Curing the Brick Surround
Once the bricks have been installed and the mortar has partially set, it is time to tool the mortar joints. Tooling the joints not only improves the appearance of the brick surround but also helps to compact the mortar and create a more watertight seal. Several different tooling styles can be used, such as concave, V-shaped, or flush. Choose a tooling style that complements the overall aesthetic of the fireplace and the surrounding room.
Use a joint tool or a rounded metal object to press and smooth the mortar in the joints. Apply consistent pressure to create a uniform and professional finish. Remove any excess mortar with a brush or sponge. Be careful not to smear mortar onto the face of the bricks. Work in small sections and clean up any excess mortar immediately.
Allow the mortar to cure completely before using the fireplace. The curing time will vary depending on the type of mortar used and the environmental conditions. Protect the brick surround from rain and excessive moisture during the curing process. Covering the newly installed brick with plastic sheeting can help to protect it from the elements.
After the mortar has fully cured, inspect the brick surround for any cracks or imperfections. Repair any cracks or imperfections with fresh mortar. Apply a sealant specifically designed for masonry surfaces to protect the brick surround from moisture and staining. The sealant will also help to prevent efflorescence, which is a white powdery deposit that can form on the surface of the bricks. Follow the sealant manufacturer's instructions for application.
Regularly inspect and maintain the brick surround to ensure its longevity and aesthetic appeal. Clean the brick surround with a mild detergent solution and a soft brush. Avoid using harsh chemicals or abrasive cleaners, as these can damage the brick and mortar. Address any cracks or imperfections promptly to prevent further damage. A well-maintained brick surround will add value and beauty to the home for years to come.
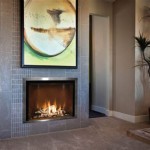
Finally, consider the installation of a fireplace mantel above the brick surround. A mantel can add another layer of visual interest and provide a functional space for displaying decorative items. Ensure that the mantel is installed securely and safely, following all applicable building codes and regulations. A carefully selected and properly installed mantel can complete the fireplace surround and enhance the overall aesthetic of the room.

How To Install A Mantel On Brick Fireplace 1905 Farmhouse

How To Install A Floating Mantle The Easy Way In Just One Afternoon

Easy Fireplace Mantel Diy

How To Install A Floating Mantle The Easy Way In Just One Afternoon

Fireplace Mantel Surround How To Install Brick Veneer Sunnyside Home

Step By Installing A Wood Mantel Over Brick Fireplace

How To Install A Mantel On Brick Fireplace 1905 Farmhouse

How To Install A Fireplace Mantel

How To Install Thin Brick Veneers On Your Fireplace

Here S How Install A New Fireplace Surround And Gas Logs