Heatilator Gas Fireplace Blower Troubleshooting: A Comprehensive Guide
A Heatilator gas fireplace provides warmth and ambiance to a home. A key component in maximizing the fireplace's heating efficiency is the blower, which circulates heated air into the room. When the blower malfunctions, the fireplace's ability to effectively heat a space is significantly diminished. Understanding the potential causes and troubleshooting steps is crucial for restoring optimal performance. This article provides a detailed guide to diagnosing and addressing common issues that prevent a Heatilator gas fireplace blower from functioning correctly.
Power Supply Verification
The first step in diagnosing a non-functional Heatilator blower is to verify the power supply. A lack of power is a common culprit and can stem from several sources. Begin by confirming that the fireplace is properly connected to a functioning electrical outlet. Use a separate device, such as a lamp or phone charger, to test the outlet. If the outlet is not working, check the circuit breaker associated with the fireplace. A tripped breaker will need to be reset. If the breaker trips repeatedly, it indicates a potential electrical overload or short circuit that requires professional evaluation.
In some installations, the fireplace blower is controlled by a wall switch. Ensure the switch is in the "on" position. A faulty switch can also prevent power from reaching the blower. To test the switch, a multimeter can be used to check for continuity when the switch is in the "on" position. If there is no continuity, the switch needs replacement. In other cases, the wiring leading to the fireplace or the blower itself might have become disconnected or damaged. Visually inspect the wiring for any signs of damage, such as frayed wires, loose connections, or burn marks. Disconnected wires should be reconnected securely, and damaged wires should be replaced by a qualified technician.
Some Heatilator gas fireplaces incorporate a power cord with an in-line fuse specifically for the blower. Locate the power cord and inspect the fuse for any signs of damage or breakage. A blown fuse will need to be replaced with a fuse of the same amperage rating. It is important to identify the reason for the blown fuse. Replacing the fuse without addressing the underlying issue may result in the new fuse blowing immediately or shortly after installation, signifying a more fundamental problem within the blower circuit.
Thermostat and Temperature Sensor Issues
Many Heatilator gas fireplaces utilize a thermostat or temperature sensor to automatically activate the blower when the firebox reaches a certain temperature and to deactivate it when the fireplace cools down. A malfunctioning thermostat or sensor can prevent the blower from turning on, even when the fireplace is producing heat. The thermostat could be a simple on/off type, or a more sophisticated variable speed control. Start by checking the thermostat setting. Ensure it is set to a temperature higher than the current firebox temperature. If the thermostat is set too low, the blower will not activate.
A faulty temperature sensor may provide inaccurate readings to the control module, leading to incorrect blower operation. The sensor is typically located near the firebox and is designed to measure the temperature of the air surrounding the fireplace. If the sensor is damaged or disconnected, it will not accurately relay temperature information to the control module. A multimeter can be used to test the resistance of the temperature sensor. Compare the measured resistance value to the manufacturer's specifications. A significant deviation from the specified value indicates a faulty sensor that needs replacement. The location of the sensor and the method of testing its resistance can usually be found in the fireplace's service manual or by contacting the manufacturer.
In some instances, the wiring connecting the thermostat or temperature sensor to the control module can become damaged or disconnected. Visually inspect the wiring for any signs of damage, and ensure that all connections are secure. A loose connection can interrupt the signal between the sensor and the control module, preventing the blower from operating correctly. Carefully re-secure any loose connections. If the wiring is damaged, it will need to be replaced by a qualified technician. The control module itself could also be the source of the problem. Internal components within the module can fail, leading to incorrect operation of the blower. Testing the control module often requires specialized equipment and expertise. Therefore, a professional technician is recommended for diagnosing and repairing control module issues.
Blower Motor Inspection and Maintenance
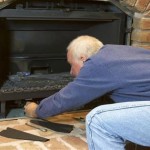
The blower motor itself is the primary component responsible for circulating air, and its condition directly impacts the blower's performance. Over time, blower motors can accumulate dust, debris, and other contaminants, which can cause them to overheat, seize up, or operate inefficiently. Regular cleaning of the blower motor is essential for maintaining optimal performance. Before cleaning, disconnect the fireplace from the power source to prevent electrical shock. Remove the blower assembly from the fireplace according to the manufacturer's instructions. Use a brush or vacuum cleaner to remove dust and debris from the blower motor blades, housing, and surrounding areas. A can of compressed air can be used to dislodge stubborn debris.
Inspect the blower motor for any signs of physical damage, such as cracks, dents, or broken components. If any damage is found, the blower motor may need to be replaced. Listen for any unusual noises coming from the blower motor while it is operating. Grinding, squealing, or rattling noises can indicate worn bearings or other internal problems. Lubricating the blower motor bearings can sometimes resolve noise issues and improve performance. Use a lightweight oil specifically designed for electric motors. Apply a few drops of oil to the bearings, following the manufacturer's instructions. Avoid over-lubricating the bearings, as this can attract more dust and debris.
A seized blower motor will not turn at all. This can be caused by a buildup of debris, worn bearings, or a faulty motor. Attempting to manually rotate the blower motor fan blade can sometimes free a seized motor. If the fan blade is difficult to turn or does not turn at all, the motor is likely seized and needs replacement. Before replacing the blower motor, verify that the motor's windings are intact using a multimeter. Check the resistance between the motor's terminals. An open circuit (infinite resistance) indicates a broken winding, while a short circuit (very low resistance) indicates a shorted winding. In either case, the blower motor needs to be replaced. When replacing the blower motor, ensure that the new motor is compatible with the fireplace model and has the same voltage, amperage, and horsepower ratings as the original motor. Incorrectly sized motors can damage the fireplace or create a safety hazard.
After cleaning or replacing the blower motor, reassemble the blower assembly and reinstall it in the fireplace. Ensure all connections are secure and that the blower is properly positioned. Test the blower to verify that it is operating correctly. If the blower still does not function after these steps, further diagnostic testing may be required.
Wiring and Connections
The electrical wiring and connections within the fireplace are crucial for proper blower operation. Damaged, loose, or corroded wiring can prevent power from reaching the blower motor, resulting in malfunction. A thorough inspection of the wiring and connections is essential during troubleshooting. Begin by visually inspecting all wiring connected to the blower motor, thermostat, temperature sensor, and control module. Look for any signs of damage, such as frayed wires, cracked insulation, or burn marks. Damaged wiring should be replaced by a qualified technician.
Check all electrical connections for looseness or corrosion. Loose connections can cause intermittent blower operation or prevent the blower from turning on at all. Corroded connections can impede the flow of electricity and reduce the blower's performance. Use a wire brush or sandpaper to clean corroded connections. Securely tighten all loose connections. Consider using dielectric grease on the connections to prevent future corrosion. The wiring diagram for the fireplace is a valuable resource for tracing wires and identifying connections. This diagram is typically found in the fireplace's owner's manual or service manual. Following the wiring diagram ensures that all connections are made correctly and that the blower is properly wired.
Use a multimeter to test the continuity of the wiring. Continuity testing verifies that there is a complete electrical path from one point to another. Disconnect the power supply before performing continuity testing. Place one probe of the multimeter on one end of the wire and the other probe on the other end. The multimeter should display a reading close to zero ohms if the wire is intact. An open circuit (infinite resistance) indicates a broken wire that needs replacement. When replacing wiring, use wire of the same gauge (thickness) and type as the original wiring. Using undersized wire can overload the circuit and create a fire hazard. Securely route the wiring away from any hot surfaces or sharp edges to prevent damage. Use wire ties or clamps to keep the wiring organized and prevent it from interfering with other components.
Grounding is also crucial for safety and proper blower operation. Ensure that the blower motor and other electrical components are properly grounded. A faulty ground connection can cause electrical shock hazards and prevent the blower from operating correctly. Check the ground wire for continuity and ensure that it is securely connected to a grounded metal part of the fireplace. If the ground wire is damaged or disconnected, replace it immediately.
Persistent blower problems that are difficult to diagnose and repair should be addressed by a qualified fireplace technician. Attempting repairs without proper knowledge and experience can be dangerous and may further damage the fireplace. A professional technician has the tools, expertise, and training to diagnose and repair complex fireplace issues safely and effectively.

Installing A Fireplace Blower Gfk4 Gfk4a In Heatilator Natural Gas

Gfk 210 Blower System Heatilator Fireplaces

Gfk4 Gfk4a Fireplace Blower Fan Kit For Heatilator Fireplaces

Update Your Heatilator Mark 123 Fireplace In No Time

Blower Kit For Heatilator Fireplaces Gfk4

Heatilator Fireplace Blower Fan Kit Gfk4b Hearth Trends

Heatilator Novus Nxt 33 Traditional Top Rear Direct Vent Natural Gas Us Fireplace

Blower For Heatilator Gas Fireplaces Gfk 4 Only

Fireplace Blower Fan Replacement Kit For Heatilator Majestic Temco Lennox Rotom

Heatilator Rave 32 Linear Contemporary Direct Vent Natural Gas Firepl Us Fireplace
Related Posts