```html
Heatilator Fireplace Insert Repair: A Comprehensive Guide
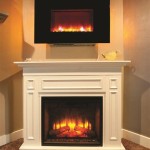
Heatilator fireplace inserts are a popular choice for homeowners seeking to upgrade their existing fireplaces with improved efficiency and modern aesthetics. However, like any appliance subjected to regular use and high temperatures, these inserts can experience wear and tear, necessitating repair. Understanding common issues, troubleshooting techniques, and repair procedures is crucial for maintaining the performance and safety of a Heatilator fireplace insert.
This article provides a comprehensive guide to Heatilator fireplace insert repair, covering prevalent problems, diagnostic approaches, and potential solutions. It emphasizes general repair principles applicable across various Heatilator models while acknowledging the importance of consulting specific model documentation for detailed instructions and safety precautions.
Common Problems with Heatilator Fireplace Inserts
Several issues can arise with Heatilator fireplace inserts, affecting their functionality and efficiency. Identifying these problems early can prevent further damage and ensure timely repairs.
Inefficient Heating: One of the most common complaints is that the insert isn't heating the room as effectively as it should. This could stem from several factors, including a dirty firebox, a malfunctioning blower, or issues with the damper system.
Smoke Entering the Room: Smoke escaping into the room during operation is a serious safety concern. This can be caused by an obstructed chimney, insufficient draft, or a faulty door seal.
Blower Malfunction: The blower is responsible for circulating warm air into the room. If the blower isn't working, the insert's heating efficiency will be significantly reduced. Common blower problems include motor failure, clogged fan blades, or wiring issues.
Damper Issues: The damper controls the airflow within the fireplace and chimney. A malfunctioning damper can lead to inefficient burning, smoke leakage, or excessive heat loss when the fireplace is not in use.
Glass Door Problems: Cracks, leaks, or difficulties in opening and closing the glass door can compromise the insert's performance and safety. Damaged seals, broken hinges, or warped glass are common issues.
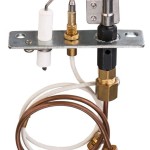
Pilot Light Problems (Gas Inserts): For gas inserts, a pilot light that frequently goes out or refuses to light indicates a problem with the gas supply, the thermocouple, or the pilot assembly itself.
Electronic Ignition Problems (Gas Inserts): In gas inserts with electronic ignition, failure to ignite or intermittent ignition issues point to a malfunctioning igniter, a faulty control module, or wiring problems.
Troubleshooting and Diagnosis
Before attempting any repairs, it's essential to accurately diagnose the problem. A systematic approach to troubleshooting can save time and prevent unnecessary part replacements.
Visual Inspection: Begin with a thorough visual inspection of the insert, including the firebox, blower compartment, damper mechanism, glass door, and venting system. Look for signs of damage, wear and tear, obstructions, or loose connections.
Chimney Inspection: A blocked or damaged chimney is a frequent cause of smoke problems. Inspect the chimney for obstructions such as bird nests, creosote buildup, or collapsed liners. A professional chimney sweep can perform a more detailed inspection and cleaning.
Blower Testing: Test the blower by turning it on and listening for unusual noises or vibrations. Use a multimeter to check the voltage at the blower motor terminals. If the voltage is correct but the blower isn't working, the motor may be faulty.
Damper Operation: Manually operate the damper to ensure it opens and closes smoothly. Check for any obstructions or damaged components that may be hindering its movement.
Door Seal Inspection: Examine the door seal for cracks, gaps, or signs of deterioration. A damaged seal can allow smoke to escape into the room. A simple test is to close the door on a dollar bill. If the bill slides out easily, the seal is likely compromised.
Pilot Light/Ignition System Diagnosis (Gas Inserts): For gas inserts, check the gas supply valve to ensure it is open. Inspect the pilot light assembly for debris or damage. Use a multimeter to test the thermocouple or igniter for continuity. Consult the manufacturer's instructions for specific diagnostic procedures.
Safety Precautions: Always disconnect the power supply to the insert before performing any troubleshooting or repairs. Allow the insert to cool completely before handling any components. Wear appropriate safety gear, such as gloves and eye protection.
Repair Procedures
Once the problem has been diagnosed, the appropriate repair procedure can be implemented. The following sections outline common repair procedures for Heatilator fireplace inserts.
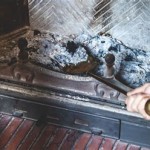
Cleaning the Firebox: Regular cleaning of the firebox is essential for maintaining efficient heating. Remove ash and debris using a vacuum cleaner or a specialized ash shovel. For stubborn creosote buildup, use a chimney sweep's brush and a creosote remover.
Replacing the Blower: If the blower motor is faulty, it will need to be replaced. Disconnect the power supply and remove the blower assembly from the insert. Disconnect the wiring from the old motor and connect it to the new motor, ensuring correct polarity. Reinstall the blower assembly into the insert.
Repairing or Replacing the Damper: Depending on the nature of the problem, the damper may need to be repaired or replaced. Clean the damper mechanism of any obstructions. If the damper is damaged beyond repair, it will need to be replaced with a new one of the same type and size.
Replacing the Door Seal: A damaged door seal can be replaced with a new one. Remove the old seal and clean the door frame. Apply a bead of high-temperature silicone sealant to the door frame and install the new seal. Allow the sealant to cure completely before using the insert.
Pilot Light/Thermocouple Replacement (Gas Inserts): If the pilot light frequently goes out, the thermocouple may need to be replaced. Turn off the gas supply and disconnect the gas line from the pilot assembly. Remove the old thermocouple and install the new one, ensuring it is properly positioned in the pilot flame. Reconnect the gas line and turn on the gas supply. Test the pilot light to ensure it stays lit.
Igniter Replacement (Gas Inserts): For electronic ignition problems, the igniter may need to be replaced. Turn off the gas supply and disconnect the power supply to the insert. Remove the old igniter and install the new one, ensuring it is properly positioned near the burner. Reconnect the power supply and turn on the gas supply. Test the ignition system to ensure it is working properly.
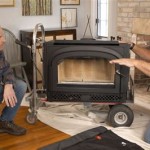
Glass Door Replacement: If the glass door is cracked or broken, it will need to be replaced. Order a replacement glass door that is specifically designed for the Heatilator insert model. Remove the old door and install the new one, ensuring it is properly aligned and sealed.
Venting System Inspection and Repair: The venting system is critical for safe and efficient operation. Inspect the venting pipes for leaks, corrosion, or damage. Repair any leaks with high-temperature sealant or replace damaged sections of pipe. Ensure that the venting system is properly connected and supported.
Preventive Maintenance: Regular maintenance can help prevent many of the problems discussed above. Schedule annual chimney inspections and cleanings. Clean the firebox regularly. Inspect the blower and damper mechanism for proper operation. Check the door seal for signs of wear and tear. By performing routine maintenance, homeowners can extend the life of their Heatilator fireplace insert and ensure its safe and efficient operation.
Professional Assistance: Some repairs, particularly those involving gas systems or complex electrical components, are best left to qualified technicians. If you are not comfortable performing a repair yourself, or if you encounter a problem that you cannot diagnose or resolve, contact a qualified HVAC technician or fireplace service professional.
```
Update Your Heatilator Mark 123 Fireplace In No Time

Update Your Heatilator Mark 123 Fireplace In No Time

Heatilator Firebox Remove And Replace

Any Reason To Rip Out Old Heatilator Hearth Com Forums Home

Ndi35 C 35 Dv Gas Fireplace Insert Heatilatorparts Com

Want To Renovate And Remodel Fireplace Hometalk

Titan 50 Dv Gas Fireplace Heatilatorparts Com

Crave4836 C 36 Dv Gas Fireplace Heatilatorparts Com

Heatilator Fireplace Repair Service And Cleaning

Pier Three Sided Gas Fireplace Heatilator